Friday 29 December 2017

Imagine the world full of magic

Hello my dear crafty friends!
Irit is here and I welcome you to read my new December post.
I made a new card not for any Holiday, but just as my artistic tribute to things that we usually forget about during our busy daily life. One of this things is imagination. We just don't have time  or energy to imagine things that are out of our regular range.
And this is a time to craft something magical and to imagine that it might be real. 
  
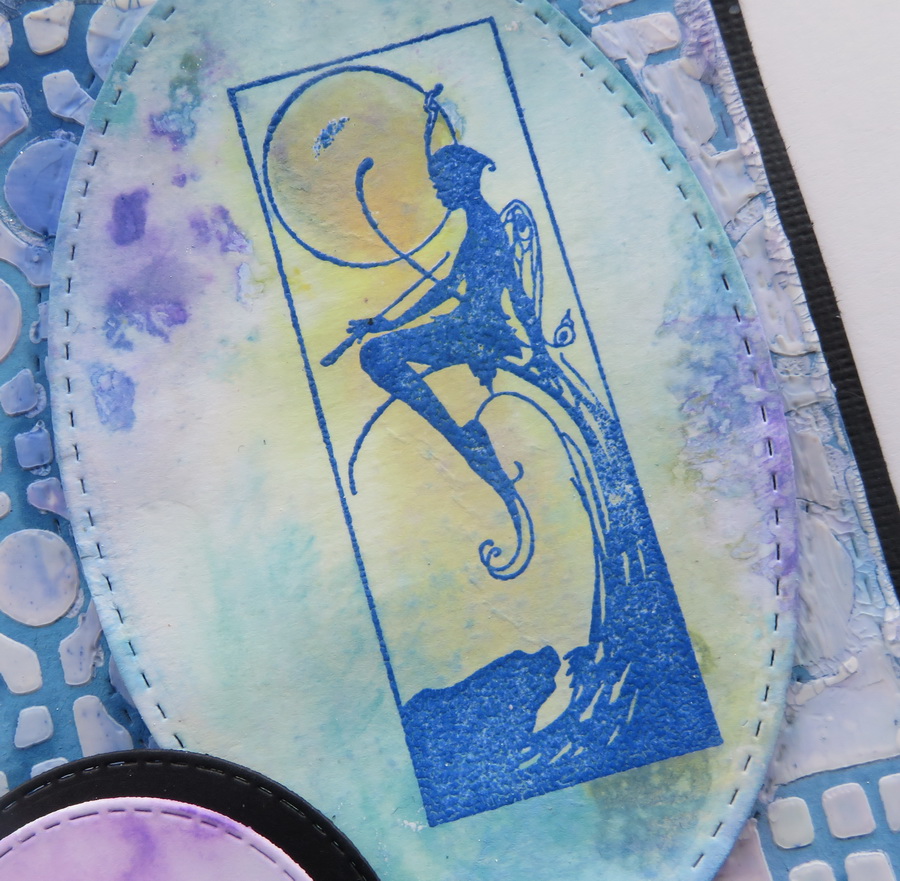
So as you can see I made this Mixed Media card with the most adorable Magenta  Fairy Tale Silhouette stamp and the background was made with one of the newest Magenta stencils.


My background was made with texture paste over the stencil and I also added a thin layer of Crackle Glaze over the edges.Then when it was dry I added Distress Oxide inks over the whole background and die cut the oval.
Then the fairy image was stamped with blue pigmented ink and heat embossed with clear embossing powder over another, just the same, die cut oval.


This stamped oval was glued into the die cut negative space that was made in the background.


The word Imagine was stamped, die cut and colored in the same way and glued over the card.


*****

Produits Magenta utilisés:
Magenta products used:


17.017.I


07.901


TM231


Thanks for being with me today and hope I inspired you a bit with my Mixed Media card.


Irit Shalom - DT Magenta


Art altered notebook cover with Topflight Stamps


Hello my dear crafty friends and welcome to my last for 2017 Topflight Stamps post.
This time I just used one single Rubber Dance stamps to make the altered cover of the small, card sized, notebook.


This notebook was " striped" from the inside pages that were then added after to cover was altered.
I used fabric for the cover and made it in this messy Mixed Media style using a lot of painted chipboards, texture paste and stencils on the back and a mix of paints and mists to get these grungy colors


The main image was stamped over the thick white cardstock using black pigmented ink and then heat embossed with clear embossing powder.
The colors were added with distress inks and some water over it.


This is the single Rubber Dance stamp I used to make this project:
Rubber Dance - Mona Lisa Stamp

I hope that you liked my altered project  and love Rubber Dance stamps as much as I do.
You can  buy this set and much more in the Topflight Stamps shop.
And if you wish to see more of my work you are kindly invited to my own blog.

Friday 22 December 2017

Plant Dreams with Topflight stamps

Hello my dear crafty friends and welcome to my new Topflight Stamps post.
This time I made a card using one large IndigoBlu stamp and the sentiment that was added using another company stamp from Topflight Stamps shop. (For the Love of  Stamps one).


The 4 layered background was made with 3 matching  card size dies in three different colors and the main image was stamped and water colored with Zig brush markers.
I actually used just a part of the colored image as it is a large image and I still wanted to show the die cut background.


The sentiment was stamped and then die cut to make this circled sentiment spot on the corner.


 Here are the stamps I used to make this project:
IndigoBlu - Cling Mounted Stamp - Country House


For the Love of Stamps - Barrow of Blooms - Clear Stamp Set

I hope that you liked my card today.

Monday 18 December 2017

Change art page with Magenta


Hello my dear crafty friends!
Irit is here today and I am going to share my new art page made with quite a few Magenta stamps and stencils.


This is an A4 size cardstock page that was covered with gesso first and then 2 parts of  Magenta stencils were used to make the main girly image and then to make the separate background.
The main image was made with thick acrylic shimmery paint and then stamped over with flowers  stamp using permanent black ink. 


Two kinds of butterflies were added over this page:  some were made with texture paste and stencil and some were stamped directly over the page.


The sentiment was stamped in the same way over the page and the rest of the background was made with more texture paste over stencil and with more stamped flowers/ leaves around.

*****

Produits Magenta utilisés:
Magenta products used:


TM160 large


TM28


14.530.J

14.663.G


44.124.Q


07.579.G


Thanks for being here  with me today and I really hope that you like my art page shown here.

Irit Shalom- DT Magenta

My new stamping Design  team
  

Friday 15 December 2017

Dreaming of white Christmas with CAS-ual Fridays


This tag was made for CAS-ual Fridays Dreaming of white Christmas challenge.


Soar door hanger with Topflight Stamps

Hello my dear crafty friends!
Welcome to my new Topflight Stamps post and this time I made a Mixed Media altered wooden door hanger using a couple of delicious Rubber Dance stamps.


The wooden base was  first covered with white gesso and then stencilled texture image were added with a stencil and heat embossed with a mix of embossing powders. Some of the powders were with a bit of glitter.
 The whole piece was then misted with a mix of mists.
Then The Studio Light background was stamped over the textured base to add some interest.
The die cut and the chipboard wing were arranged with a few flowers as the main image base.

The main image was stamped with black pigmented ink and heat embossed with clear embossing powder and then colored with Distress Oxide inks and glued on the top.


The Rubber Dance sentiment was stamped as one single stamp and then hand cut to strips and glued in a kind of art journal over the finished piece.

And here is another view of the project from the side:


Here are the stamps from Topflight Stamps shop used to make this project:


Rubber Dance - Large Postoid Stamp

Rubber Dance - Hummingbird Stamp

Studio Light background- out of stock 

Thanks for being here with me today and see  you next week!


Tuesday 12 December 2017

Card made with a lot of love

Hello my dear crafty friends!
Irit is here today and also everything around is about Christmas and Holidays, I decided to make something just for love.
So this card is all about  my love for flowers, my love for water colours and my love for great Magenta stamps and stencils.


This light Mixed Media card was made with one single Magenta stamp as my focal point.
The stamp was stamped with black pigmented ink and heat embossed with clear embossing powder.
Then it was coloured with Zig watercolour brushes inside the stamped image.
The outside colour was added using Distress oxide inks and water spray.
As it was still pretty mush bare outside of the image I added circles using Magenta ....... stencil with clear Gel Medium. The circles are almost non seen, but you can feel them and see them a bit on the close- up photo here:


And here is this card from the side:

I added a few black mist splashes around and the die cut sentiment.
The black background, black splashes and black sentiment added more interest to this cool colours card.
*****

Produits Magenta utilisés:
Magenta products used:


44.024 Q


TM179- DUO


Thanks for being here with me today and I hope that you like my pastel card made with our gorgeous Magenta products.

Irit Shalom- DT Magenta


Friday 8 December 2017

Fun ATC set with Topflight Stamps

Hello my dear crafty friends!Welcome to my new Topflight Stamps shop blog post.
We invite you to our daily sales that we have in Topflight Stamps shop for 12 days before Christmas.
Watch the shop for today's sale!
Irit is here today and I am going to share a set of 4 Mixed Media ATC cards made with the most gorgeous PaperArtsy stamp set- Eclectica Sara Naumann 21 set.
 I know that we are close to all winter Holidays , but as I live in a very hot country and we still wear our short sleeves here I decided to make this bright and bold ATC set . I did it mostly because of the stamps I have for this week, not because of my Spring mood.

 First each ATC card was stamped with one of 4 stamps from the set using permanent black ink.
Then I made the background using some stencils (one is a honeycomb as we have a bee as one of 4 stamps here). Stencils were used with texture paste and when dry I painted all over with acrylic paints from Prima.
Then each image was stamped again over black cardstock using clear embossing ink and then heat embossed with white embossing powder.
Then each stamped image was hand cut partially and glued over the original background stamped image.
The words on the stamps made this " Explore Beauty" saying as it should be for any ATC set.
Here are the single ATC cards for you to see with more details.
As you can see the embossing powder was not the fine kind, but pretty much grainy, but as we are talking Mixed Media art pieces it looks just fine.


 And this is the stamp set I used to make this project:


I hope that you liked my ATC set and love PaperArtsy stamps as much as I do.
You can  buy this set and much more in the Topflight Stamps shop.
And if you wish to see more of my work you are kindly invited to my own blog.

Tuesday 5 December 2017

Holidays gift card envelope


Hello my dear crafty friends and welcome to my new post .
This project was in print in a new issue of Just Christmas cards and decorations! magazine 2017 issue.


This is an easy to make gift card envelope made from a real Kraft envelope, some dies, some mists and the most lovely sentiments both together on one die cut circle.


Step by step: 1. Glue the cream envelope (Canvas Corp) and then cut the top of it to make
 the opening. Cover it with patterned paper (7 Gypsies).2. Die cut the scene with Sizzix die from black and white cardstock and arrange the double die cut over patterned paper (7 Gypsies). 3. Stamp the double sentiment (Two Paper Divas stamps) over white cardstock. Die cut it with a circled die (Die Versions). Add black circled die cut from the same set under the sentiment.4. Mist the sentiment circle with Tattered Angels golden mist and glue over the middle of the envelope. 5. Mist the die cut scene with the same mist. 6. Paint the trees over die cut with Tattered Angels paint.


See you next week with more Holidays inspiration!

Popular Posts