Showing posts with label glitter paste. Show all posts

Sunday, 28 October 2018

CAS- ual Fridays November release-Big Hope Fri-Die


 Hello my dear crafty friends!
Welcome to Day 1 of our new CAS- ual Fridays Holiday release.
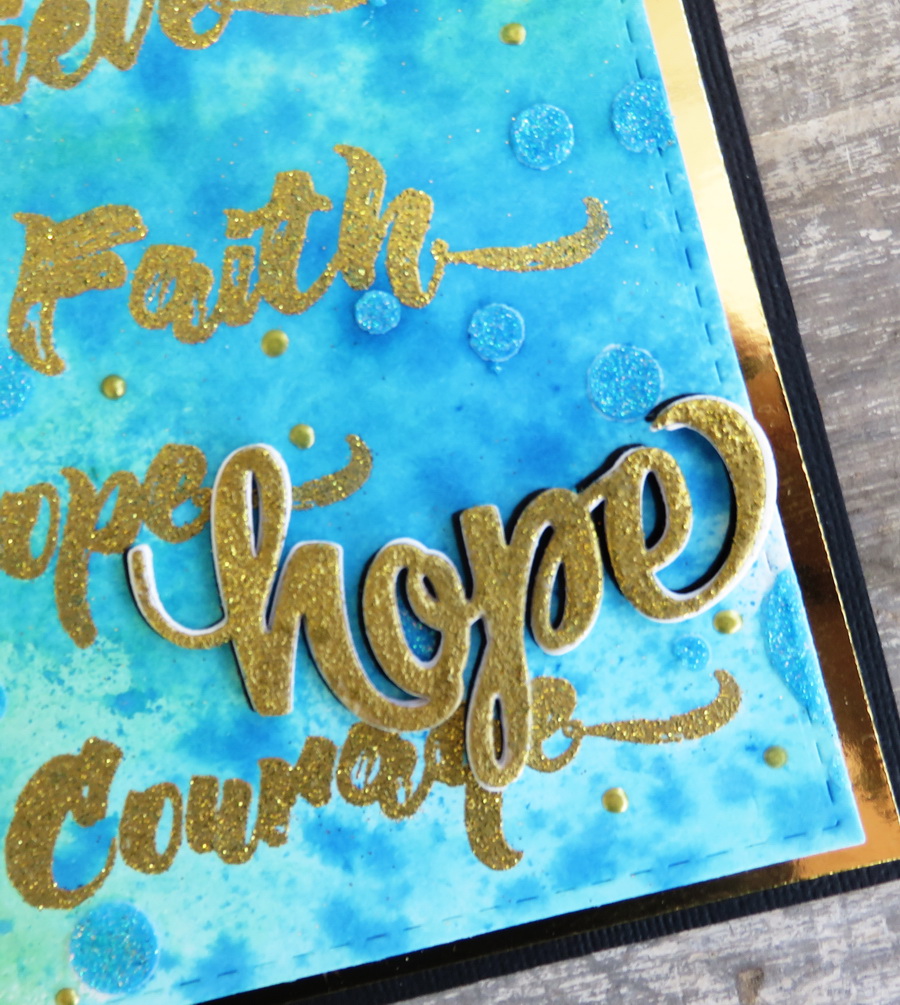
Today I am going to share a card made with one new single word die, but the word I used is maybe the most powerful one. Hope. This is the thing we all need and cherish and if  there is a hope around things are going better.
 So Hope for the best and use this gorgeous new CAS- ual Fridays die!


The background of this card was made with emboss- resist technique.
First the four words from Powerful Words  stamp set were stamped with VersaMark ink and heat embossed with glitter gold embossing powder.
Then some dots were added with blue glitter paste over a stencil.
The dry surface was misted  with a mix of blue mists.


 The word Hope was die cut 6 times. The bottom layer is white for the contrast and then all layers were glued one over another. The upper layer was heat embossed with the same embossing powder.


This is the new die released today!


 Big Hope Fri- die

 And this is the older stamp set used for the background:


So come back during the next 5 days and if you want to buy some of our new goodies, here is the discount code for you to use:
See you tomorrow with more CAS- ual Fridays inspiration from the new release!

Thursday, 6 September 2018

All about ATC -and it's not just Artistic Trading cards - with BoBunny

Hello my dear crafty friends!
Irit from Irit Shalom's Designs is here today and I am going to share with you all about ATC.
As you all most probably know ATC was first  Artistic Trading cards item-baseball card size small artistic project that was traded and kept in the baseball cards plastic pocket. And this was sore for two decades.
Then the crafters around the world felt bored and decided that C can be changed to ... cube.
So Artistic Trading Cubes were born: small 3'' squared cube made  from one single cardstock piece and embellished on 5 sides. It also can be folded and mailed for swapping.
Then about 6 months ago the brain stormed artists decided that C can be also for Coins. And so Artistic Trading Coins were born: 2.5'' circled art pieces that are embellished, stamps, misted, painted and whatever and can be mailed and traded.
So today I am going to share all three ATC kinds that were made with one single BoBunny collection named Sunshine Bliss and all of them are  in this correct ATCs size and ready for swap.


 This is my collection of two coins, two cards and one cube.
Also I used stencils, glitter paste and stamps these are not really Mixed Media art pieces, but more scrapbooking style collaged ones.
And this is the glory of BoBunny products: you can make classic projects with them or to move to Mixed Media art. It just depends on your style and your own skills.
So here are the first " born" of ATC- Trading cards.


Both cards are made in the same way: American Crafts black cardstock base. Then Sunshine Bliss die cut rectangle. Over the rectangle BoBunny stencil with Black glitter paste was used and then Noteworthy die cut pieces and Combo stickers were added to finish the card.
ATC must be pretty flat art piece as you are going to mail it in the flat envelope, so I stopped on this level of layers. Some background stamps were used around the upper layers to add more artistic interest to the card.

The next are Coins: same way of crafting and pretty much same style and look.


 And here are the flat pieces all together:


 And now the last C for the Cube.


The cube should not be glued so you can fold it and to ship it. I glued it as I wanted better photos from a few sides.

So here are some close- ups to some sides and to the embellished top:


 So I hope that you understood all kinds of ATC projects and maybe would try to make some of your own with BoBunny delicious paper collections!

Product list
BoBunny 
Sunshine Bliss collection: Peace, Charm, Felicity, Sunshine Bliss, Serene 12*12'' cardstock
Sunshine Bliss Combo Stickers
Sunshine Bliss Noteworthy
Sunshine Bliss Layered chipboards
Mandala Garden stencils
Rough it up stamp
Trellis Square die
Licorice Glitter paste
Clover Pansy flowers
Buttercup Dahlia flowers
American Crafts:
Textured solid cardstock Black
Sticky Thumb glue runner
Sticky Thumb Adhesive foam dots
 AC Black ink

Thanks for being here with me today and see you soon again with a totally different inspiration!

Wednesday, 8 August 2018

So grateful card with SNS


 Hello my dear crafty friends!
Irit is here today and I am going to share a very simple, but yet impressive card that I made with the new Sparkle N' Sprinkle Feathered Friends stamp set.
I am not a vivid colorist, so when I see a stamp that can be just colored a bit or even left as is I am happy and try to show you the way to make a fancy and lovely card without any coloring at all.


As you can see this card was made with just white and Kraft cardstock. The upper image was stamped over the Kraft die cut part with VersaMark and heat embossing. The lower part was stamped in the same way and then I glued both parts.
The white color was added with white pen only. The wood grain was added over the card with Tonic Glimmer paste over stencil. Then some pale pink was added both with Crystal drops and Mica Mist.

Product list:
Feathered Friends set #909P5
1/2'' Tear- ific tape
Stencil- craft shop
Dies
Uniball white pen

 As always a full step by step tutorial is HERE in my own blog and your all are kindly invited to visit it.
You are also invited to visit our SNS shop for the products used to make this card and much more!


Step by step tutorial:
1.Stamp the sentiment and the wrap image over white cardstock card using VersaMark and heat emboss with Black Detail EP.


2. Die cut Kraft cardstock topper and stamp the birdies in the same way.


3. Glue the Kraft part over the white card front and add clear Glimmer paste over it as shown using stencil.


4. Color the birds with white pen.


 5. Splash a few random Turkish Rose Mica mist drops over the card.


 6. Add a few pink Crystal Nuvo drops as shown.


Thursday, 26 July 2018

Magenta ATC trio with more than dozen products


 Hello my dear crafty friends! Welcome to my very last post as Magenta DT member.
It was a lovely year long trip with this company and it's over now.
So as my last tribute to this design team I made an ATC trio using not less then 5 Magenta stencils and 8 Magenta stamps just to make those small and adorable art pieces.
I made the backgrounds with white texture paste and 3 different stencils.
Then I added black glitter over two more Magenta stencils.
When it was dry it was Painted with Prima paints.
Stamped imaged were made over white tissue paper with permanent ink and glued with Gel medium over the textured pieces.
As the last, but no least, part of the design butterflies and bees were stamped over white cardstock, painted, glittered and hand cut.
Here are some larger photos of my ATC:


Wednesday, 11 July 2018

Bravo eclipse card tutorial with CAS-ual Fridyas


Hello my dear crafty friends!
Irit from Irit Shalom Designs is here today with my very first post made for CAS- ual Fridays main company team.
About  a year and a half ago I was asked by CAS- ual Fridays owner Michele to make some guest design for the company release.
From there I became a member of their challenge blog design team for a year and now lucky me moved to the main inspiration  blog.
So from here on you will see my CAS- ual Fridays projects made with new releases and oldies all together and some will have a full step by step tutorial.
So today I made a full tutorial for a kind of eclipse card.
Usually we need a larger alphabet single letters dies  to make a proper eclipse card,but as you can see CAS-ual Fri- dies words can make the job too.
So here is my eclipse card and yes, let's say Bravo to all of us who survive the Summer vacation... 
I know that with four small grand kids it makes my Summer a full time job of babysitting, but I still can craft in between.


So in general this card was made with several techniques  (see them all on the following step by step tutorial):
Stamping with VersaMark and heat embossing; masking with die cuts;coloring with water color markers;making faux chipboard with layered die cuts; adding texture with texture paste and stencil; misting around.
 And with all these techniques this card still looks pretty much clean and simple; exactly the way I wanted it to look.


 These are CAS- ual Friday products I used to make this card:

Pretty Posies 

Posies Fri Dies

 And now here is my step by step tutorial:

 1. Die cut or hand cut  your card front from a thick white cardstock. Stamp the largest flower with Memento Luxe black pigmented ink or us VersaMark (whatever works best for you). Heat emboss with clear embossing powder (if you used VersaMark  heat emboss with black embossing powder).


2. Stamp all flowers and leaves from Pretty Posies stamp set and die cut them all with Posies Fri- dies.
I made all masks in advance, also I didn't use them all at the end.


3. Use your die cuts as masks and stamp the flowers cluster on one corner. Then move to the other corner and make another flower cluster.


 This is how it looks after this serial masking, stamping and heat embossing.


4.Water color the stamped images with you favorite water color tools. Mine are Zig Real Brush.


5.  Arrange Bravo cutting die over the colored card front and die cut it.


Die cut the same word 2-3 times from black cardstock to make this your inner layers.
Glue the top die cut layer over the inner ones and make 3d " chipboard like" word.


6. Die cut deep purple background rectangle in the same size as your card front.
Glue the die cut card front over the background dark layer.
Glue the sentiment into the die cut negative part with 3d foam glue.


7. Use stencil and glitter paste over the " white spaces" to add some interest to the card.
 Let it dry.


8. Add few color splashes over the dry glitter paste.
You card is done! Enjoy!


Hope you liked my small tutorial and see in in a couple of weeks with more CAS- ual Fridays inspiration!
You can also get yourself great discount using my own special discount code.


Irit


Monday, 9 July 2018

Halloween book of black cats tutorial with SNS


Hello my dear crafty friends!
Irit from Irit Shalom Designs is here today  with my first July  Sparkle N' Sprinkle release project.


This Halloween card was made with the new and just released stamp set called When the black cats prowl
and it's incredible Halloween stamp set!
I made this card with Tattered Lace book shaped die as a Halloween book using Tonic Studios Mirror black and gold cardstock as my book layers.
The stamping was done with black pigmented ink and heat embossed with Black detail SNS embossing powder.
The coloring was made with Tonic Studios inks that are listed below.
More texture around the pages was added with Tonic Glimmer paste, Tonic Mica Mist and Tonic Nuvo drops.


Product list:


And now here is my step by step tutorial for you :
1.Die cut the book page layers from Mirror cardstock and die cut one upper layer from white cardstock.


2.Stamp the sentiment on the right side of the upper book page using Memento Luxe Black ink and heat emboss with black detail SNS embossing powder.


3.Stamp the pumpkin image on the left side in the same way.


 4. Cover the stamped images with Tonic Maskinh fluid and let them dry.


5. Cut the background white card and ink the edges with Tonic Carrot stick ink as shown.


6. Glue all layers with 1/2'' Tea- riffic SNS double sided tape.

7. Add texture with Tonic Glimmer black paste using Tando Creative mini stencil.
When dry peel off the masking fluid from the images.


 8. Stamp the pumpkin second time. Color with water color markers and Tonic inks and hand cut the colored image.Use Tonic water brush with inks for coloring.


9. Add gold  splashes over the stencil area with Tonic Midas Touch brush.


10. Add a few random gold crystal drops to finish the card.


 Thanks for being here today and see you in a couple of days with more SNS new release inspiration!

Popular Posts