Showing posts with label Mixed Media. Show all posts

Tuesday, 28 May 2019

CAS- ual Fridays May post

Hello my dear crafty friends! Irit is here today and after a month in hiatus I want to  welcome to my new May post made for CAS- ual Fridays blog with their most delicious products.
I am going to share a Mixed Media card made in clean and simple style.
Can you believe that Mixed Media can be done in CAS style? Yes, it can.You use s lot of different mediums, but then the general car layout is still clean and simple, as you can see on this card.


I used one single CAS- ual Fridays stencil with crackle paste and two Fri- dies with the add- ons of a few mists and some enamel drops.
I also made a small and short tutorial for you to follow and to try this maybe odd card style of mine.
Here are the CAS- ual Fridays products used to make this card:


 And now let me show you some steps of doing this card:
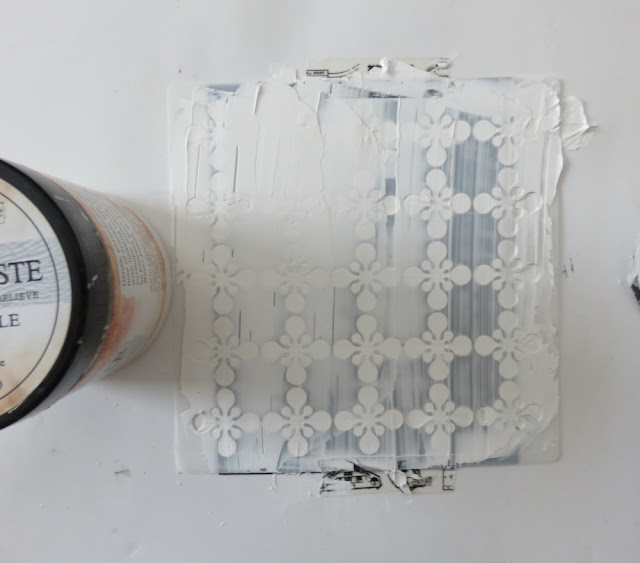
1. Cover the black card front with Bold Trellis stencil and use Crackle paste over it.


2. This is how it looks without the stencil, but yet without any cracks.


3. Add three mist over the dry card front and let they dry.


4. Make the central matting part (I used a die to make the shape, but it can be just a rectangle). Mist the matting part with two of the mists and let it dry. Die cut the CAS- ual Fridays title from white cardstock.


5. Mist the die cut title with the light blue mist and let it dry.Die cut another title from light green cardstock.
Die cut one Noteworthy strip from the same light green cardstock.

6. Arrange the title as shown: one word with blue over green as the shadow and the second word green over blue as  the shadow.
Add the die cut strip under the matting piece.
Add a few blue enamel drops over the card.


Here is a close- up to the central part of my card:


I hope that you like my new Mixed Media card and would try something similar with our gorgeous CAS- ual Fridays products.
You can also use my own discount and to get this 15% discount with my own code.

See you next time with more CAS- ual Fridays inspiration!

Thursday, 29 November 2018

Best Day Ever card

Hello my dear crafty friends! Irit is here today and after a long few weeks without web connection I am finally back with my new fancy and warm card made with gorgeous CAS- ual Fridays stamp and Fri- die set.

After a few post with Christmas and Hanukkah projects I decided to make something general and not green or blue.
So this card is in all warm colors and made as a grid card.
I punched a lot of rectangles and squares in different sizes first. Then I colored then with warm inks and glued over a piece of sticker paper. The gaps were filled with light pink glitter and my background was done.
It takes some time to punch, color and arrange the pieces over the sticker paper. But then it was almost finished as this kind of a card doesn't need much more, but the fancy sentiment.

 The sentiment was done with CAS- ual Fridays stamp and Fri- die set Best Day Ever.
First I stamped the sentiment and then die cut it and glued over another die cut layer.


The only embellishments added were square rhinestones to keep it in this " angled" arrangement.
The layered die cut was covered with clear 3d glue that is not much seen on the photo.

This are CAS- ual Fridays products used here:


I really hope that you like my card and please visit our CAS- ual Fridays shop as we have a lot of great deals in the shop!

Sunday, 28 October 2018

CAS- ual Fridays November release-Big Hope Fri-Die


 Hello my dear crafty friends!
Welcome to Day 1 of our new CAS- ual Fridays Holiday release.
Today I am going to share a card made with one new single word die, but the word I used is maybe the most powerful one. Hope. This is the thing we all need and cherish and if  there is a hope around things are going better.
 So Hope for the best and use this gorgeous new CAS- ual Fridays die!


The background of this card was made with emboss- resist technique.
First the four words from Powerful Words  stamp set were stamped with VersaMark ink and heat embossed with glitter gold embossing powder.
Then some dots were added with blue glitter paste over a stencil.
The dry surface was misted  with a mix of blue mists.


 The word Hope was die cut 6 times. The bottom layer is white for the contrast and then all layers were glued one over another. The upper layer was heat embossed with the same embossing powder.


This is the new die released today!


 Big Hope Fri- die

 And this is the older stamp set used for the background:


So come back during the next 5 days and if you want to buy some of our new goodies, here is the discount code for you to use:
See you tomorrow with more CAS- ual Fridays inspiration from the new release!

Tuesday, 21 August 2018

Green CCB challenge tutorial


Canvas Corp August challenge is ALL ABOUT GREEN!
And this time it's just tag or card, so anyone can enter and win!
Here is my project for the challenge and you can see the full step by step tutorial in the company blog HERE!


 Here is the moodboard for you to use:

 And another view of my tag:


Thursday, 16 August 2018

Spread your wings folder card with CCB


Folder card made with Canvas Corp products.
Full tutorial is here in the company blog.
Enjoy!


Tuesday, 3 July 2018

CCB and Magenta altered canvas tutorial

Hello my dear friends!
This Mixed Media journal page was made for Canvas Corp Brands Playing with friends post and I used one of my other DT products on it. It was a year full of fun on Magenta blog and it's almost over, so let me show you this page and then you have a link to a full step by step tutorial in CCB blog HERE!


 I hope that you like this colorful summer page!

Tuesday, 29 May 2018

One stamp- three projects with SNS

Hello my dear crafty friends and welcome to my new Sparkle N' Sprinkle blog post.
Today I am going to share " same stamp- three project" crafty post.
I used same large single SNS stamp called Danielle and made three totally different projects with this beauty.
The first is this Mixed Media card and I made a full tutorial for you to follow in my own blog.


Product list:

Happy Birthday metal stencil Stampendous
Stencil Rebecca Baer
Water colors


 The card was made with artistic stencil, Nuvo glitter paste and then misted with Nuvo Mica mist for the background.
The lady's image was stamped over cardstock, heat embossed with black embossing powder and then covered with Masking fluid. When fluid was dry the more stamped image were added around using Pretty Blooms stamp set. 
Then the main image was colored, misted and added to the card.
The sentiment was done with the same Glimmer paste over stencil.
And as I said- here is the full tutorial for you to follow. And now a few close-m ups to this card:


And now for my second card today:


 Product list:

Stencil - Rebecca Baer
Alcohol inks- Ranger

The second Mixed Media card was made with the same stamp, but as it was stamped over the transparency I flipped it to another side. The image was then colored on the back with alcohol inks. The background was made with sticker paper, stencil and two SNS gorgeous glitters. First add the dark glitter over the stencil and then peel the stencil off and add  white color over the sticker bare spaces.
The sentiment was die cut several times and heat embossed with black embossing powder.
 And a couple close- ups to this card:


 The last project is a stamped Steampunk tag that was made with the same image stamped over transparency. But this time I made the " just add ink" coloring on the back as this is a totally free project and Steampunk is not intended for pretty coloring.
The chipboard pieces were all heat embossed with four different embossing powders in metallic colors.


Product list:
Embossing powder Timber SNS
Embossing powder Copper SNS
Embossing powder Gold Detail SNS
Embossing powder Black Detail SNS
Embossdable acetate
Alcohol inks- Ranger
Chipboards- Dusty Attic
Cardstock- BoBunny
Titles- Tim Holtz
And a few close- ups to this tag:


 And now for the full tutorial for the first card.
 1. Stamp and heat emboss the image with Timber SNS EP.


2. Cover the stamped image with Tonic Masking fluid and let it totally dry.


 3. In the meantime add Tonic glitter paste over the metal stencil to make the sentiment.


4. Stamp the flowers around the woman's image while covered with dry masking fluid.


 5. Peel off the dry fluid and cut as shown around the images.


6. Color the images with water color markers.


 7. Mist the colored images over with Tonic Mica mist.


8. Make the glitter paste background with Tonic glitter paste and then mist with Tonic Mica mist.


9. Arrange the stamped image over the card as shown and add the black background cardstock.Hand cut and color the sentiment and glue it over the card.


Thanks for being here with me today and I hope that you like my " same, but different" projects.

Popular Posts