Showing posts with label sticker paper. Show all posts

Wednesday, 11 July 2018

Lovely thoughts of you card tutorial with SNS

Hello my dear crafty friends!
Irit from Irit Shalom Designs is here today  with my second July  Sparkle N' Sprinkle release project.

I made  this card using the most gorgeous Sketched Pear blossom stamp set and added totally glittered background using a stencil and three SNS glitter colors. 


 The main image was stamped over embossable SNS acetate, heat embossed with black detail embossing powder and colored from the back and from ther front with different coloring mediums.


Product list:
Sketched pear blossoms stamp #904
Tim Holtz 5'' mini scissor
 Here are some close- ups to the project:


 And now here is my full step by step tutorial for you to follow:
1.Die cut the square using sticker paper. Add the stencil over and sprinkle Waterfall glitter.


2. Peel off the stencil and add Spirited green on the top. Try to avoid the middle part that will be covered with third color.


 3. Add pink glitter on the middle of the square.


 4. Die cut cardstock rectangles to make your card.


 5. Arrange the rectangles and glittered square as shown using Tear- ific 1/2'' double sided SNS tape.


 6. Stamp the Pear blossoms over embossable acetate  - the large and two small ones- using VersaMark ink and heat emboss with Black detail SNS embossing powder.

7. Color the stamped acetate from the back side with a mix of Ranger alcohol inks.


8. Hand cut the stamped images. Don't try to make it perfect as this is a clear acetate around the stamped images.


 9. Glue the stamped pieces over the card as shown using Tonic glue pen.Remember to glue from the heat embossed side up.


 10. Color the image with acrylic paints. (Green one is not shown on the photo).


 11.  Stamp and die cut the sentiment. Glue it over the card.
Add some random Nuvo drops around the card.


 Thanks for being here today with me and see you in a couple of weeks with my last July release project!

Wednesday, 13 June 2018

Congratulations with Magenta


Hello dear crafty friends!
Irit is here today with my new and pretty different card made with our gorgeous Magenta products.


I made the background with the gorgeous Magenta  Chicken Wire stencil over sticker paper.
I added  black glitter over the stencil and then peeled the stencil off the sticker paper and added a generous layer of clear glitter. That's it! You lovely and totally different background was done.
Then the main Magenta  Bird on Branch image was stamped over embossable transparency with VersAMark ink and heat embossed with fine black embossing powder.
I hand cut around the image and didn't even try to make it perfect.
The sentiment was stamped with permanent black ink and the whole piece was splashed with similar light olive acrylic mist.


*****


TM48


0748.O


07.295.J

Thanks for being here with me today and see you soon again!

Irit Shalom - DT Magenta


Wednesday, 23 May 2018

Greateful heart with SNS May reveal


Hello my dear crafty friends and welcome to my third  Sparkle N Sprinkle May reveal post.
This card was made with the new and most delicious Cardinal and Holly stamp set, but yet because of the different sentiments in this set I made it just as Grateful  card.
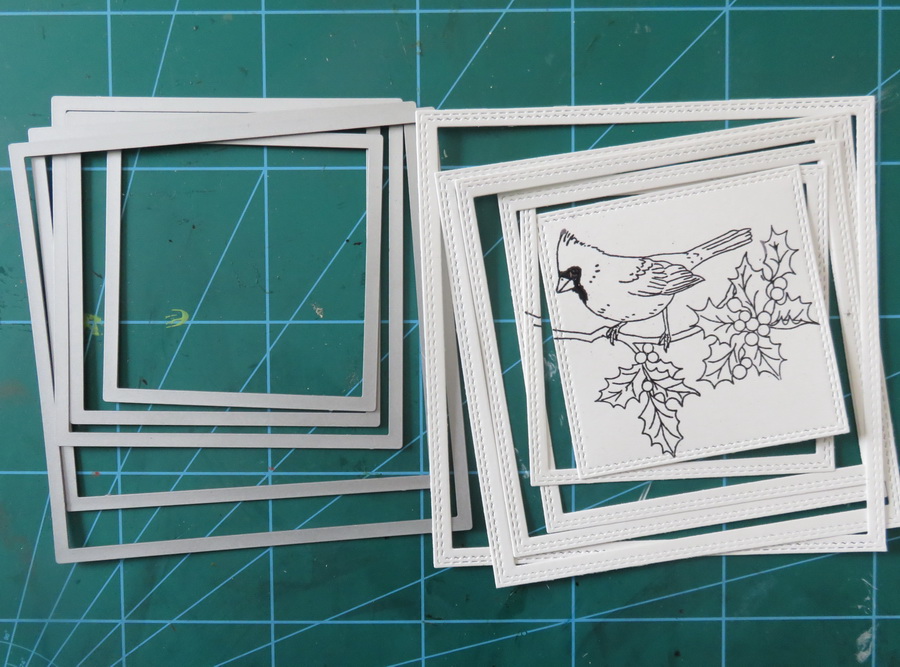
I made the layered squares background over Sticker paper and left one single square to be covered with red glitter. 
The stamped and heat embossed image was colored with water color markers and clear Nuvo drops were added over the berries and as random drops of water over the card.
The blue mist was added then for more interest over the white frames.

Product list:
Cardinal and Holly stamp set # 895
Zig Brush Markers
Cardstock AC
Blue watercolor mist self made
Dies- craft shop

Here are some close- ups to the card:


And as always - my step by step tutorial for you to see and to use!

  Step by step tutorial:

1. Stamp the main cardinal image with VersaMark and heat emboss with Black Detail embossing powder.


2. Die cut  the nested square frames and die cut the stamped image to the smallest one.


3.Die cut the Sticker paper to the largest square and arrange the frames over it as shown.


4. Color the stamped image with Zig water color markers.


5.  Mist the whole frame with blue water color mist (not shown on photos).
Glue the colored square and fill the square gap left with Fire Engine glitter.


6. Add Morning Dew drops over the berries.


 7. Stamp and die cut the sentiment and glue it over the card.

Popular Posts