Tuesday 29 January 2013

Make you own Bow Maker!

Hello, my dear crafty friends! Today is my last post as a Guest Designer on Really Reasonable Ribbon blog and this will be a small tutorial I want to share with  you.
And if ribbons are the main issue of this blog/shop, how about your own portable Bow maker and this time I am pretty sure it's a new and never seen tutorial. Why I am sure about it? As I used a dental supplies to make it and I am pretty sure   about not having so may dentists crafting with ribbons around the web.
So here it is- my Portable Tin Bow Maker for you. Look as a cute  altered box? So it is, but wait for the inside of it.


Don't worry- dental supplies are not obligatory, you can use any paper clay or polymer clay to make this tool.
Pick a tin with a lid- can be recycled one too (I used Making Memories tin, but any mint tin about 3*2'' will do the job.)
Now pick some molding paste (can be bought in any craft shop, but if you have a dentist friend it's even better as our molds  smell better and mine has this great grape taste and smell). Make 4 3'' wooden sticks from your BBQ wooden sticks or use an old chopsticks we all have at home as you will need them during  the process and after. Now mix the equal parts of both pastes (all molding pastes have 2 parts to be mixed for a minute or so) , make a rectangle about  3/4'' flat and fill the inside of your tin.


Now stick 2 of your wooden pieces about 1/2'' from each side (it will give you 2'' ribbon  bow) and another 2 in the middle to make this 1'' bow. Let it dry with sticks inside. Now pull the sticks and your bow maker is done.


Here are some photos to show you how to make 2'' bow. The box will use those wooden sticks storage and  you don't need to buy any fancy one (anyway, my fancy bow maker was lost  after all)
Please note that the pearl pins are just my add on to make the more clear photos, you don't need to use them during your bow making at all.
First tie the ribbon around the pegs as shown .

 Now take the left   ribbon end (the upper one) under the loop as shown.

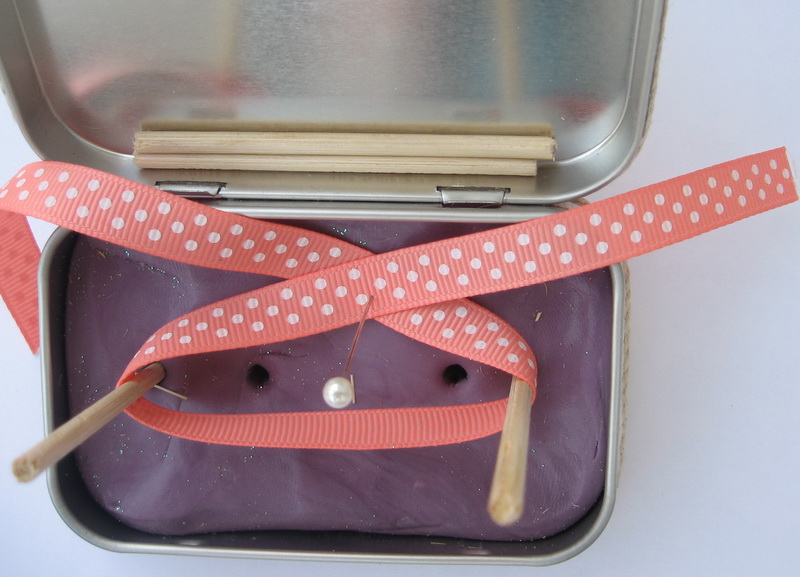
Now move the same ribbon above  the loop as shown

This was a moment to take my pins off (as I said you don't even need them) and to make a tie with both free ribbon ends.

Pull the pegs of the mold and your bow is made. Trim the ends as wanted and use it as I did to embellish my bow maker box.

Now just take time to embellish your Bow Maker box.
First of all pick some Score tape and embellish the lid with Jute  Natural 3/8'' ribbon, cut the edges to fit the tin lid. Add some thin tape around and glue Hemp Cord from Multi Weight set. For my tin lid it were 3 layers of 3/8''width. The bottom was just perfect for one layer of Natural Crochet Lace  trim and I added the same hemp over it.


I  glued a nice flower branch over the lid (Prima) and added my pink bow I made with Swiss Dots Light Coral ribbon.
And now here are some examples of using this Bow Maker  on my other projects.
And as I said- any mold will make the job and if not- try some Paper clay  or some Polymer clay (can be baked with a tin, but don't use Microwave as the tin is metal)
Product list:
Really Reasonable Ribbon:
Jute Natural 3/8 ''
Hemp Cord Multi Weight set
Natural Crochet Lace
Swiss dots grosgrain Light Coral
Tin (Making Memories)
Flowers (Prima)
Other: molding paste, wooden pegs
That's it for this post and for my Guest Designing for Really Reasonable Ribbon shop. Thanks for great products and this fantastic exposure!
See you again in my blog with more ribbon posts!

Sunday 27 January 2013

Hello , Winter wall deco- WOW Embossing Powders January post

Hello. my dear crafty friends! My name is Irit and this is my very first post here, also for a year I was on Wow Embossing Powders USA team, so I am not new to those gorgeous Wow products at all.
This month is a month of Ice and Snow in our blog. Ice and snow for Israeli girl? We hardly see snow once in a lifetime. But as I design only for out of Israel companies, I do have great winter products to design with and today I am going to show you my "Hello, Winter" wall deco full of Wow stamps and powders.


The basic part of this deco is this 30*30 cm (12*12'') chipboard piece from Australian A2Z Scraplets company. It was a long way to make this board to look like it is now: each part of it was covered with Versamark embossing ink and heat embossed with a lot of WOW powders.
I used Metallic Silver Sparkle , Azure, Pastel Blue and Neutral Ultra Shimmer in a mix and most of them were double or triple embossed.

Then I made this inner stamped circle: American Crafts light blue cardstock was stamped (on the smooth side, not over this textured one) with a lot of Wow stamps. I used Brocade, French Music and all three backgrounds form Funky Border Strips set and made them in a kind of a grid , totally randomly, stamping with the same Versamark ink and then heat embossed with Bright White embossing powder.


After stamping and heat embossing I cut a circle and embossed it around with Azure powder.

The Pink Paislee huge chipboard letters were distressed and then heat embossed with Neutral Ultra Shimmer powder again. Finally I added some American Crafts letters and as those letter are not so sticky after all, I made a made a thin line over them with Glossy Accents (my tip for altered projects using so called self adhesive letters- looks great and different).


Then I added some button snowflakes and one big grunge board one on the bottom. I decided not to add any more embellishments over the central part as I wanted the stamping be shown and not covered with other products.


Hope you like my altered piece and see you next month with more WOW inspiration
Products list:
Cardstock: American Crafts
Chipboard: A2Z Scraplets
Letters: American Crafts, Pink Paislee
Buttons: Dress it Up
Snowflakes: Advantus
WOW STAMPS and inks
Brocade
French Music
Fanky Border Strips
Versamark ink
WOW POWDERS:
Bright White
Metallic Silver Sparkle
Azure
Pastel Blue
Neutral Ultra Shimmer


Saturday 26 January 2013

Same, but different: Faber Castell Design Memory Craft tutorial

Hello, my dear crafty friends! This is my second post as this 4 month long guest designer for Faber Castell Design Memory Craft designer and this time I took step by step tutorial from Tim Holtz blog (12 tags for 2013)  and made it without any single Tim Holtz product.


Want to see how? Go to Faber Castell Design Memory Craft  blog for a full step by step tutorial.
See you there!
And if you still want to read it in my own blog, it will be posted here again on February 8 th
as my Visible Image Friday post.

Friday 25 January 2013

Visible Image Friday: For your special day


Hello my dear stamping friends! Today is Friday and this is my new card made for my
Visible Image Friday post.
This time it's a shabby and not so usual Congrats card, that can be for Birthdays, but in the same way can be used for any other special day.
I made the background with Crackled Background stamp in brown over the patterned paper (Kaisercarfts  for the base). Then I added 4 punched borders and a tag (My Little Shoebox). The tag was embellished with art supplies (twine on spools, brads, buttons) and I added this Visible Image
 " For you on your special day" sentiment. And as I wanted to add some more greetings I used this Life is Grand sentiment from Chandelier  set on the bottom.

Here is a close up  of the sentiment


 Subscribe on our newsletter! All information is in our blog!Great deals, ideas, prizes and anything you need for more stamping inspiration. You can find all info in our Blog. And last , but not least: the shipping costs all around the world are just 3$ flat rate and are free for UK. Really very low price for the International shipping and you can buy as much as you want for this flat rate cost of shipping. Great deal!

And Like our FB page too- lots of " for the members only" promos can be found there.
Also play with our challenge. Make some  Timeless  creations with any stamp from any company and you can win a great prize and TOP 3 badge too.
And check our blog today: we have some adorable new releases in the shop!


Visible Image Blog Badge, Blinkie

Thursday 24 January 2013

Inspired by Stamping January 24 Inspiration challenge

My January 24 Inspired by Stamping challenge inspiration card.
I used the new January released Cute circles set to make this card , together with AC and Core' Dinations cardstock, Pink Paislee and Kaisercrafts paper,IBS flowers, Prima felt doily and Blumenthal Lansing felt buttons, Spellbinders die, Martha Stewart punch and Wow Embossing Powders Red powder to emboss  my stamping. Ribbons and twine are from Really Reasonable Ribbons shop.


Play with Inspired by Stamping challenge and you can win some lovely goodies to craft with!

Monday 21 January 2013

Really Reasonable Ribbon: Make your own accessory kit


Hello, my dear crafty friends! Irit is here and this will be my last post as RRR guest designer for January. I already made cards, altered bag, box and even taught you how to make your own Bow Maker. So today I am going to show you simple and lovely projects that can be even made with kids (10 years old girls will love it a lot)

All you need is this gorgeous Swiss Dots Bright Assortment from Really Reasonable Ribbon kit, wooden spools- small and one medium, tacky double sided tape, some old beads and some jewelry bases.

Let's begin with a necklace.


This is what we call "tie a knot" beading and you need about 3 yards of the hemp – I used the thin one from Bamboo Cord Multi Weight Set as some of the beads have small holes only.

Fold your hemp to half and make a tie, then begin to add beads and make it totally random. Add one bead over double string and then add one on one string only, make another tie and so on. But now, as you can see, the most colorful part of this project is those covered with dotted ribbon wooden spools. The size on the small spools is just perfect for ribbon width in this collection. Use your Score tape to add small bits of ribbons and add more beads until the necklace is done. Tie the ends and your necklace us done.

Now for the hear clips. I used the pre- made wooden clips base, but you can make it from polymer clay, paper clay or use the old piece you already have. This time use stronger glue (kind of jewelry making one) and add 3 strips of our dotted ribbon over it. Now cover the big wooden spool with 3 different dotted ribbons (the size is just perfect for full 3 ribbons to cover it all) and glue the spool over the clips. Add the metal base with the same strong glue and your hear clips is done.


And as I still hade a lot of ribbons and some small spools I decided to make this dash pin using the metal base (ca be bought in every craft store)

I wrapped 2 small spools and glued them over the metal base (use strong glue) and then added a small bow over it for this fancy look.


So, as I said, even  kids can do it, but please be careful with glues (those are not kid safe glues after all) and with a pin (just cover it with a cover before they begin).


Product list:

Ribbons: Swiss Dots Bright Assortment
http://www.reasonableribbon.com/item.php?item_id=4045&page=2&category_id=101
Bamboo Cord Multi weight SET
http://www.reasonableribbon.com/item.php?item_id=4045&page=2&category_id=101
Glue: 1/4'' Score tape
http://www.reasonableribbon.com/item.php?item_id=4892&category_id=405
Wooden spools: Maya Road
Clips, pin: craft store
French clips
http://www.reasonableribbon.com/item.php?item_id=3830&category_id=332
Other: Beads

Saturday 19 January 2013

Faber Castell Design Memory Craft Altered arch post

Hello, my dear crafty friends! Today my very first post is published on Faber Castell Design Memory Craft blog.
Here is a small close up of my new project and you can see much more, with full step by step article in the company blog.


Please, visit me here  and leave some love too!
See you!

Friday 18 January 2013

Visible Image Friday: 3L CARD

Hello my dear stamping friends! Today is Friday and Friday is my Visible Image day. So here is my new card made with Kaisercrafts papers and stickers and 3 most gorgeous Visible Image stamps.
The corners were stamped with brown ink and Wrought Iron  Corner  stamp.
The main sentiment was white heat embossed over the black card using Live- Laugh- Love  stamp. And finally my beloved Large Butterfly stamp was heat embossed, cut and glued over the corner.


Subscribe on our newsletter! All information is in our blog!Great deals, ideas, prizes and anything you need for more stamping inspiration. You can find all info in our Blog. And last , but not least: the shipping costs all around the world are just 3$ flat rate and are free for UK. Really very low price for the International shipping and you can buy as much as you want for this flat rate cost of shipping. Great deal!

And Like our FB page too- lots of " for the members only" promos can be found there.
Also play with our challenge. Make some About Time  creation with any stamp from any company and you can win a great prize and TOP 3 badge too.


Visible Image Blog Badge, Blinkie

Thursday 17 January 2013

2013 with new calendar

This gorgeous  perfect size calendar was sent to me in my first 100 Proof Press DT box and I new it will be my all year long project. Like I don't have time to make all 12 pages and a cover at once, but I sure can do one page a month  for the current month and then to display it for 30 days and so on. But then it has a cover too, and also in this calendar it's not seen, I decided to embellish it after all.
So this is my 2013 calendar cover.
And here is a bare calendar you can buy in 100 Proof Press shop (go for it, you still have almost 12 month to use it.) with my fancy cover (still need to make a hole on the bottom to hand it after all on my wall). Here is a link to the calendar in the shop.

I made a basic cover with light kraft cardstock, inked around with brown ink. Then I made the middle part with white stamping and white heat embossing (WOW embossing powders ) using Old script and  Commemorative Castle  Coin stamp and added some more distress Ranger inks. The Calendar blocks  stamp was stamped with black ink and heat embossed with clear powder and then  inked a bit to fit the colors. Last stamp I used here was this Open book that was just perfect to add 2013 numbers (American Crafts). To make it more interesting, but still very flat (it should be totally flat to hang it on the wall after all) I added some Prima blings and Words or Whatever  chipboard corner and some old lace.

I will do January  page in a week or so to show you and then one page a month.
 And some challenges too:
Something new- all stamps and a calendar itself- for   Crafts and me
Vintage for Frilly and funkie
 Scrap it girl Sparckle challenge
 New  to Unique Crafters challenge - calendar is totally new for 2013
 Anything goes for Inky Chicks
 Anything goes for Sweet Stamps
 Anything goes for Through the craftroom door
 Lace for Simon says stamp and show
Vintage for Vintage stamping challenges

Wednesday 16 January 2013

RRR GDT Valentine challenge post


Hello, my dear crafting friends!

Today Really Reasonable Ribbon has a new challenge in their blog: VALENTINE/ LOVE 


Also it's almost a month till the actual day, but you can do your Valentine projects right now with this most gorgeous monthly Valentine set.

So here is my project: Valentine card.

This card looks very simple, but used quite a bunch of different techniques.

I dry embossed the Core' dinations cardstock with Sizzix/Tim Holtz embossing folder and distressed all over for this mute look. The Pink Paislee paper was die cut with Cherry Lynn die and then I added 2 ribbons from RRR Valentine set: Red hearts and Lace. Then some Pretty Little Studio tags, Bingo card etc were collaged over with 3d foam glue and I added another ribbon layers: Pink Satin covered with white and made this pink bow. The flowers and leaves are from Inspired by Stamping shop, so was the sentiment stamped with red Clearsnap ink.


To make it more interesting I added 3 ribbon flags, using the very same collection.


After all this card looks pretty fancy, but not too bulky and is great as Valentine small gift.
So go to Really Reasonable Ribbon shop and grab this fantastic Valentine set! Enter the challenge and you can win gorgeous ribbons too!

Cardstock: American Crafts (brown), Core' dinations )Pink)

Patterned paper: Pink Paislee

Tags: Pretty Little Studio

Die: Cherry Lynn Design

Embossing folder: Sizzix/Tim Holtz

Flowers, leaves, stamp: Inspired by Stamping

Bling: craft shop
 I add this card to Flowers and ribbon challenge on Pretty Little Ribbon shop
Valentine for Craftroom challenge


Tuesday 15 January 2013

Celebrate life : Fun with ATC BLOG HOP

Hello, my dear stamping friends! This is an Fun with ATC 3 RD ANNIVERSARY BLOG HOP!
Today I am going to show you some ATC made for my team friend Caro( we actually design together on 3 companies such as  Visible Image, Tando Creative and 100 Proof Press stamp)  and Caro  runs this ATC CHALLENGE BLOG. This month it's all about Celebrate life and my ATC just make it so.Caro also asked me  to join here DT on this challenge blog and I agreed as I love ATC making and it's already our 4 th DT together.
I am a second  one on this hop, so if you came from the main blog above- you are on the right way and if not- just jump to FUN WITH ATC blog and begin there. Remember: we have a lot of great sponsors on this hop, but you need to comment on each blog on the way and to follow our blogs in order to win.
 You can also see more of my ATC on Visible Image stop on this blog hop.
For this ATC I used Visible Image Timeafter time set and Movie set small film strip too and I added an old totally recycled charm over this piece.


But wait! There are a few sponsors on this blog hop and I actually design for all of them. So here is my tribute to 100 Proof Press company- another new ATC with their stamps.

I used Old Script, Alarm clock, Calendar and Communitive Castel Coin over this small card with some distress paints, washi tapes and staples.
And now for your next stop on this  hop: Claudia

As you can see there are goodies offered as prizes from 3 great companies: Visible Image, 100 Proof Press and Tando Creative. Fortunate me design for all three, so it's your turn to win all of those goodies. Follow all blogs, comment and you are in a draw to win great stash!


MY MOST FAVORITE ALTERED 2012 PROJECTS

Hello, my dear blogging friends! 2012 is almost over and this is a time I usually pick my most favorite crafty projects from each crafting category. So this time those are my most favorite Altered projects and this year I decided to pick 7 only for each category as 7 is a lucky number.
So here are  my 2012 altered beauties

Altered box and handmade book
Altered chipboard house

Altered chipboard tray

Altered wooden tray

Altered recycled book

Altered chipboard jewellery
And the last

And there are two lovely pieces that I can't post here as both were picked for an early 2013 print- so they will be posted when I can.
Hope you like my own favorites.
And as there is a call for an altered art DT call challenge blog called Crafty- Emblies , I decided to make a try for this one as some of my DT are close to the end  in a month or two.
Hope the like my work.

Monday 14 January 2013

Tando Creative January blog hop: Arches around us

Hello, my dear crafty friends!
 This is our Tando Creative monthly blog hop and this time we are going to show you our use of Tando arches. There are a lot of arch shapes on Tando site, but this time I picked a smallest jewelry piece arch and made a new Mixed Media stamped  necklace.

If you came from  Gez blog - you are on the right way and if not- please go to Tando blog and begin there. Please, follow our blogs, comment on all of them and you can win some great  Tando chippies.
 Long time ago (let's say about 6-7 years ago) I was deeply into beading and jewelry making. Time changes and I moved to paper crafting and then it changed again and I moved to stamping  and Mixed Media mostly. So this is my tribute to old lover and new one all together.
I  first I covered this small Tando arch with clear embossing ink and Copper Heavy Duty WOW!Embossing Powder powder with heat embossing.
Next I stamped this  Commemorative Castle Coin stamp from 100 Proof Press with black pigmented ink , heat embossed with clear embossing powder, inked a bit with some distress inks  and glued over acrylic Tim Holtz charm from both sides  as I want it to be water proof piece. Then this acrylic sandwich was glued on my arch back and my central piece was done . OK, some small black and brown bling were added and this old Love staple too, but it was not a must thing.


I made this beaded crystals flower, a tassel and made the whole necklace piece and I think I love it a lot. Don't you?

Your next stop is Karen. Remember: you need to comment on each blog to win the prize!
See you again next month and good luck with  our draw for all comments on this hop.

Sunday 13 January 2013

Really Reasonable Ribbon January blog hop


Hello, my dear crafting friends!

Irit is here again and this time I am a part of Really Reasonable Ribbon DT Blog hop.


This month the new monthly released  Valentine ribbon kit is this red- pink and white most gorgeous Valentine day one.


If you came from Bonnie's blog  here you are on the right way. And if not- go to Really Reasonable Ribbon blog  and begin there. And as always- we have a great giveaway for you. Follow our blogs, comment and you can win!

So I decided to make an altered box, full of roses and very much Valentine.


The basic box I picked to recycle was one of those well known Ikea round boxes. The only color I had was blue, but it was just perfect add on to all those reds, pinks and whites.

So I covered the lower part with 3 different ribbons, using a tacky orange double sided tape. Then I added a piece of white lace from the kit and glued 2 pink buttons to cover the edges (doesn't matter how much you try, the edges are still ugly, unless you can fold them to the backside.)

Then I embellished the cover part of the box: 2 ribbons around, one lovely bow made with my own Bow maker (wait for the tutorial how to make this one in my next post here). The top was covered with light pink doily that was just a right size for this box and then I added 2 felt heart buttons tied with another ribbon from the set.


But wait- it's not only a box. Look inside! It took me an hour to fit all those small paper roses to make this "heart" shape and now my gorgeous Valentine box is done.


Do you want to add some more inside? You still have a lot of space for some small items to put inside the box.
Product list:
Really Reasonable Ribbon Valentine January kit- 6 ribbons used
Ikea box Flowers: Iamroses
Felt, buttons: Blumenthal Lancing Co.
Other: paper doily
 And as those gorgeous ribbons were on my craft table, I decided to make a card with this very old and forgotten Iris folding template. So I picked a heart template and made the folds with 3 different ribbons to get this heart shape. As the outer  part was not so fancy, I added this lace  twisted heart using the lace from the same set and made a small bow on the top of it.


The edges were covered with Washi tape (sorry, I never know the washi tape companies as they all are just same) and I added a few flowers from Iamroses and a few pearl pins. The sentiment  are Webster pages stickers.
Now go  to your next stop in our blog hop:  Cheryl's blog
Product list for the card
 RRR Valentine January kit
Cardstock: American Crafts
Flowers: Iamroses
Letter stickers: Webster pages
Other: washi tape, pins
Hope you like it and maybe can do a very similar one if you buy this ribbon collection from
Really Reasonable Ribbon  store .

Popular Posts