Thursday, 28 January 2016

Fabric bag with Ann Butler and Canvas Corps


Hello my dear crafty friends and welcome to my Fabric post made for Ann Butler's blog.
Today I decided to make my own canvas tote. Maybe not to make it as it's a Canvas Corps one, but at least to decorate it over. And as I only have one tote and I was not sure about the results, I made the front canvas stamped piece just to glue it over the tote.
 So here is my tutorial and I hope you like my final project.

Step by step tutorial:
1. Cut a piece of Canvas Corps natural canvas to 10*10'' piece with good fabric scalloped scissors. Grab all possible Ann Butler's  Backgrounds Basics stamps from Clearsnap and begin your random stamping with Ann Butler's Blueberry Crafter's ink. I used both triangles and squares and just tried to arrange them with a bit of gaps that will be filled later with stiches' stamps.


This is not a step; just a close up to the stamped surface.


2. Now grab the full set of Ann Butler's Stitch stamps from Clearsnap and your Aquamarine Crafter's ink and add some stamped stitches in between the stamped triangles and squares.


3. The last step in stamping was to make this Limelight ink stitch around the piece and over and over the gaps.


4. Iron your stamped piece to make the ink permanent. Then glue it with fabric glue over the bag. I added adhesive lace to make the frame for the stamped piece.
And then added this fabric flower on the top. The handles were also embellished with fabric tape. And also it's " self adhesive" I added some fabric glue. Believe me this " self adhesive" thing is usually " non adhesive" after a few hours.
I think the result is very pretty. Don't you?


Wednesday, 27 January 2016

Are you lucky?

 Hello my dear crafty friends and welcome to my new post made for Two Paper Divas and Die Versions  companies.
I decided to combine  those two companies as I got those new released Western Vases Die and only thing that I could think about was to add some gold/ jewelry inside those  vases. And then then best sentiment I thought about was something about luck. Not St. Patrick 's day, but just pure luck when you dig for your own gold somewhere.
 So I used Canvas Corps cardstocks to make the card and made black die cut with golden background.
Metal coins and pearls were glued into the vases and around and I stamped Two Paper Divas sentiment using this gorgeous Lucky  me set.


Just for you mini owls card - with Tando and TPD


Hello my dear crafty friends and welcome to my last January post for Tando.
This is our Animals/Birds week and each of us picked her favorite animal/bird for this call.
I made this art card with Owls chipboards for two reasons. First- I have them in my stash. Second- I love owls for being the symbol of wisdom .
So first I stamped those with flowers over the card with Two Paper Divas stamps and then painted the chipboards with DecoArts paints; I also added those gold dots over the painted chipboards with gold paint and arranged the lovely owl couple over the chipboard branch.
The  small book plate was heat embossed with gold powder and I also stamped the gold sentiment inside.


Products used:
Chipboards
Tando minis- Owls 2
Tando Mini's - Owls 2

Mini pack of birds and branches

Mini pack of Birds and Branches

Mini book plates

Mini Book Plates

Gold metallic fluid acrylic paint
Fluid Acrylics: Gold Metallic


Tuesday, 26 January 2016

Makin's Clay Love project


Hello my dear crafty friends! Irit is here with my very first project  in 2016. January is a perfect moth to make projects for  Valentines. Yes, Valentines is  in February, but then you need time, so here is a small clay projects that is easy to make and fancy to give.As  young kids we all believed in this fairy tales love stories. So I connected hearts with a fairy image and made my own Love figurine.
Say " Hello" to my Fairy heart figurine.


Step by step  tutorial:
1. Use a full 120 gr. package of Red Makin's Clay.Roll it with Makin's  roller tool  from Roller and Cutter set to the 1/4'' sheet of clay. Cut the  flat clay sheet to a few pieces to fit your cutters using the cutter from Makin's Professional Clay Tools set.  Pick you Makin's Heart shaped cutters and find some bigger heart shaped cutters in your stash. The simple ones from the baking shop will do the job (also I never used them for baking ). Cut the largest heart, the second size heart and the 2 smaller using Makin's cutters.Use


2. Pick three Makin's  Texture  sheets and  roll  over the cut hearts with the roller. I used the following textures, but you sure can pick your favorites.Let the embossed hearts dry for a couple of hours before we add the glaze over them: Lace from Set C; Diamond from set E and Curly Beard from set E.


3. Cover each one of 4 large hearts with any kind of a glaze you have. I used the one on the photo, but it;s just because I own it.  Adhere the hearts as shown - you can use glaze to do it, but  glue is much better. Let it dry  for 24 hours to be sure the clay is totally set and dry.


4. In the meantime cut 6 small hearts with the smallest Makin's Clay Heart shaped cutter. Arrange all 6 hearts and shown and cover them with glaze.


5. Cut the smallest hand with Makin's Hand cutter and Paisley shaped cutter.  I made each  hand with 2 clay cuts adhered one over another. The drops made my feet shapes, again I glued two cuts one over another. Cover them with glaze.


6. And now to the finished project. I made the base of my figurine  from the flower shaped hearts. 
Glue " feet"  over the base. Glued hands over the hearts' shape. Then I made a fairy using Makin's White clay and some craft store mold; covered it with glaze and a layer of Fairy dust glitter (not seen much on the photo, sorry about it).


 And a bigger photo of the finished project:


I hope you liked my Valentine's project and see you next month with another one. Hint- it's all about being Lucky.

Saturday, 23 January 2016

CC ornament tutorial- Bella January


Hello my dear crafty friends and welcome to my new Bella post.
I know that Christmas is over; but it's always another year. So just keep the tutorial for the next year or maybe  make this oranment at advance.
I altered the Dollar Tree $1 plastic ornament with a whole pack of red cord, some lace, some burlap threads, a paper tag and a lot of glue and mess. The final result is lovely and the colors can be changed to another, non traditional ones, too.

Product list:
1.45'' wax cotton cord Red - whole package
2. Lace
3. Green burlap sheet- just a few strings
4. Plastic ornament
5. Better not pout tags of Kraft cardstock
6. Mod Podge Extreme glitter

Step by step tutorial:
1.Cover the plastic ornamnent with a thick layer of glitter Mod Podge. You sure can use any other liquid glue, but this one alreadt has glitter inside and you don't need to add another giltter to your glue.


2.Roll the wax red cord around the plastic ball and add more glitter over the cord as you move on. It's a bit messy, but very effective and a a few minutes the cord is sticked and doesn't move. Cover the whole ball- one package of red cord will cover the whole surface.


3.This is a covered ball: let it dry as the glue is all over the cord.


4.Take a square piece of lace, fold it twice and make a single hole in the middle. " Dress" the ball with the lace and don't cut the edges. We want it to be a bit longer than the ball .


6.Pull like 6-7 threads from the green burlap and make a bow around the top of the ornament. Cut a single tag from the cardstock and add it with a small ball chain (hardly seen). Hang your ornament on your tree and enjoy!


Friday, 22 January 2016

Holidays projects with PHP


Hello my dear crafty friends!
Today I want to share a few on my Hoildays' projects that were all print published  lately. As not everyone can get the print copy of each magazine, I decided to share some of those projects with a little " about it" and I hope that you still can do some very similar projects before the  the next Christmas(LOL) with those gorgeous PHP Christmas products.
 So here is a first one: Magical tag


Thursday, 21 January 2016

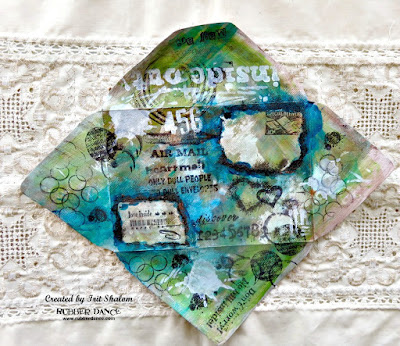
Rubber dance January tutorial


Hello my dear crafty friends and welcome to my Mail art tutorial made for Rubber Dance blog.
This is my second recycled envelope only; I am just on my learning curve, but I think that the result looks fine.
So here is my tutorial and remember to recycle your envelops as thing is good for the Earth and for all of us.

STEP BY STEP INSTRUCTIONS:

1.Find a good thick  used envelope and open it from inside. Cover it with a thin layer of gesso (not shown here) and let it dry. Paint over the gesso with a mix of Gel Medium based paints. I used Earth Safe Finishes Iridescents paints here, but any shiny semi translucent paint will work. While your paints are pretty wet wipe  some paint with baby wipe to leave this distressed white space look.


2. Tear a couple of rectangles from the left over paper and glue them as  shown  with repositionable glue. Paint over both rectangles with one of the paints (I used shiny blue one) and add a thin layer of black embossing powder  around the rectangles while your paint is wet.
This step was a bit tricky as you can't add it from the jar if you want it to be only a thin line around the rectangles. So I added it with a tiny spoon part by part.
Heat emboss the powder and peel of the paper pieces (easy to do as we used non permanent glue).


3.Grab your Rubber Dance Envelope stamps and some others- list on the bottom of this post- and using Ranger Archival black ink stamp randomly  and not so randomly over the envelope.  I tried to stamp with a different inks, but it seams that this Archival is the only one that works over this  glossy paint. I tried to stamp with STAZ- ON, pigmented inks and dye inks; bad result or zero result.
After all this stamping I  used a stencil to make some white paint images, such as SECRET word and a few splashes. This was done to add more interest and more depth to this  totally flat, as it should be, piece of art.


See how textured this looks after all! 


And this is my finished envelope when closed. 

And this is how it looks from the back. 

I really love this Mail Art Rubber Dance  stamp set! I will use it again and again. Just for fun. I never send real letters anyone. Who does? 
Stamps used from Rubber Dance company:

You can buy all those gorgeous stamps HERE!


Wednesday, 20 January 2016

Baby girl shaped card with TPD


Hello my dear crafty friends and welcome to my new Two Paper Divas post.
This is the second shaped card made this month and it's a BabyGirl one. The Baby boy card, made in the very same way, was posted in my blog last week.
I made the oval scalloped card using Cherry Lynn dies- 4 of them. The basic card was die cut without the top, so its connected to be open. Then I added Canvas Corpscanvas layer  and I just hand cut it with good fabric scalloped scissors. The next 2 layers were die cut from CC patterned cardstock. I stamped over the solid cardstock with pink  ink using TPD gorgeous Baby Bundle of Joy set.
Then I covered the stamped booties with glitter glue and added 3 cloth pins to connect the ovals.


Monday, 18 January 2016

Rubber dance double frame


Hello my dear crafty friends and welcome to my new Rubber Dance post. Today I made an altered frame inside the frame using EyeConnect scalloped frames.

I didn't make a full tutorial while making this project, so I am just  going to explain a bit about this Mixed Media piece.
First I  covered the  outer frame with gold embossing powder and I made it like 3-4 times to get the full coverage over the bare  chipboard. Then I added those black and gold mini brads into the holes and it was quite a work to do. But I love the result!
Next I made the background with a lot of Rubber Dance stamps stamped over the grungy, steampunk kind of painted chipboard. I used the chipboard from the frame set and stamped over the painted background with black permanent ink. The white spots are acrylic paint over stencil.
The list of stamps used is on the bottom of this post.
The smaller inner frame was covered with the same gold  embossing and I arranged it with a piece of wire and some brads. I made the word PAST inside the frame to show us what this piece is  all about.  The embellishments cluster are Makin's Clay (air dry polymer clay) molded pieces, painted with a real gold paint and covered with some blue patina.


 Stamps used from Rubber Dance:
Vintage Script
Stitch and Frame
Envelope stamps
Pick a number
 Funny Birthday
You can buy all those lovely stamps HERE!

Saturday, 16 January 2016

Card week on Tando: Be Unique in any style (Steampunk too)


Hello my dear crafty friends and welcome to our Tando Cards week.
I do make cards and even a lot of them. But making a Steampunk card was a bit of a challenge for me.
So with a couple of Tando stencils and a few of Tando chipboards  this card was born and I even like it.
It can be given to anyone who is a bit different and I used VISIBLE IMAGE stamp sentiment to say this .
Be Unique- and it doesn't matter what is your style. Just be you!
I made the background with acrylic paint and Tando Distorted Harlequin  stencil. Then I used Scullduggery stencil to make this textured scull over the cardstock and heat embossed it with a mix of black and gold powder.
The Steampunk  Wings and Cogs Tando chipboards were all heat embossed with copper and I added a bit of blue paint for this " patina" look.
The last touch was this metal bird over the wings and a bit of blue paint around the edges.


Tando products used:
Stencils:
Distorted Harlequin 
Distorted Harlequin Mask

Scullduggery
A Skinner Stencil/Mask - Skullduggery

Chipboards:
Steampunk wings and cogs
Steampunk Wings and Cogs

Popular Posts