Thursday, 16 June 2016

Strawberry fields forever: Makin's Clay tutorial


Hello my dear crafty friends and welcome to my new tutorial made for Makin's Clay blog.
As you maybe remember last month I decided to make a couple of flower tutorials  made with Makin's Clay and totally different techniques. This is my second tutorial and this time , as my tribute to Spring, I made this Strawberry blossoms with strawberries piece. Last month I explained the die cutting of dry Makin's Clay sheet technique.This time it's hand made, scissors cut flowers with a little help of other techniques that you will see in a second.
So lets make this beauty!
Step by step tutorial:
1. Roll a think sheet of Makin’s Clay® white clay using Makin's Clay  roller from the Makin’s Professional®Roller and Cutters set® set over Makin’s Professional® Cutting Mat.
Don't let it dry for now!


2.Use medium size circle cutter form 3 pc Makin's Clay 3 pc. Round Cutter set and make a few circles from your rolled white clay.


3.Now  lets see how to make  strawberry blossoms. First  I checked the number of petals and the general shape of those blossoms. We need 5 petals flowers and  they are round shaped ones.
So divide the cut circles to 5 as much as possible equal sectors using  Makin's Clay  tools and make the central notch. (See circle #1 from the left ).
Use your fine scissors and cut between the sectors as shown on flower #2 on this photo.
Now round the petals with scissors (#3 on this photo).
Flatten the hand cut flower a bit- not too much- with the roller (#4 on the photo).
Make veins with any tool you feel comfortable with and shape the flower (#5 on the photo).
Make as many flowers as your need. For this project I made just 5.


4.Make leaves with a die, but just as a shape maker.  I didn't die cut the leaves and used the die over the wet clay. Then hand cut the shape around the image as shown.Those leaves are pretty much general shaped ones; so you can also free  hand cut your own leaves without any die or template.


5.Make the back of the flowers using hand mixed Makin's Clays; I  used a mix of the same size Yellow and Olive green and just made an initial mix with marbled look. Then use Makin’s Clay® Cutters smallest Flower cutter and make 5 pieces from the mixed clay as the bottoms of your blossoms. 


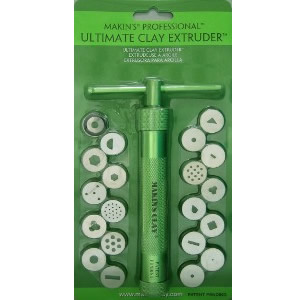
6.Make the blossom centre with Makin's® Ultimate Clay Extruder™  using the disc with the smallest possible round holes. Then arrange a few  round strips together to make your blossom's centres.


7.From this step and on there are no more detailed photos, but the general ones.
Use Colorarte Silk Acrylics (gel medium based) to paint the leaves and the finished blossoms with the centre on them. 
 Make three strawberries using a mold  with Makin's Clay  white clay and paint them as shown.


8. Make the arrangement base from Makin's Clay Brown clay and  medium  4 pc new Flower shaped cutter. This piece is not really seen, so you can use any other  natural color too.


9. Arrange your leaves, blossoms and  berries as shown.
Cover them with glaze and enjoy your Spring project!


Products used:
Makin’s Clay® white
Makin’s Clay® brown, olive, yellow
Makin’s Professional®Roller and Cutters set®
Makin’s Clay® Professional Clay Tools® 
Makin’s Professional® Cutting Mat
Makin’s Clay® Cutters-3 pc Round, 3 pc Flower

Wednesday, 15 June 2016

Dream big and shine card


Hello my dear crafty friends and welcome to my new post made for Two Paper Divas.
This time I used this elegant sparkling TPD  Dream big sentiment stamp and my only stamped image over this die cut card.
The whole card is made with glitter chipboards and the stars are Die Versions die cuts. The sentiment is heat embossed with clear embossing powder over the purple pigmented ink. And yes- I dream big and shine bright and sparkle even more on this card.


I enter this to some web challenges:
Darre2BArtzy- Bling

Tuesday, 14 June 2016

Dare to dream art page tutorial


Hello my dear crafty friends and welcome to my new tutorial.
This is single art page made with a lot of mediums and this time I used Faber Castell DMC products as my mediums and Rebecca Baer stencils  and a lot of Mixed Media page.


 Step by step tutorial:
1. Make the background over thick white cardstock with Faber Castell gelatos and wipe the colors with baby wipe.
I made rectangles with those colors, some are metallic colors and then blended them all together without adding any water.


2.Use Rebecca Baer stencils- two of them- with modeling paste  over the watercolored page.
You may secure the stencils with washi tape as shown.


This is  how this page looks  without the stencils and it's still wet. 


3.Cover the main circled areas with a thick layer of Faber Castell DMC Glaze Medium, also I used Texural Accent Sampler. Add a few more smaller circles on the " empty areas"  as shown for more interest.


4.Add a thick layer of clear glitter over the glazed circles as shown.


5 Wait till all previous mediums are totally dry. Now let the fun begin! Cover the entire page with a thin layer of Faber Castell DMC Chalkboard paint. Then wipe the paint over  glazed, embossed, glittered areas with baby wipes. And  also just one wipe  is shown  here, you sure need much  more to get this finished look. And yes, it's totally messy, but worth the result.


6.Stamp Rubber Dance flowers from Antique Botanicals  and  Bold and Beautiful sets with FB DMC   Stampers Big Brush pen in Black over white tissue paper.This is an India ink big pen that works perfectly as an ink over rubber stamps as you can see.


7.Stamp two Rubber Dance Dragonflies - large and small ones-  over clear vellum.
Use clear embossing ink and heat emboss the images with black  embossing powder.
Hand cut the images and color them with FB DMC Pitt Artost  Pens in two  colors and one Stampers Big Brush pen in Light blue.


8. Stamp s few more flowers from Bold and Beautiful set  directly over the page near the edges using the same  black Big Brush.
Now tear the tissue stamped images and glue them as shown with FC DMC Gel Medium.
Outline the largest circle with the pen- this will be our sentiment spot.


9.Let the page be totally dry and them color the tissue  flowers and leaves with a mix of bright colors using FC DMC  Stampers Big brush pens in a few colors.


10. Glue the  vellum dragonflies over the  page using Gel medium.
Make the sentiment with stickers (I used MME ones)
Outline some glitter circles with white  pen as shown.


And here are some close- ups to this art page:


I hope that you liked my tutorial!
I also enter this piece to some web challenges:

Anything goes with embossing powders- WOW! Embossing Powders and I used their product here
 More Mixed Media- Anything goes with purple
Floral frenzy for Stamps and Stencils
Anything goes for Creative Artiste

Monday, 13 June 2016

Rebecca Baer inspiration

Hello my dear crafty friends and welcome to my June inspirational post made with Rebecca Baer delicious  collage style stencils!
This time I made a double sided bookmark and as you can see I used one single stencil for both sided.
First I used two bookmark blanks  arranged side by side. Then I applied Modeling paste over both with one single Enchanted wine and let  both part dry.
The next part was adding DecoArt Fluid acrylic paints with sponge over the dry paste and as your see I got fantastic pastel colors  with very visible stencil image over both  sides.
Then I just flapped them one over another and glued to get this double sided effect. 
The top part was punched and I added a ribbon over the bookmark.


And this is the second side with a fabric flower added on the top and over the front.
Same colors with a bit of different design and it's still the very same  Rebecca Baer stencil used here.


 I think that this project can be done as a kind of " mass production" using a lot of blanks and different Rebecca Baer's stencils with same paint or different colors. 
Very easy to make as teachers' appreciation gifts and Birthday girl/boy small presents. 


Sunday, 12 June 2016

ARTplorations inspiration: Happiness tag


Hello my dear crafty friends and welcome to my last ARTplorations post!
This was a great and fun year to design for this lovely company and I thank Shery  for all great stencils and stamps  I got and will sure use in the future.
I love ARTplorations/STAMPlorations designs for their versatility and simplicity and I think that this was fantastic company to design for. But with all my other obligations I decided  not to stay for another term and to move to new unexpected adventures.
So here is my new Mixed Media tag made with new, just released Big Bloom Factory stamps and the  matching Big Bloom Factory Large stencil.
The backgrounds were made with Gelli Plate and DecoArt fluid acrylics. The stamped flowers are heat embossed with black powder and hand cut. Some of the flowers were stamped inside the stencil flower with the same heat embossing. I added this fantastic sentiment from Fond  Expressions 2 stamp set and I do wish you all Happiness!


I also enter this tag to some web challenges:
Anything goes with embossing powders for WOW! Embossing Powders- and I used their products here

Saturday, 11 June 2016

Bless your nest card


Hello my dear crafty friends and welcome to my weekly post made for Two Paper Divas.
This time I made a lovely, almost clean and simple card with new Bless your nest stamp set.
Then background is Die Versions die cut and I made it partially to add more interest to this card.
The stamped nest is hand cut and made in 3d manner with distress markers painting.
The stamped sentiment is arranged over two more die cut layers and it's a very general card that fits a lot of occasions.


I also enter this to a few web challenges:
 Anything goes with dies (Die Versions) for Scrapyland
Happy little stamper- Anything goes with dies challenge

Beautiful soul art page


A few days ago my dear crafty friends Einat and I decided to make some art pages. This is the first one we made that morning and I think that I am in love  with this Unity stamp (need to buy one, but thanks to Einat i could use it).
The sentiment stamp is also Unity and so are the background stamps. I used DecoArt paints and mediums with some Tim Holtz stencils over this page.


I enter this art page to some web challenges:
Crackle for Country view challenges
 Inspiration- colors mostly and the mood for Berry71Bleu


Happy little stamper- Mixed media with texture
Anything goes with heat embossing - for WOW! Embossing Powders and I used their powders here
 Anything goes for Creative Artiste
 Inks- for Craft stamper
 Mixed media monthly-for  #18 Texture challenge

Popular Posts