Saturday, 6 January 2018

Happy 2018 planner


 This fabric covered planner with easy to make chipboards only decorations was in print in the last Just Christmas cards and Decorations 2017 issue.
Now it's time to share it on the web.

 I enter it to some web challenges:
Happy new year for Papercraft challenges
 Something new for Simon Says Monday blog- New Year- New Planner
Creative Embellishments- inspiration from ornaments and New Year celebration and color gold- used CE chipboards mostly on this planner.
 Mixed Media Monthly-New Year planner is sure new and MM style
Image may contain: text

 Art- Piaskownica- Vintage style


Quick and easy Birthday card


This is a quick and easy to make cards made with PPRS stamps, distress oxide inks, some washi tape and a few pearls.
The stamped image is heat embossed so we can add the distress inks over the image without any problems.


I enter this card to a few web challenges:
Seize the Birthday- Anything goes
Our Badge

Something new- new stamps for me , sent in a " move it to the next designer" box- for Simon Says
Watercooler challenge- Anything goes Feminine and the colors are sure very feminine

Create Mixed Media wooden frame


This is my first new project for 2018 that was made not for any Design team.
I altered the $ store wooden frame with tons of different chipboards, background stencils, lots of paints and mediums and made is as my word for 2018- Create (things that make you happy).


I enter this piece for some web challenges:
 Simon Says Monday challenge - Something new- new word for 2018 and new use of old wooden frame. 

SanDee and amelie's challenge-Steampunk/Industrial
 Anything goes for Country View challenges


Friday, 5 January 2018

Glitter with CAS-ual Fridays stamps


Hello my dear crafty friends and welcome to our new and first for 2018 CAS-ual Fridays challenge!
No automatic alt text available.

Stamps used:
Sleighride, Snowy Sayings


There are no genre restrictions for this challenge. Link up your clean and simple designs or layer it on -- the choice is yours.  Make sure to link back to this blog post and include the graphic below in your post for consideration of being chosen a winner.
What are your playing for? 10 winning entries will be highlighted on this blog each Thursday before a new challenge is set to go live the next day.  In addition, Michele has generously offered up a $25 gift certificate to the overall winner at CAS-ual Friday stamps. And if that weren't enough, if the chosen winner has used CAS-ual Friday stamps and/or dies as the main focus in the card, that gift certificate will increase to $50.


So don't wait! Play with us and you can be our WINNER!

Monday, 1 January 2018

Last minute give boxes using BoBunny Fa-La-La with Irit

Hello my dear crafty friends and welcome to my new BoBunny Holidays post.
We are just close to  Christmas and sure some of us need a few last minutes gift boxes or tags.
So in this post I am going to share a few of these fast to make gift boxes made with BoBunny different products and one single Fa-La-La paper collection.
Usually we can hand cut the box shapes, to buy the templates or to use dies.
When I get a small gift box I  mostly unglue it and scan to trace the shape. Then I can use my Cameo and to cut the boxes. As I am truly techno dummy I don't change the sizes of my scanned boxes.
So three of my boxes today were made using my own cutting file and the envelope is a non- branded die I got as a present.
Here are all my gift boxes together: two rectangular small boxes that are just perfect for a small jewelry gift; one candy box that can be filled with candies; one pretty large pillow box that I like to use for jewelry or hair staff and one small envelope where you can add the gift card or just to use it as a gift tag for a larger bag.


And now for some close- ups to each box.
The first are the rectangular box and you can see them opened too. The chipboards were covered with a thin layer of BoBunny Sugar Glitter paste and glued over the die cut banner and heart.


The second is the pillow box and it's embellished with a few layers and a BoBunny flowers.
The layers were made with die cut pieces and then the sentiment card was added over them.


The candy box is the easiest one to make- just cut from any patterned cardstock, fold and tie the ribbons.
 This is the simple one to make and all you need is BoBunny gorgeous Christmas cardstock and some ribbons.


The envelope is actually a large folded heart and I added a sample photo to show you the shape before and after it was folded and glued. As I said I used the non branded die, but it's just 6*6'' heart shape that you can hand cut and then to fold to get this cute envelope done in a few seconds.


Supply list:
BoBunny products:
Fa-la-la collection 12*12'' cardstock:
Fa-La-La
Noteworthy
Sparkle
Santa Stripe
Be Merry
Double Dot 12*12'' cardstock:
Sugar
Wild Berry Dot
Wild Berry Chevron
Licorice
Sweetheart die
Darling Doily die
To and From dies
Nested Banners dies
Tick Tock die
Ornaments laser cut chipboards
Holiday laser cut chipboards
Wild berry Bouquet
Denim blue bouquet
Double dot ruby red brads
Double dot Aqua flourish jewels
Double dot Emerald jewels
Double dot Ruby red jewels
Sugar glitter paste
Pentart products:
Gold metallic acrylic paint

I hope that you like my small HOLIDAYS projects and I am going to show you a few more  complicated boxes using the very same BoBunny paper collection.
So see you next week!

Friday, 29 December 2017

Imagine the world full of magic

Hello my dear crafty friends!
Irit is here and I welcome you to read my new December post.
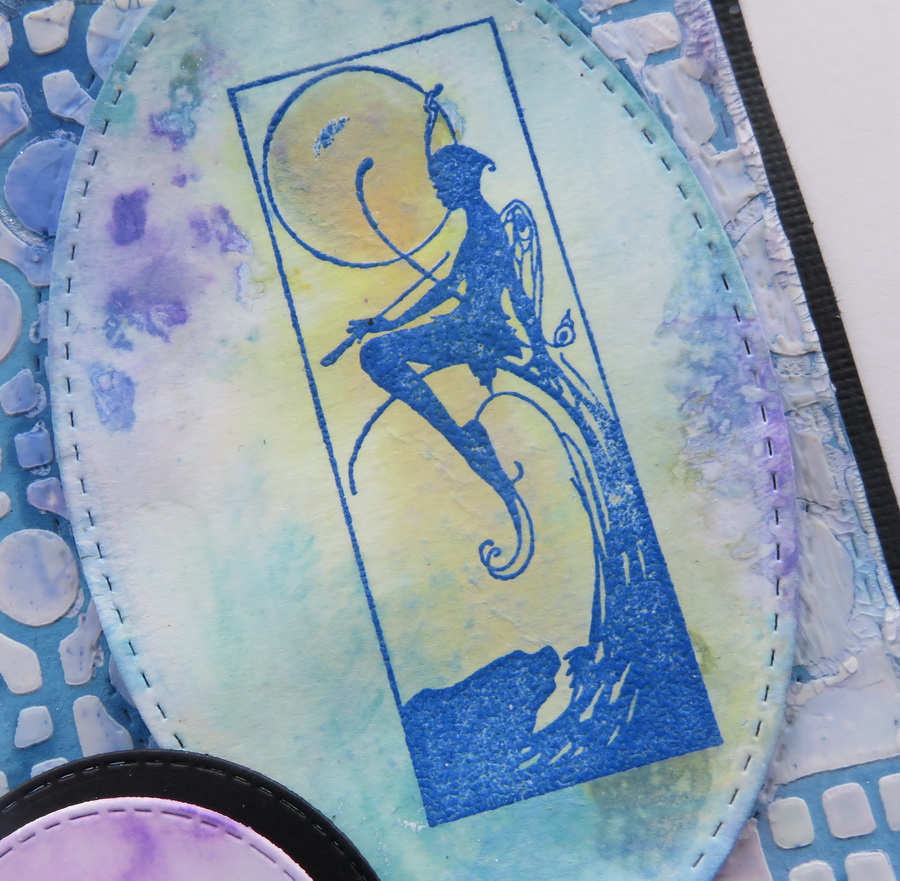
I made a new card not for any Holiday, but just as my artistic tribute to things that we usually forget about during our busy daily life. One of this things is imagination. We just don't have time  or energy to imagine things that are out of our regular range.
And this is a time to craft something magical and to imagine that it might be real. 
  
So as you can see I made this Mixed Media card with the most adorable Magenta  Fairy Tale Silhouette stamp and the background was made with one of the newest Magenta stencils.


My background was made with texture paste over the stencil and I also added a thin layer of Crackle Glaze over the edges.Then when it was dry I added Distress Oxide inks over the whole background and die cut the oval.
Then the fairy image was stamped with blue pigmented ink and heat embossed with clear embossing powder over another, just the same, die cut oval.


This stamped oval was glued into the die cut negative space that was made in the background.


The word Imagine was stamped, die cut and colored in the same way and glued over the card.


*****

Produits Magenta utilisés:
Magenta products used:


17.017.I


07.901


TM231


Thanks for being with me today and hope I inspired you a bit with my Mixed Media card.


Irit Shalom - DT Magenta


Art altered notebook cover with Topflight Stamps


Hello my dear crafty friends and welcome to my last for 2017 Topflight Stamps post.
This time I just used one single Rubber Dance stamps to make the altered cover of the small, card sized, notebook.


This notebook was " striped" from the inside pages that were then added after to cover was altered.
I used fabric for the cover and made it in this messy Mixed Media style using a lot of painted chipboards, texture paste and stencils on the back and a mix of paints and mists to get these grungy colors


The main image was stamped over the thick white cardstock using black pigmented ink and then heat embossed with clear embossing powder.
The colors were added with distress inks and some water over it.


This is the single Rubber Dance stamp I used to make this project:
Rubber Dance - Mona Lisa Stamp

I hope that you liked my altered project  and love Rubber Dance stamps as much as I do.
You can  buy this set and much more in the Topflight Stamps shop.
And if you wish to see more of my work you are kindly invited to my own blog.

Popular Posts