Saturday, 29 October 2016

Tando Halloween projects


 Hello my dear crafty friends and welcome to my Inspired by Stamping new post.
Halloween is just around the corner.So as my Home deco project for Inspired by Stamping I decided to make this spooky project and to leave you some time to buy those gorgeous Inspired by Stamping Halloween stamps.So just jump to the shop and buy this spooky amazing Halloween Labels set and Halloween Tags set! Not much left as those sets are ON SALE!

 So this chipboard house I made is  fully covered with stamped background images from
IBS set and the skeleton  from the Spooky Halloween set on the top is stamped and hand cut .

 There are 4 stickers over the top that are not IBS stamps as I just wanted  to add something that is
 not " hand made".
The whole piece is inked with a mix of distress inks and misted with red mist (kind of a " blood" drops)


And with the same stamps I also added another deco project: kind of a wall art made as an art page.
This piece is layered with stencilled texture using Tando Creative stencils and DecoArt paints.
The background is all stamped with Inspired by Stamping stamps from different sets  linked in a previous piece of art and then I added this  chipboard skeleton (Tando again).
 My tip to those who make such a project: stamp  with pigmented  ink and heat emboss the images with clear powder. It looks a bit mute without the heat embossing.


Products used:
Stencils, chipboards- Tando Creative UK
Paints, mists, crackle medium, texture paste-DecoArt
Inks- Clearsnap
Embossing powders- WOW! Embossing Powders
 Stickers- Paper House Productions

Friday, 28 October 2016

Inspired by Stamping card tutorial


Hello my dear crafty friends and welcome to my second post made this month for Inspired by Stamping.
We are close to Thanksgiving and this is a Thanks cards week on Inspired by Stamping.
So I made a Fall /Thanksgiving card using delicious Inspired by Stamping sets and here is my tutorial.
1. Stamp all leaves using IBS Happy Fall. set with gold Clearsnap ink over patterned BoBunny cardstock. This is a permanent ink, so just wait a bit till all stamped images are dry and then cut them out one by one.


2.Stamp the Sentiment using another IBS new released sentiment builder set-Sending you  and this time use pigmented gold ink and heat emboss with gold embossing powder.Thids time I used the reversed side of  a lighter BoBunny Double Dotted cardstock as I wanted the sentiment be totally clear.


3. Use BoBunny Tag dies and die cut the stamped sentiment and then add two more  die cut tag layers from the same cardstock.


4.Make the basic card from the light green cardstock. Die cut the Stitched rectangles layer from the dark cardstock and arrange all three layers of tags as shown.
 Arrange all hand cut  stamped leaves from both sides of the  sentiment tag.
Add a few random rhinestones.


Inspired by Stamping  stamps used:


Inspired-by-Stamping-Sending-You-Stamp-Set


Inspired-by-Stamping-Happy-Fall-Stamp-Set

Products used:
Cardstock, rhinestones- BoBunny
Dies- BoBunny, Elizabeth Crafts
Inks- Clearsnap
Embossing powder- Wow! Embossing Powders


Scrapmatts October inspiration: Travel layout


Hello my dear crafty friends! This is my layout made as a part of my inspirational post made for Scrapmatts company.
 I don't scrap myself too much, so whenever i have good photos and lovely projects I scrap a bit about our travels.
And as we travel a lot I don't even remember what country it was, also I am pretty sure is was somewhere in Southern or Eastern Europe and it was last year.
So I made this layout with DCWV travel collection and as always the Scrapmatts chippies are my real stars.
I added two circled chipboards around the title on the top and the subtitle on the bottom. Both were painted in dark red to add some additional color to this mute layout.
The subtitle is the Scrapmatts word TRAVEL painted in black and layered over Scrapmatts filmstrip (painted in black too).
All around the page I added green ink circles using Scrapmatts Circles stencil. It looks like a kind of leaves and complete the circles  that are present over the page.
A chipboard chain is added under the photo to frame it and to separate from the patterned background.
An here are some close ups to this page:


And here is a list of Scrapmatts products used on this page:


Thursday, 27 October 2016

Hello tag with Scrapmatts and Makin's Clay


This is my new altered tag made with Scrapmatts gorgeous Gears stencil using texture paste and then painted with a mix of DecoArt paints over is.
All borders and Scrapmatts chipboards are painted with gold acrylic paint.
The Angels are casted with Makin's Clay white clay in a mold from some unknown company and then lightly painted with the same gold paint.


The list of Scrapmatts products used here:


Wednesday, 26 October 2016

Holiday tag with Two Paper Divas


Hello my dear crafty friends and welcome to my last October post made for Two Paper Divas.
This lovely pretty small Christmas tag was made for a print submission and already was in print in Just Christmas cards and decorations! issue.
So now it's a right time to showcase it on- line.
The main stamped image is TPD fantastic You are the light stamp that was stamped with white pigmented ink and heat embossed with  white powder over a chalkboard style small tag.
Then the small tag was added over the bigger tag made with Canvas Corps cardstock and embellish with Paper House puffy stickers. The gold star is 3d  chipboard piece from Tando that was painted with DecoArt gold paint and  glued on the top.
I also painted inside the stamped image with the very same gold paint.


Tuesday, 25 October 2016

One lo three ways with BoBunny


Hello my dear crafty friends! Irit is here and  I welcome to my new BoBunny inspirational post.
This time it's One layout: three ways post and it's all about the most  odd Christmas I've even seen.
 I live in Israel and as you most probably know we celebrate Hanukkah and not Christmas.
But as our family loves to travel and I was born and spent my early years in a former USSR, I am a huge fan of all things Christmas and I love to make Christmas projects. But then making the OOP project or cards is easy. But even  if you don't have any Christmas photos with people on them you still can make lovely Christmas  layouts with everything around. And this layout is one of this kind: scrapping Cubanian Christmas trees.
Most of the people are not familiar with Cuba. So when we spent a couple of weeks there last Christmas it was unique thing to see how they do decorate all kind of artificial trees (they are tropical country without any real trees around), but that is all...
No Santas. No stockings. No red hats. No presents (hello, how can you buy any present with the totally empty shops and no money? ). But them they sing (not about Christmas); they dance and they are happy in their own way.
So here are all three levels of my layout here- from the simple one to the more Mixed Media one.


I used Tis the Season collection to make this layout and yes, this pretty much vintage line is perfect for this pretty much living in vintage country.
I used the back side of Traditions cardstock as my layout base. The matting of all three photos was made with Cranberry Dot cardstock that is a perfect fit for this collection. I added a chipboard layered stickers JOY title and finished the  title with a very old BoBunny sticker letters and one single sticker from the combo of this line. I love to make mixed titles. They look gorgeous and are very creative after all.
Then I added a corner cluster  with the date on it. 


The next level of this layout was to add some journalling that was made over hand cut from cardstocktags and tells a bit of the Cubanian Christmas story. To make it more interesting I added the top garland using both cardstock stickers and chipboards and connected the upper photo with this light bulbs garland.
 Let's say that it was all done for so called classic scrapboking, but I had to add some Mixed Media elements and those were added on the third version of this layout.


The only three things added here are some stencilled lines made with Gold Pearlescents and Serenity stencil over the minimal " white space" that was left.
Then I added pearlescent dots over the upper patterned paper with the same Gold pearlescents paint and Sugar Pearlescents paint and also it takes time to add it and to wait till it's dry it made the whole layout more textured.
And then I added two small flag stickers on the left of the main photo. This was a " repair" add on over the layout as I messed with the paint. But look how easy to can cover the " problem" with some of the flat cardstock stickers?  


And now some close- ups for you to see the details.
This one is to show the hand written journalling.


This one shows the pearl dots over the cardstock.


This close - up was made to show the dimension of the page.


And the initial corner that was left as is.


P.S.
After I made this post I realised that I have a spelling mistake on my title and it should be " Cuban".
As the layout is already made and glued I can't change it. Sorry for my English third language. I just translated it from Hebrew.

BoBunny products used:
Cranberry Dot cardstock Double Dot Designs Dot 12CR773
Tis the Season Pine  cardstock 20501703
Tis the Season Traditions cardstock 20501705
Tis the Season Peace cardstock 20501702
Tis the Season Layered chipboard 20509710
Tis the Season chipboards 20515711
Tis the Season combo stickers 20503708
Tis the Season Noteworthy 20513709
Gold Pearlescents 12741753
Sugar Pearlescents 12040601
Serenity Stickble stencil 10736462


Time Flies canvas with Art Anthology


Hello my dear crafty friends ! Irit is here again and this time I made a mini card size canvas with some gorgeous Art Anthology products.
This project was made because of a stencil. When I see Time Flies words I make a Mixed Media project that is all about time using clocks and gears and things that are connected to a time issue. But then working on 7*5'' canvas doesn't leave you a lot of space to add many things over. So I just add mediums and textures and Art Anthology products are just perfect for this matter.
Here how the finished project looks:

I made a full Snapguide tutorial for you and here is a link to it:

The full supllies list is  in this post HERE!


Altered Home sign


Hello my dear crafty friends and welcome to my small tutorial post made Susan K. Weckesser stamps.
It's an easy art piece that you can make in no time and the stamps that you can can be totally different, just fill the " window" with whatever you like. I made it as a kind of " Home" sign.
Step by step instructions:
1. Cover the black craft store puzzle with a thick layer of white gesso and let it dry. You can  also recycle the old puzzle in about A4 size if you have one.  Use Rebecca Baer Mosaic Medium stencil with Texture paste over the puzzle piece and let it dry.


2. Mist the dry piece with  Tattered Angels blue mist and .... you know, let it dry!


3. Take out a few of the central pieces and make the " window" inside the puzzle.
Stamp Susan K. Weckesser " Home"  sentiment using her TUMBLEWEED HOUSES  Unity co-branded stamp set with her Clearsnap ColorBox Color Pop mini Mystery ink  and glue it inside the puzzle as shown.
Stamp 4 houses with the same stamp set in different Color Pop mini inks in Kiss, Sky,Ice and Fresh colors and  hand cut them and glue over the puzzle.
Mist the whole piece with gold mist of any company.


Sunday, 23 October 2016

Travel Mini album with Scrapberry's


 Hello my dear crafty friends and welcome to my mini album tutorial post made for Scrapberry's blog.
I am not a big fan of mini albums, but if I decide to make one it should be easy to make and fun to receive.
So this album is one of this kind: really easy to make and great gift for anyone who loves to travel and to scrapbook the memories.
So here are all steps to make this small lovely album:
1. Find some good chipboard pieces to make the base of the album. This is a perfect time to recycle your old boxes or to find some good cardboard pieces around.
Cut two pieces into 16*12 cm size (6 1/2*4 1/2'') and one spine piece  into 16*3 cm size (6 1/2*1 1/4'')
Cut the cardstock a bit larger  so you have at least 1 cm to fold around the chipboards.
2. Use double sided glue tape and cover the chipboards as shown on the right top photo.
3. Cut another cardstock to cover the inner part of the cover (as seen on the left lower photo).
4. Cut another piece of chipboard in the same size as the narrow piece and cover it around with another piece of cardstock (as seen on the lower right photo).


2. Make 5 folds of natural twine around the thin covered inner spine piece. Tie the twine on the back of the piece and glue it over the cover inside as shown.


3. Cut 5 pieces of different cardstocks  to make your album pages. Each piece should be(22*15 cm  same as  8 3/4*5 3/4'' size and then fold each of those pieces into half.
4. Use stitched rectangle dies to cut the second layer for some of your pages (right top photo).
5. Heat emboss some chipboards for the cover embellishment cluster using clear embossing ink and black embossing powder. (Lower left photo).
6. Color some metal and polymer pieces with Alcohol inks as shown on the last photo here.
Not shown, but also done are some Scrapberry's white chipboards (hot air balloon and arrows) that were painted with distress ink and covered with 3d glaze.
Stamp the Camera with white pigmented ink and heat emboss with clear powder. Cut it out.


7. Die cut the background layer for the cover and arrange all the embellishments as shown over the cover.
Add the key hole embossed chipboard on the spine.


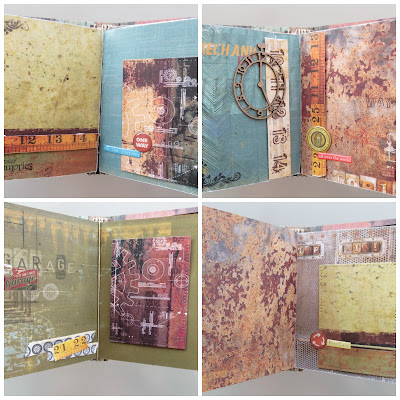
 Here you can see the close ups of  the cover.


8. Embellish all inner pages before they are inserted into the twine. 
Add some epoxy stickers,  more stamped images, some die cut pieces and leave the space for the future photos.


And some close ups to the stamped images over some pages.


Scrapberry's product list:
Edge of Town collection: Out of Time Double sided cardstock 12*12''
No Parking Double sided cardstock 12*12''
On the Road Double sided cardstock 12*12''
Metal and Memory Double sided cardstock 12*12''
The Best Deals in the State Double sided cardstock 12*12''
Mechanic on Duty Double sided cardstock 12*12''
Photo Archive stamps SCB4907011b
Photo Archive stamps SCB4907013b
Elegy: Precious Memories stamps SCB4904020b
Butterflies Best Things stamps SCB4907001B
Around the World set of metal embellishments SCB34001006
Around the World set of metal charms SCB250001059
Angel Wings metal embellishments, SILVER SCB341101
Antique Shop Chipboards SCB620001096
13 Colomns Set of polymer items SCB26001029
Around the World Curls SBC250001066
Around the World Epoxy Stickers SBC34001079b
Metal hangers SBC25013717-1

I really hope that you liked my small tutorial and my mini Travel album!
See you again in two weeks with my new Scrapberry's inspiration.


Popular Posts