Sunday 30 September 2018

Recipe stand with Canvas Corp

Hello my dear crafty friends! Irit is here today and I am going to share an easy and fun project made for our September" Let's orginize" challenge.


And a few more views of this project:


You can see a full step by step tutorial in a CCB blog HERE!


Monday 24 September 2018

Enjoy Every Moment decoration frame with CAS- ual Fridays

Hello my dear crafty friends! Irit is here today and I welcome to my new post made for CAS- ual Fridays  blog.
This time I decided to use CAS- ual Fridays stamps and die to make a lovely and totally easy to make home frame.


I got this black and white plastic frame for free and it was almost in the trash box. But then I've seen these CAS- ual Fridays Sands of Time 2 and Hourglass Fri-die on my craft table and BINGO!
This stamp set was a perfect match for this frame.
The central part is the main image that was first stamped and heat embossed and then die cut with the matching die.It was glued with 3d foam glue and the top and bottom die cut strips were inked with the same red ink and heat embossed with clear embossing powder.  
The upper and lower parts were used to stamp the sentiments from the same stamp set.
Everything was stamped on one single long white cardstock strip. Then the whole stamped strip was misted with light pink mist and added to the frame from the back (as it should be with photos).
Here are the CAS- ual Fridays products used to make this project:


And now to some close- ups for this project:


I hope that you liked my altered frame and remember- this stamped over the strip technique can be done with the hand made or die cut film strip frame too. 

See you  again in like two weeks!
Have a great crafty day!


Wednesday 19 September 2018

Winter Hi card with SNS


Hello my dear crafty friends and welcome to my last  Sparkle N' Sprinkle September reveal post.
I know that Winter is far away. But when you see this most adorable winter stamp and you like pinguins as much as I do, you jump to this Winter Hi card and just keep it for later. 
Anyway, it's so hot here in Israel right now that making something cool just gives you a hope for better days.
So this is the second Winter card made in ...July. 


The double background was made over white cardstock and then the second background layer was added using stamped and heat embossed acetate. Then another texture  layer was added with Glimmer paste over the acetate. The main image was stamped, heat embossed, colored and hand cut and then arranged over heat embossed chipboard piece. The sentiment I used  has two parts and I used just one upper part of it.

Product list:
Dancing Penguin set #00-013
Tear- ific tape 1/2''
Chipboard- Dusty Attic
Stencil


As always I made a full  and pretty long step by step tutorial for you to see HERE IN MY BLOG.
You are mostly welcome to my own blog to see the tutorial and them to jump to SNS store to buy yourself a lot of great products to make any of your Winter creations.

Here are some close- ups to my card:


Step by step:

1. Stamp and heat emboss large snowflakes over white cardstock.


Add more snowflakes to fill the space.


 Add smaller snowflakes from the Penguin set to fill more space.


2. Mist the stamped cardstock to get this resist- emboss effect.

 Wipe the extra mists as we want it to be mute and not so blue!


3. Stamp snowflakes from both sets over acetate and heat emboss it.


4. Stamp the main image using VersaMark and Black detail EP.


 5. Color the image with water colors.


 6. Add Raspberry Glimmer paste over the red hat on the image.


 7. Add Snow white flock over the hat, face and image body.

8. Use blue Glimmer paste and stencil over the stamped acetate.


9. Staple the acetate piece over the background stamped white cardstock.

10. Cover the bare chipboard piece with VersaMark and heat emboss with Vanilla Ice EP.


11. Stamp the sentiment. Arrange the chipboard and the imagew over it.


12. Add white and blue crystal drops over the acetate as shown.


Monday 17 September 2018

Thanks layout with BoBunny


 Hello my dear crafty friends!
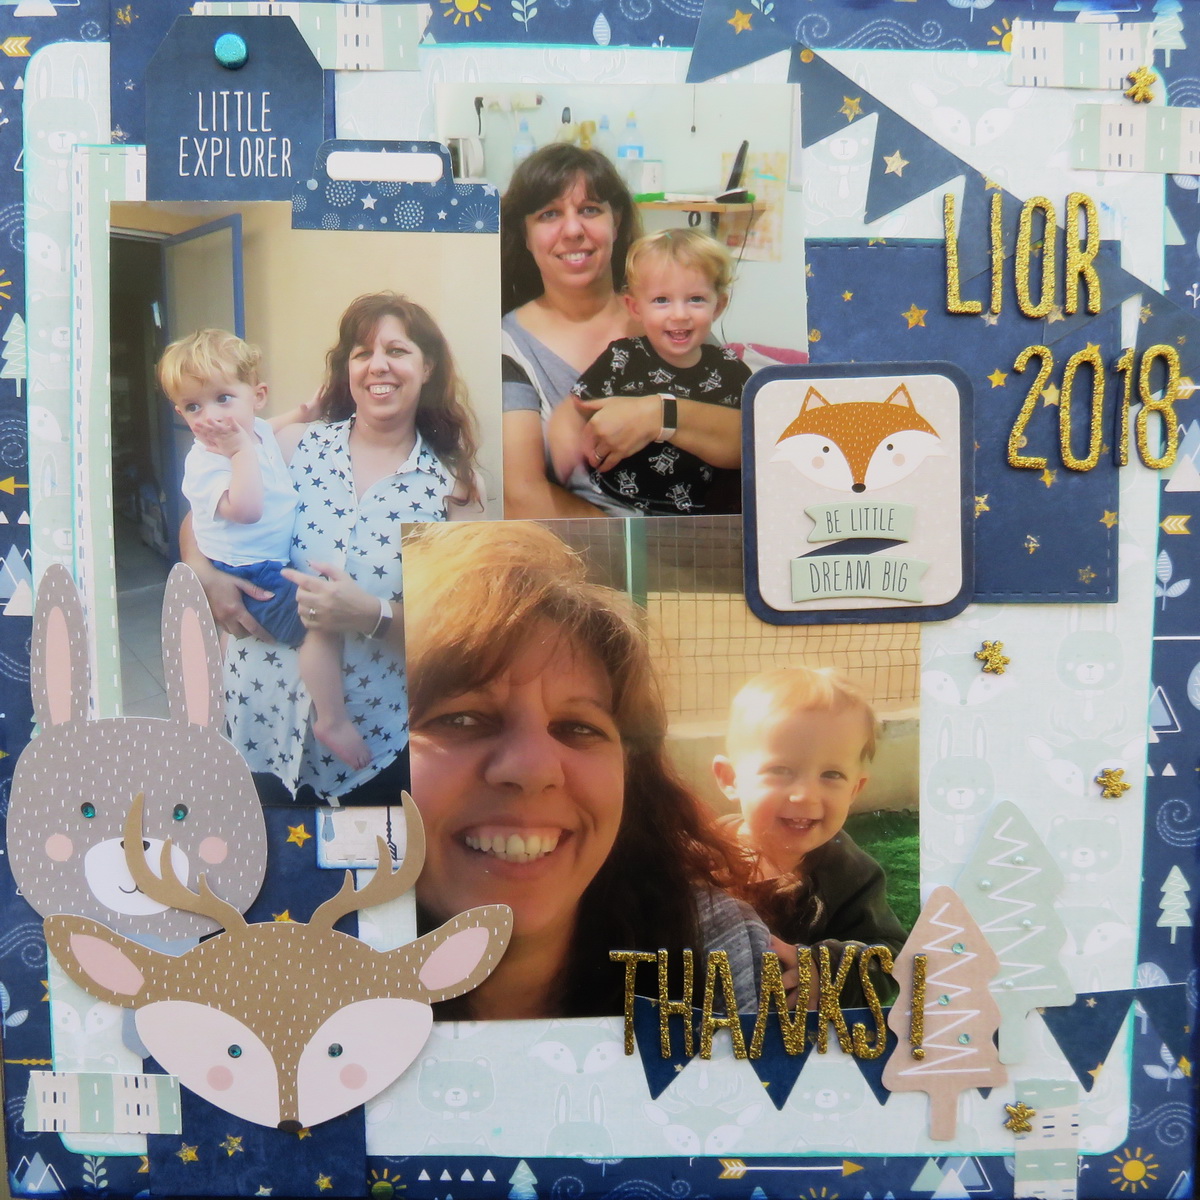
Irit is here today and this time I am going to share a layout made as a gift for the nursery staff .
 My third and most adorable grandson Lior spent a year and a half in this wonderful place and he is moving to the " big boys" kindergarten.
So my daughter asked if I can do a craft gift with some photos she made during the last months.
Yes, I sure can, even when the photos are totally out of my scrapping range (bad backgrounds, poor quality photos are not my usual scrappy mojo).
But then, with BoBunny cutest ever Little Wonders collection I made a nice multiphoto layout and as for the staff? They are not scrappers, so they just adored it even with the blurry photos.


 I arranged this layout over the wooden 12*12'' stand and there is an option to hang it on the wall too.
This is a totally classic scrapbook layout in a totally classic  style: cardstocks, few photos, title, sub- title, few paper embellishments and a lot of smiles.
I think, and you can connect with it if you feel the same way, that the classic and non Mixed Media scrapbooking is still the best.
When you have a pretty scrapbooking collection with some stickers, dies and photos you don't need to hide the smallest possible photo  under dozens of paint and mediums layers.
Make your photos the stars of your layout!
Make people smiles the joy of your creations!
Go back to classic scrapbooking as we did for ages and this will be the best gift ever!


 And now some close- ups to this page:


 Product list:
 BoBunny products:
Little Wonders collection: Little Wonders, Max, Elliot, Jacob, Evan 12*12'' cardstock
Little Wonders Layered chipboard
Little Wonders Noteworthy die cuts
Little Wonders Combo stickers
Little Wonders Alphabet stickers Gold Thickers
Double Dot Aqua Jewels

 American Crafts :
Color Wheel Mixed Media ink by Vicki Boutin- Blues

Thanks for being here with me today and see you with new BoBunny projects in the near future!


Monday 10 September 2018

Happy Thoughts with CAS- ual Fridays


Hello my dear crafty friends! Irit is here today with my September card tutorial made with CAS- ual Fridays most delicious stamp and die set- Peaceful Garden stamp set and Garden Fri- dies.


This card is made in a kind of " light Mixed Media style". The background  was made with Distress Oxides; all card was misted at the end; die cut pieces were  covered with embossing ink and heat embossed . But even after all these mediums/ inks/ powders this card looks pretty much clean and simple.


And these are CAS- ual Fridays products I used to make this lovely card:


 Here is a small step by step tutorial I made for you to follow!
1.Die cut card front from white thick cardstock. Die cut the oval frame to use as your stencil.


2.Ink the oval inside the stencil with three Distress Oxide inks as shown.


3.Stamp the leaves over the inked part of the card using black pigmented ink and heat emboss with clear embossing powder. You can use VersaMark ink and black embossing powder as well.


4.Add more stamped leaves and flowers around the main stamped image using the same technique.


5.Stamp and die cut two  more leaves.


6. Die cut roses; ink them with  ink and heat emboss with clear embossing powder.


7.Glue the die cut leaves and flowers over the stamped ones.


8. Stamp the sentiment on the card.


9.Cover the entire card with VersaMark ink and heat emboss over with clear embossing powder.


10. Add green ink splashes over the card.


11. Add enamel drops as flower centers and around the card.


I hope that you like my small tutorial and would try to make the similar card with all shown techtniques.

You can find the products in CAS- ual Fridays chop and to use my own discount if you wish to do so.


Popular Posts