Wednesday 30 September 2015
Let your faith be bigger than your fear with TPD
Hello my dear crafty friends and welcome to my last (5 th) Two Paper Divas post for September.
This time I used one single fantastic Let your faith sentiment stamp and I think it should be something we all can connect with: Believe in whatever you want, even if it's just in yourselves and you will nor fear!!
I made it over this Kraft cardstock and cut asymmetrically with some feathers added and an old fabric flower.
I love this sentiment a lot and will sure use it on my art pages again and again.
Labels:
card,
heat embossing,
kraft cardstock,
PRIMA,
stamping,
two paper divas
Tuesday 29 September 2015
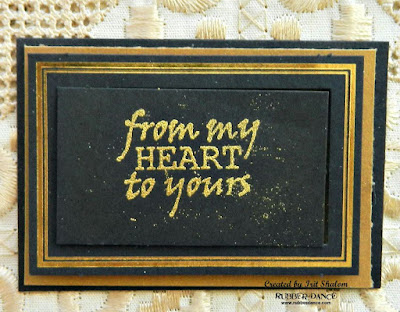
Mini cards with Rubber Dance
Hello my dear crafty friends! Today I am going to show you how we can take some paper frame leftovers and to make a few lovely mini cards for all occasions.
Those black and gold small frames were the inside of some very old in my stash black photo frames. So I made another black and then gold background and then stamped Rubber Dance lovely sentiments from Just s note set with clear embossing ink and gold heat embossing powder.
I didn't try to leave it clean: I really love those gold lines, splashes and spots and even my golden fingerprints around. This is a kind of Mixed Media minis for me and MM is never too clean.
Monday 28 September 2015
Make a happy Holidays tag with ETI
Hello my dear crafty friends and welcome to my new post made for ETI.
This time it's my own " old new" technique : making molds from clear acrylic stamps and casting them with ETI resins.
So here is a finished tag I made with this technique:
And here is another project made with the same mold, but with air dry white clay painted with acrylic paints over the dry shape.
Keep your molds as you can make more and more Christmas embellishments with those gorgeous molds and ETI products.
This time it's my own " old new" technique : making molds from clear acrylic stamps and casting them with ETI resins.
So here is a finished tag I made with this technique:
First find a large Poinsettia acrylic stamp with leaves. The one used was from Inspired by Stamping stamp company and it has a good thick acrylic material (checked already and easy to mold without getting the whole stamp purple).
Then grab your beloved ETI Easy Mold Silicone putty and make your mold.
I didn't have a photo of this step, but you can see the finished mold in the next step.
And those are the dry molds filled with Easy Cast Resin over the red and green glitter layer.
First add the glitter inside the molds and then fill with a layer of mixed by the manufacturer's instructions ETI Easy Cast resin.
Make your Holidays tag and add the casted Poinsettia and leaves over it as shown.
Let it dry for at least 24 hours.
Now make your tag and add your casted unique embellishment over it.
And here is another project made with the same mold, but with air dry white clay painted with acrylic paints over the dry shape.
Keep your molds as you can make more and more Christmas embellishments with those gorgeous molds and ETI products.
Labels:
ETI,
Inspired by Stamping,
makin's clay,
stamping,
TAG
Sunday 27 September 2015
Make your memory book cover with ESF
Hello my dear crafty friends and welcome to my new project made with Earth Safe Finishes gorgeous products.
This time I made a Mixed Media mini book from a chipboard Tando set and made photos of all steps. So you are welcome to make your own similar or different book cover using those techniques.
Product list:
Chipboartd book kit- Tando Creative
Mask- Tando Creative
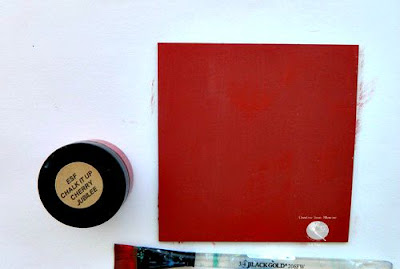
Paints: Chalk it Up English Tea Cake, Cherry Jubilee, Milk Chocolate - ESF
Crackle- ESF
Texture paste- ESF
Copper Iridescent Powder - ESF
Step by step directions:
1. Paint the front window piece and the back cover piece of chipboards with English Cake Chalk it Up paint and let it dry.
2. Cover both painted pieces with crackle and let it dry.
3. Paint the inner chipboard (the one that will be layered under the window cover) with Cherry Jubilee paint.
4. Make the poppies using the mask and texture paste and let it dry.
5. Cover the dry textured poppies with Copper pigment.
6. Go back to the dry crackled pieces and paint over them with Milk Chocolate paint. Don't make more than one single layer as we really want to see the crackled effect.
7. Add a thick layer of Copper pigments over the painted cover.
Arrange the cover as shown . Add a metal corner, a button and a stickers title on the low right corner.
Arrange the whole book with a spine (chipboard piece that was painted the same way, but not shown on photos) and the back cover.
Enjoy your new creation!
Labels:
ALTERED,
crackle,
earth safe finish,
mini album,
paint,
stencil,
Tando
Saturday 26 September 2015
Happy Halloween jewelry with Makin's Clay
Hello my dear crafty friends and welcome to Makin's Clay Halloween month!
Let me first say that I don't celebrate this holiday, but I sure love it.
I love the colors, the images and the overall feeling of those ghosts, bats and pumpkins and I like them so much that I create a lot of projects using those images even without any tight connection to the main meaning of Halloween.
So for this post I decided to make a fancy scary necklace and those are the steps to make the very similar one if you like mine.
1. Using your Makin's Ultimate Clay Extruder and the disk with 5 round holes make 5 long round strips from Makin's black Clay. For now let them all air dry a bit and move to the second step.
3. Use Halloween B cutters set with another texture sheet from the very same set over the black clay sheet and cut some Halloween shapes. Cut a couple of ghosts from white Makin's clay.
I wasn't sure if I want black or white shapes over my necklace, so I made these and those and as I finally used the white ghosts I used the left overs for another project. I only used one black bat on the top of the pendant later.
4. Roll all 5 round strings together and cover them with a mix of shiny pigments.
I used Pearl Ex ones, but you can try any pigments you own.
Cover the ghost with a thin layer of liquid resin /glaze and add some clear glitter and let it dry. Add a simple magnetic closure to the back with good jewelry glue.
My tip: buy a cheap $1 store jewelry piece with magnetic closure (bracelets usually cost around $1) just to use their closure as at least here, in Israel, the closure only costs more than $1 for a piece.
Arrange your fancy scary necklace as seen and enjoy!
Labels:
cutters,
extruder,
jewelry,
makin's clay,
texture plate
Friday 25 September 2015
Embellish your notebook
Hello my dear crafty friends and welcome to my September Bella blog post!
Today I am going to show you how you can embellish your notebook/planner/album with hand-made polymer clay flowers made from Makin's air dry polymer clay with die cutting, dry embossing and stamping. Seams a lot of work? Not really. It's just a few very simple steps and you can do it in no time.
Products list:
Makin's Clay- White, red
Sizzix die- Tattered flowers
Cuttlebug embossing folder- Flowers
Stamp- Rubber Dance
Ink- Ranger black permanent
Paint- ESF Ann Butler's Iridescents Sheer Copper
Bling- craft shop
Old notebook
Step by step instructions:
1.Mix white Makin's air dry polymer clay with just a small dot of Makin's red clay. You can add more red if the color is too light , so just add red clay a bit after bit. Roll the mixed clay with Makin's Clay machine into #3 setting. This is a setting that fits the die cut devices. Use Sizzix die to die cut your flowers and let them air dry just a bit.
2.Use permanent black ink and small script stamp from Rubber Dance stamp company and stamp over the almost dry die cut clay flowers.
3. Use embossing folder and dry emboss your dry stamped clay flowers.
4. Arrange your flowers over the blank note-book in your desired flower cluster. Add flower centers and a few shiny leaves.Glue them to the notebook with good adhesive and enjoy!
Labels:
ALTERED,
Ann Buttler,
die cut,
dry embossing,
earth safe finish,
makin's clay,
Rubber dance,
sizzix,
stamping
Thursday 24 September 2015
Fall into Autumn lo- September themed project
Hello my dear crafty friends and welcome to Paper House Productions themed week. Themed project means we used themed papers and stickers for our project and Fall - just around the corner- is a perfect theme for a perfect products. But I didn't find a lot of Fall themed papers in the shop, so I just made my own " themed kit" with very similar papers in fall style.
So here is my Fall layout and PHP 3d sticker title says it all : Fall into Autumn with my lovely photos and those lovely papers and stickers that made my layout.
Living
in Israel makes a real fall to be something you can see only out of the
country. We actually have only Summer and then a very hot summer. So I try to
catch fall photos whenever it's possible and this is a mix of them on this page
without being sure where exactly I took them (Europe, 2014- this is for sure).
I
worked with themed patterned paper and just one single package of fall themed
stickers and made my own sketch for all 5 photos.
Product
list:
Patterned
paper- PHP
Embellishments:
Leaves- Flourish with a Bling
Directions:1.Cut the Leaves paper to 11 1/2*11 1/2'' size. Distress the edges and glue it over the basic
paper with a little diagonal twist as shown
2.Cut a few strips fromAt the lake wood paper and add the 1/2'' strips cut from basic paper vertically on the left side of your page. Distress them all before adhering over the page.3. Make matting from At the lake wood and Lowland Camo paper and glue your 6*4'' trimmed photo over the matting. Then glue the matted photo on the top right of your page.
4. Trim all other 4 photos to 3*4'' size and make the matting for those photos. Glue them over the strips as shown. Add 3d Fall stickers, one photo sticker and one canvas sticker as shown.
Add plastic leaves under the upper sub- title. Make your hand written journalling on the bottom of the page with white pen.
Out of the Blue- and Proud: VLVS TUTORIAL
Hello my dear crafty friends and welcome to my new tutorial made with delicious (even if those are a bit odd) VLVS stamps.
As you all know I always have a story to share about the " brainstorming" of my art piece.
So this time it's not different and here is a story.
I ordered VLVS whimsical stamps as I wanted to get some stamps that are totally different from my usual Mixed Media picks.
Then, when those stamps came, I was not sure about them. They are gorgeous, but so much not me.
At that moment I felt that I was " out of the blue" ordering them. But them it was like" let's make lemonade from the lemons": lets make " Out of the Blue" piece with blue shade and some new slogan.
So this is how my own " OUT OF THE BLUE AND PROUD" slogan was born. I think that it can be used in many different ways, just like this " Keep calm and..." one.
It can be "out of the blue and going " or" out of the blue and dreaming" or even " or of the blue and feeling great". But those will be used next time. Today I am totally proud with my " OUT OF THE BLUE" 3d foam cube.
So here is my step by step tutorial:
1. Paint the foam cube into a shade of blue color; pick the color that is not totally blue, but close to it.
I used Earth Safe Finishes Rock Candy Chalk it up paint and made just one single layer that covered the foam perfectly.
3. Color the stamped images with distress markers and ink them over with distress inks. I tried to make them colorful, but to stay mostly in blues (remember the title? ).Add two more stamped images cut outs : those will hold the title panel.
4. Glue all 5 stamped piece over the painted cube. Leave the bottom as is.
5. Make the title panel using a chipboard. chipboard and sticker letters and 2 stamped cut out images.
I painted the chipboard with inks and clear embossed it . The letters were colored two using different markers and inks. This is how the top panel is looking.
6. Glue the title panel over the cube and your project is done.
This is one side look of it.
And from other side:
And from the back:
I also painted the back as this 3d project can be seen from all corners.
And from the top:
Now this " OUT OF THE BLUE" cube is on my craft table and I am totally proud of it!
Hope you like it too.
Stamps from VLVS used to make this project:
Grunge circles Item 19563 Plate 1451
Whimsical rat Item 19531 Plate 1448
Whimsical Beaked Guy in crown Item 19530 Plate 1448
Whimsical Jester lady Item 19521 Plate 1448
Whimsical Beetle man Item 19525 Plate 1448
Whimsical key man Item 19527 Plate 1448
Whimsical star hat lady Item 19526 Plate 1448
Whimsical Man face- Fish Item 19678 Plate 1457
Other products:
Ranger distress markers and distress inks
American crafts Thickers
Chipboards from different companies
Labels:
AC,
ALTERED,
chipboards,
Clearsnap,
distress ink,
distress markers,
heat embossing,
stamping,
VLVS,
wycenanka
Wednesday 23 September 2015
We are blessed with TPD
Hello my dear crafty friends and welcome to my new Two Paper Divas post!
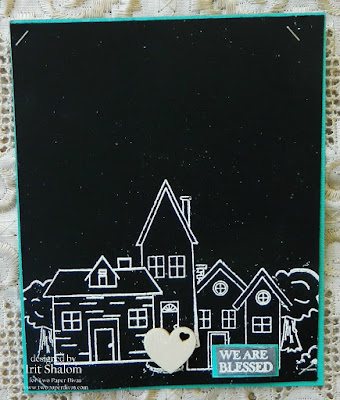
This time I made this masked CAS card and I love the result a lot.
I used this new and most adorable My neighbourhood set and stamped with white ink and heat embossed with white powder.
I made masks from all houses and made this scene as a background for my cut from In this house sentiment: WE ARE BLESSED.
I think those little houses are Home and we all are blessed to have one. So this wooden heart of love was added over the card.
Labels:
AC,
card,
heat embossing,
stamping,
two paper divas,
wood
Subscribe to:
Posts (Atom)
Popular Posts
-
Hello my dear crafty friends! Irit is here today and I want to welcome to my new June post made for CAS- ual Fridays blog with their mos...
-
Hello my dear friends! A couple of weeks ago I was aksed by Michele Gross, the owner of CAS- ual Fridays Stamps company to take a part in t...
-
This work made Top 3 on Pocket full of posies wings challenge- thanks!! This work made Top3 spot on Elephantastic challenges- thanks!! This ...
-
This card was one of the Pink elephant pink challenge winners- thanks!! OK- it's Valentine all over the web- I just don't have time ...
-
I still have lot of stash I got as a Rak to do some Halloween web chalenges- and to keep the finished projects for my American niece . So...
-
This box was a winner on Get sketchy sketch challenge- thanks!! This box made Top 3 at Die cuts r us challenge- thanks!! This box made Top 3...
-
Hello my dear crafty friends and welcome to Die Versions and OWH BLOG HOP! With this March new military release it was just natural t...
-
Sparkle N Sprinkle and Die-Versions are partnering up for a very special joint blog hop, called the Awareness Campaign. A porti...
-
Weekend again and I have some time for crafting, so this time I decided to try an apron tea bag holder. I know there are some apron template...
-
Hello my dear crafty friends and welcome to my new Mixed Media canvas post. This time I decided to make a Mixed Media canvas as this is one...


