Tuesday 30 December 2014

My vintage love : altered canvas

Hello my dear crafty friends!
Close to the 2014 end (just two days left) I decided to close my year with a project that shows my love to all things vintage. This is an altered Mixed Media canvas I made with Rubber Dance stamps and for Lindy's Stamp Gang December challenge.
I think they  were asking for the lighter colors, but I did used 3 of the mists in the challenge set and that's what I got with a lot of layers, texture paste, gesso, glitter and some acrylics techniques.
Pretty  much dark. So let it be.
 Let me show you some close-ups too: all flowers were white and I changed the colors with LSG mists.


Tibetan Poppy teal
Rizzo's Rowdy Red
T-bird Turquoise


I also enter this to Anything goes for Imagination crafts
Anything goes for Simon Says blog
Artistic stamper - Anything goes


Dream with Meg's Garden

Hello my dear crafty friends!
Irit is here again  and this time, after a few months of altered art made with Meg's Garden gorgeous products, I am back to scrapbooking.


The new French  Garden collection is the most perfect one to make dreamy, shabby and colorful layouts and this is the first one of this kind.
I used the patterned paper as my background one without any cardstock and added a few bog  and cut pieces from another paper from this collection.  Lucky me had those delicious  peonies photos  that are the perfect fit for the paper. I added background texture paste masking with  light and dark green pastes and surrounded my photos with Die- Versions die cuts of background, fence and bird cages, all made of the same patterned paper.

My photos were actually embedded into the background as I added  some pieces under, over and in between photos.


Transparency butterflies from More Butterflies set were hand cut and glued randomly over the page.
I added some vintage metal findings from Meg's Garden shop over the piece paper and embellished them with pearls. Some trims  and ribbons were added too. As the last touch I added 3 big flowers, some doily trims and a big chipboard heat embossed title.


All the page was misted with a mix of light yellow and pink mists.


 Meg's Garden products  used:
 French  Garden collection
More Butterflies transparency
Vintage metal trinkets
Paper flowers
Doily lace
Fibres
Ribbons
 Other products:
Die Versions dies
 Sweet Stamps chipboard title
LSG mists
TCW and Tando Creative stencils
Texture paste
Pearls

Monday 22 December 2014

Be true Mixed Media art

Hello my dear crafty friends!
This is my altered new canvas made with Rubber Dance stamps and Tando Creative masks.


First I made the texture over the background with pieces of paper, chalkboard paint and a lot of misting. Then I made the masked images with texture paste and then stamped over the dry (wait a lot) background and added white shadows around the images.


I used Something Wonderful set  sentiment from Rubber Dance company , leaves from Twiggy  Leaves set and made a kind of a frame around with Fluorishes  stamp.

Thursday 18 December 2014

Life is what you make it


 This is very easy fancy card made in second!
Try it- just use Paper House Productions paper pad and some stickers. 
Products used:
Blossom Paper pad
Enjoy the Journey 3d stickers
 Other products:
Light blue and light green cardstock
Green dotted ribbon
Twine
 Light blue mist
Pink and blue mist
How to make this card:
1. Make the basic light blue card; add lime layer over it; round one side corners.
2. Round all 4 corners of pink paper from the pad and adhere it over the cardstock.
3. Cut 3 strips from stripped paper from the same pad and make free hand banners. Glue the banners over the pink paper. Tie the ribbon as shown, make the small bow and tie the bow with twine.
4. Add all stickers as shown. Add a few drops of light blue and red mists a few small green pearls all over the card.


Tuesday 16 December 2014

Happiness card with Rubber Dance


 My new Mixed Media card made for Rubber Dance company.
Supply list:
Cardstock: White, yellow- American Crafts
Inks: VersaMark- Tsukineko
Stencil: Memory Box
Embossing Powders: WOW! Embossing Powders
Rhinestones: Molossi
Punch: Martha Stewart
Other: Texture paste
How to make it:
1. Make a basic card with white cardstock. Make the second yellow matting a bit smaller than the basic card and adhere it to the white base.
2. Punch a circle and glue it over the centre of another white cardstock piece as we want this place to be without texture paste after we will use the stencil. Add texture paste over the stencil and peel the stencil off after a few seconds. Sprinkle a mix of red, yellow and sparkle embossing powders over the wet masked texture and heat emboss it.
3. Stamp the sentiment over another punched white circle and heat emboss it with black powder. Make a mask with another stamped sentiment and then stamp the background script with clear embossing ink. Heat emboss with red powder and peel the mask off. Glue the sentiment over the card and add some random rhinestones.


Monday 15 December 2014

My dark side window: RSM PRINT PUBLICATION

 This Mixed Media piece of art for print published in Rubber Stamp Madness Fall 2014 issue and it's a time to showcase it  in my blog too. 
I used VLVS stamps, Creative Embellishments chipboards, WOW! Embossing powders, Ranger paint and inks and some old ABC stickers and a metal charm. All together- this is a window to a dark part of my soul. My Steampunk part of it. My " sometimes" art. Myself. 
Hope you like it as much as the magazine editor loved it.


Saturday 13 December 2014

Ann Butler's Designs and ETI Designer Blog Hop


Welcome to the Ann Butler Designs/ETI Blog Hop! Please visit each blog and leave a comment to be entered for the blog candy. YES, a comment on EACH blog gets you an entry for the BLOG CANDY shown below! Share the fun with your friends! We will Pick the winner on Saturday the 20th and announced on the Ann Butler Blog and ETI blog! Again, make sure and visit all the links and leave a comment.
Due to Blogger changes it asks for a word verification- you can post your comment and to ignore the word verification and it works (a very new bug of Blogger...). Just comment and that's it!


First the story:
I decided to make an altered canvas with new  Ann Butler's Stars Art Screen from Clearsnap. So I added textured stars, a lot of Ann Butler's inks such as Crafter's Aquamarine, very new Ocean Breeze and Blueberry and some stamps from Ann Butler's Unity 1'' Stripes. Dots. Hearts using Clearsnap Surfecez Black ink. I was not sure what this is going to be. Then I had  to add some ETI products and I still  had no idea what my final project is going to be.
Grand kids came and the oldest, now almost 4 years old, asked to see his  old photos. And here it was- watering a rose  a Little prince of our family.
I went to the web to pick a good quote from one of my most loved childhood books and the quote I loved had both stars and a rose on it. And this is how this art piece was born.
Please say hello to my own Little Prince and his lovely rose.

And now for some techniques used here with ETI PRODUCTS (some pieces were made for another projects, so not everything on those photos are relevant to this blog hop).
The lover pale blue circle was casted with Jewelry Clay  and I added some crystals using  this Scraperfect Embellie Gellie to pick those small stones and to fit them into this Plaid mold.


 Then I mixed both equal parts of ETI Jewelry Clay . Please, use gloves with it!

For the next step I added some ETI Resin  Transparent Dyes / Opaque Pigments and casted the clay for a long day and night and day... Not sure how long, but it was a hard step for this hyperactive  lady here. There finished casted pieces were used for different projects and I just added two circled ones over this canvas using a leftovers of already mixed ETI casting Resin.


Now for the rose  piece:
This one was made with EntroviroTex Lite  High Gloss Finish resin and Red pigment color.
Mix them  exactly by instructions and you will get the most lovely casted resin roses ever!
Again, wait, wait, wait..

Here is a close up to this gorgeous rose! I used the other 2 for another projects and even had more of this red resin to make the pendant for another project.

Some of the leftovers were dropped over the finished canvas too.


And now for the " planet" shape technique- this is a round piece the photo stands over, full of glitter and really the most beautiful piece of this canvas. My photos didn't  make justice to this piece.
Use the round ETI mold and use their Mold Release conditioner before you cast resins into it. Let it dry.


Mix the Easy Cast Craft Resin and fill the ETI  mold to the 1/3 mostly as we really don't need it to be too high. Add some teal/ blue glitter over the liquid resin and... You know the drill! Wait, wait, wait... And wait again. 


Actually the level I had was low, so I added another mix of resin over it and added a bit of Clearsnap clear glitter. No photo of this part- sorry.
 As I had some clear resin leftovers again, I made some drops over the canvas and added  more clear glitter over them. Nothing was lost! That's the best part of making an altered art or Mixed Media project: there is no right or wrong! There are no mistakes!  Anything and everyting goes! 
So here is my finished canvas again


I hope you  loved my project and please ignore this Blogger's Word Varification thing, as this is a new bug. 
Your next stop is Kristi's blog


Thursday 11 December 2014

Snowflake key chain and altered kids puzzle game: last minute Holidays gifts with IBS

Winter is right here and the last minute  Holiday gifts too. So here we go with 2 quick last minute  possuble gifts to make.


This is my new altered jewelry piece in  Mixed Media style. As you can see the whole chain is a mix of jewelry findings and stamped with Inspired by Stamping snowflake image charms from Elegant Christmas Sentiments set.
I stamped the snowflakes with blue pigmented ink, heat embossed it with clear embossing powder and then covered with a clear plastic bubble as it's a true wearable piece  of craft.
The beaded rectangle is my own crystal beading (never again as it was hard ad long  crafty experience) and the whole piece is a lovely wintery gift.


And now for a second possible quick gift: altered kids stamped  puzzle game.

This is a really easy, 10 minutes to make, altered kids toy piece  made with one single and most gorgeous  IBS winter stamp from December 25TH set.  I am really sorry that I didn't take a " before" photo, but is was a Smiley  round image over this  moving parts 10 cents  plastic puzzle. Lucky, the smiley face size was just the perfect match to this lovely stamp , that was stamped with dark blue ink over a simple white cardstock and then heat embossed with clear embossing ink. The circle was hand cut with craft knife over the original lines  and then covered with a thin layer of glossy medium to make it durable for kids play.The outer frame was covered with  clear glitter for this fine wintery look.
This is a  perfect piece for a " mass production" of gifts: cheap, one stamped image only and makes an easy and lovely gift.

Wednesday 10 December 2014

I love you with Ann Butler's products


 Hello my dear crafty friends!
Today I am  going to share my Mixed Media card- small one- made with Ann Butler's fantastic products.
I made two  die cut frames with CLD cardmaker's dies from a thin white chipboard and inked the outer one with Aquamarine Clearsnap Ann Butler's ink.
The inner frame was painted with Night ink in this " non perfect way" and after the ink was totally dry  I stamped I and U letters with Ann Butler's Flourish 2'' ABC set  from Kellycraft with Snow ink and heat embossed it with Clear embossing powder from Clearsnap.

Then I inked the wooden heart- just a bit - with Ann's inking tool and made a few blue dots with Aquamarine reinker. Then I inked around the black board to fill the white spots and glued the blackboard over the blue frame.


Products used:
Kellicraft 2''Flourish ABC
Wycinanka wooden heart
CLD  Cardmaker nested dies


Monday 8 December 2014

Rubber dance Dream frame with tutorial

Hello my dear crafty friends!
Today I have two whole tutorials for one art piece I made with Rubber Dance stamps. 
Introduction:
This project was made with two separate tutorials: one for a frame and one for the central stamped art piece. I made one tutorial for both parts of the project with one supply list, but they can be used as two separate ones with separate supply lists.


Supply list:
 IMAGINE Crafts/Tsukineko: VersaMark Watermark stamp pad, StazOn inks: Blazing Red, Azure, Mustard; Walnut ink Antiquing Solution: Terra Cotta, Walnut Ink; Goosebumps Clear Texture Spray; Shimmer Spritz Sparkle, Jumbo  dauber; Fantastix tool
TCW: Wood grain stencil
Prima: Flowers
Flourish with a bling: Pearls
Other: white chipboard, ruler, gesso, glossy cardstock


Step by step instructions:


1. Stamp your Dancing Lady stamp with VersaMark ink over 8*6'' glossy cardstock and heat emboss with fine black embossing powder.


2. Cut a piece of a cardstock around the stamp to use as your mask and adhere it to the stamped image with repositionable glue as shown. Stamp around the mask (and over it) to make the background with two background stamps (Music and Lace) and add Art and Dream words on the left bottom of your stamped 
piece. Use the same VersaMark heat embossed black embossing powder technique as we did previously.


3. Take some smaller stamps and fill the gaps around the image and on the background with the same technique. Add some stamped dots using the backside of some round brush or another small round tool, stamping directly into the pad and then heat emboss the dots in the same way as we did before.


4. Gather three StazOn inks that will be used as primary inks to make the rainbow look of our stamped and heat embossed image. Use three Jumbo daubers to spread three inks around the stamped piece and try to connect them to make this piece rainbow perfection. Those three StazOn colors work as primary ones and we can make all seven rainbow colors using just those three.

5. Mist your colored art piece with Shimmer Spritz Sparkle and when it's dry add some Goosebumps Clear Texture Spray to get some more interesting texture. Let it dry as we are moving to the Faux Wood frame tutorial for a few minutes.


6. Make your own brush tool: cut with scissors each second row inside the old or bad and unused tooth 
brush. Apply gesso with this brush over the A2 piece of thin white cardboard and let it dry.

7. Make wood grain texture with more gesso and a wood grain stencil over the first gesso layer. Let it dry a lot!


8. Spray some Terra Cotta Antiquing ink over the dry wood grain texture and add more over the edges and less in the middle. Wipe the extra ink with baby wipe and add some more layers if you want your "wood" to be dark.

9. Make the faux plaque look with adding some dark ink lines with a simple metal ruler. Use Walnut Antiquing ink and Fantastix tool to make all those lines.


10. You sure don't need a tutorial to make this frame from your Faux wood piece and to insert the art 
piece (really should be dry now) into the frame. Embellish it as you wish and enjoy your creation!


I enter this to All thingds distressed Virginia's View challenge


Sunday 7 December 2014

Princess Birthday with IBS


   This is a card made with  Inspired by Stamping Princess stamp set that was just perfect for PHP Little Girl paper pad and
as I stamped over the patterned paper it's in the same colors and so much fit together with all those Birthday stickers too.


Friday 5 December 2014

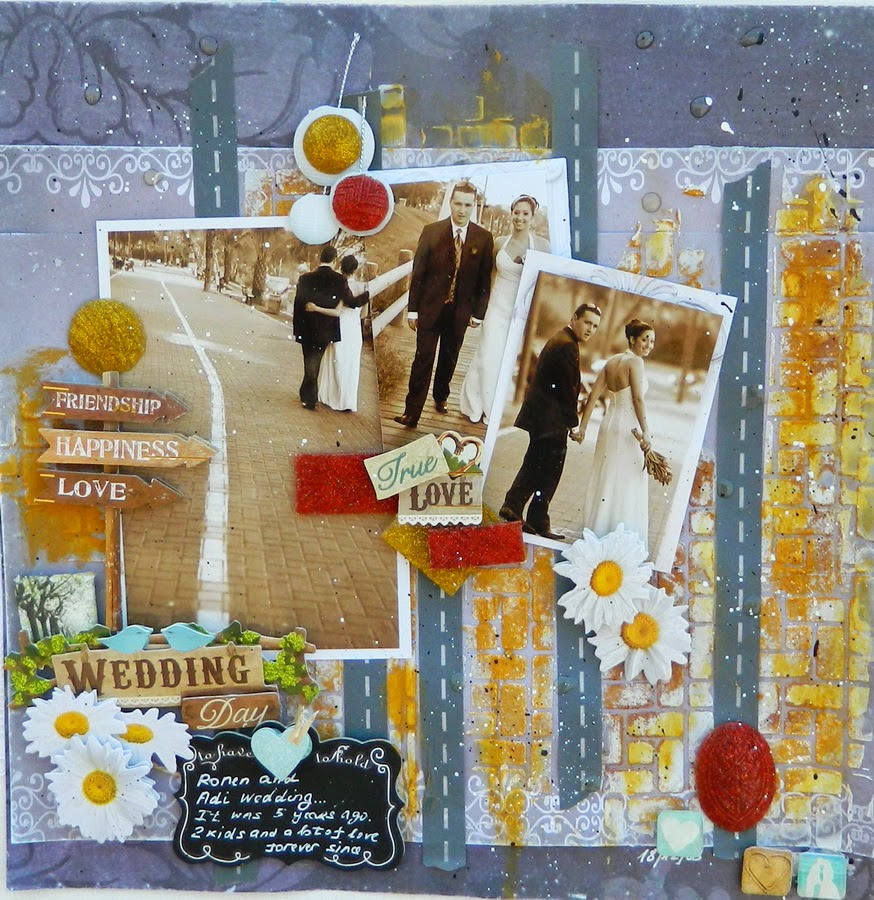
Wedding day: PHP and Plaid project

  Hello my dear crafty friends!
Welcome to my blog!
Today I am going to share a layout made with PHP and Plaid products.


Products used:
PHP
To have and to hold paper pad
Wedding 3d stickers
Wedding chalkboard stickers
Nature canvas art stickers
Daisies 3d stickers

Plaid:
     Patterns mold
Mod Melts Christmas colors
Yellow ochre, Licorice, Wicked White FolkArt
Mod Podge Satin
Foam brushes
Dimensional Magic

Other products:
Stencil- Sweet Stamps
Texture paste
Embossing powders
Washi tape

Step by step:
1. Cut the gray paper to 8*12'' size and distress it around. Using stencil make the brick road stripes with texture paste and then heat emboss it with some earth tones powders. Paint a bit over with Yellow Ochre acrylic and let it dry. Add 5 strips of road signs washi tapes vertically as shown.
2. Trim three photos to the desired sizes, make some matting with journaling cards from the paper pad and glue photos with 3d foam glue.
3. Make mold with red and gold glitter Mod Melt and Patterns molds. Let it dry and trim around. Make handwritten journaling over the chalkboard sticker. Make the lower left cluster with canvas sticker, Wedding day title sticker, some daisies and chalkboard sticker.
4. Add arrows sticker over the lower cluster and glue one of the molded shapes over it. Make lower right cluster and glue another molded shape. Make "True Love" small cluster with 3 molded shapes and the sticker. Add two round molded shapes over the sticker on the top.
5. Make some white and black paint splashes around the page. Add some Dimensional Magic drops here 
and there and let it dry.


Popular Posts