Tuesday 30 April 2013

There is a season for everything... And a lot of work too..


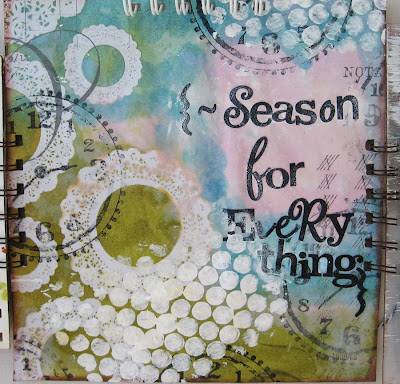
This is a kind if " never finished" project, or at least I still have about 12 pages to add to this one. I used this " There is a season for everything" Bible quote and I am just in a process of it. I only made the cover and about 4 pages, but the concept is to add more and more  Mixed Media pages to this self- made with Bind-It-All project (it opens from the top and from both sides and the reason I used the huge wire on the top is that it will be very fat after I finish it all.


The Zutter acrylic 8*8 cover was stamped all over and I added this Tando Creative fantastic clock chipboard.The lower cover was painted with Tim Holtz distress stains, stamped with Unity clock stamp  and then I added some bubble wrap white paint stamping.
I made just 4 pages for now (will add more in time, maybe one a month)
The pages I made are Time to love, time for peace, time to plant and time to sew. I didn't make all " bad" thing yet (like time to die?)


And the back chipboard- 8*8 size - it's like a back cover with a title
You can see it covered with acrylic front here

Rest of the pages will come... Sometimes...

Sunday 28 April 2013

Best wishes card

My new card made for Creative Inspirations  Paint Anything goes challenge and as my second project made for Inspired by Stamping 2 monthly challenges  entries our DT must make.


And I also enter it to some more web challenges
Avenue 613- color ispiration and anything goes
Pumpkin spice- Nature
Docerela- Flowers and stamping
Flowers for Crafters companion
Cupcake craftroom- Summer blooms

Saturday 27 April 2013

Blossoming Beauty

My new stamped page made with A2Z Scraplets theme kit. Actually this kit made this page- everything else was just some background stamping with Inspired by Stamping set  (flowers and a sentiment on the bottom) and a lot of mediums used to cover this chipboard set.


I enter this to some web challenges
Paper lovers inspiration challenge- I was inspired by colors, also not by stripes.

Journey (kind of)

My new lo with a great studio photo of Omer and it was so obvious that I am going to use those embellishments I had in my stash, the A2Z title and a lot of trendy arrows(thanks a lot, my old  Paper Studio punch)


This lo was made for some web challenges
Scrap it girl- Arrows
Use your staff- pastel colors. Nothing on this page is new, but the photo.

Wednesday 24 April 2013

Flowers speak with stamps

My new vintage style card. made with Visible Image Face stamp and Inspired by stamping roses and a sentiment. Some Tim Holtz goodies were added and Graphic 45 paper as my basic paper.

Tuesday 23 April 2013

100 Proof Press and Hydrangea Hippo blog hop


Hello my dear crafty friends! Please join us here  to celcbrate our blog hop  on this FB EVENT!
 We also offer some great prizes too:
Hydrangea Hippo is giving away a  lovely craft kit and 100 Proof Press is offering a $25 gift certificate.All you need to do is to follow all blogs, to comment and you will be in this draw to win!


Today we have a great blog hop with 2 companies: 100 Proof Press and Hydrangea Hippo.  Both companies DT girls  will share their projects  with both companies products.
So if you came from Candice  blog, you are on the right path. And if not- the full hop list is on a bottom of this post.
And here is my projects made for the hop.
We got 2 fabric bags from HH shop. So the large canvas bag is my first project.


I misted it with Walnut Stain, added a lot of gesso and then stamped  with 100 Proof Press stamp and heat embossed the stamped circle with clear embossing powder. Then I added a lot of mixed mists and let it dry.
 I  then glued a few rows of HH laces and trims and made the clustered corner with gold leaves and  plastic  flowers. The flowers I got were gorgeous, but blue, so I changed the color to deep red with  alcohol ink. The stamped Sleeping Fairy  was added to the bag and it was all done and ready for a small present inside.


My second bag from HH shop was this burlap smaller one and it's impossible to stamp over burlap, so I just embellished it and added some stamped 100 Proof Press images.
Again, as I decided to stay in some color scheme, I had to adjust my colors. So  dark purple buttons were heat embossed with copper powder and light blue paper flowers were misted into the deep brown color. I also added 2 puzzle pieces made with another burlap over the cluster.
Hope you liked my projects and now here is your next stop:     Sara
Thanks for visiting our blogs and see you soon again with more crafty inspiration.
Here is a full designer's list
hydrangeahippo.com/blog Jennifer
craftaddicts-tracyevans.blogspot.co.uk/ Tracy
homesclscrapper.blogspot.com Nancy
heartnsoul-amy.blogspot.com/ Amy
thetamarisk.blogspot.com/ Teresa
miraclesmommadesigns.blogspot.com Heather
cbee-cards-and-more.blogspot.com Caro
www.scrapbookingtechnique.blogspot.com/ Christine
truedivinehand.blogspot.com Candice
iritshalom.blogspot.co.il/ Irit
Zemphira.blogspot.com Sara
experiencelifewisely.blogspot.com/ Holly
100 Proof Press
hydrangeahippo.com/blog Jennifer

Saturday 20 April 2013

Same but different- tag tutorial

Hello, my dear crafty friends!
I decided to make my "Same, but different" crafty project. Those are already my " over made" projects as my DT term on Visible Image was over last month. But as I already made more projects, I decided to make those posts to share my projects with you.

Lot of times we see a tutorial from one of the most popular artists over the web that is great and inspirational, but we don't feel like those "copy and paste" kind of crafters, so we just pass. I saw this tag tutorial online, and I felt that as much as I like this tag, I hate to be a " duplicating monkey" and if I would make it, it should be done in my own and totally different way. So I made a design, even with similar shapes, but not a single product the designer used was used making this project. All I used were some stamps from Visible Image company I design for and all possible Faber Castell Design Memory Craft products.
So here we go!


Step 1
Stamp some Clock stamps  from Time After Time Visible Image set with clear embossing ink; add clear embossing powder and heat emboss them as shown.


Step 2 and here the watercolor fun begins:

Pick some green and blue Gelatos and begin to play with them all over the tag. I picked 4 colors from 3 different sets (Green, Blue and Metallic):
Now spread the colors and use my favorite baby wipe to do so. Less water, less drying time till the next step. Wipe the cardstock all around to get this lovely look.

Step 3:

Stamp the small  Film strip from Movie Set randomly over the tag with  Grey Big Brush Pen, but let the tag be totally dry after the blending.  The original tutorial was to add some clear film tape, but if you have a similar  great stamp you really don't need to use all those expensive products at all.


Step 4:

Paint your chipboards. Again, the original tutorial was about to die cut your own cogs, but for this you need a die to use and I don't have it, but fortunately I do have some bare grey chipboards from Tando Creative and they were just perfect for this project.
The dry Gelatos coverage was sufficient and a bit of Light blue Big Brush made it look like an old distressed metal. I also added some gold highlights with Metallic Mixed Media Sampler Gold pen.
This is how my tag looks with all chipboards covered with paint and some more brass metal cogs added over them.


  Step 5:
Make the sentiment tag. I used a plain Kraft cardstock with 2 more stamps from Visible Image Time After Time SET  and 2 colors of Big Brushes from the Red set .
I also inked the edges with Light Blue Big Brush and added some White Gelatos to mute the cardstock around.


Step 6:
And now for the last step for this project- arrange the sentiment tag and stamp Enjoy Life over the white seam binding ribbon.
Here is my final project, very similar to the tutorial, but yet so different.

This project was originally made for Faber Castell  blog, but as I used Visible Image stamps to make it I felt like my own readers and Visible Image fans  should read it too and I just remade it here.
Hope I inspired you a bit to take a web tutorial and to make it your own design.

Thursday 18 April 2013

Clean and simple Love card

This new card was a kind of " use home items and make a card " kind. The pin circle full of real pins was bought  one day for cents and as I never used those pins  were lost in my stash. I decided to make a card with them and then it can be used as a part of someone's craft stash.
I used Bo Bunny paper and a stamped sentiment from Inspired by Stamping new set with red embossing (WOW!Embossing Powders) and a bit of washi tape. This is a real 5 minutes card and very lovely one (keep out of kids as pins are real)


I enter it to Love my tapes Red and pink +washi challenge(not a lot of those colors but it  fits the theme)

Bon Voyage card


Very easy to make card  if you have this gorgeous VLVS stamp  - the blue one-stamped and misted, and 2 most gorgeous Die- Versions dies. Everything else is just a piece of cake (the background is a recycled piece from  somewhere. Great glossy cardstock after all.

Tuesday 16 April 2013

Follow yellow brick road and it will take you home

My new Home Sweet Home stamped card made with 100 Proof Press most gorgeous stamps.
I ordered the Brick Pattern stamp (fussy cut made as this is a rectangle stamp) to fit the  Commemorative Castle Coin stamp and to make my Yellow brick road to my Emerald city. Then as you no it's all about " there is no place like home" and then this card was born. The background Calendar  Blocks stamp was added to  show that no matter when and where , home is always with us.

Monday 15 April 2013

Challenge or a lot: using Inspired by Stamping stamps

My new card made for Symon Says Stamp and Show challenge: use background stamps.
I made this card using one single background stamp from Inspired by Stamping  Vintage Background set , stamped 6 times and heat embossed with clear ebmossing powder. Then I cut it with Sizzix die and made another unique piece cut from fabric.
You are Extraordinary title was made with two IBS stamps from Inspiring Sentiments set.
I used Tim Holtz background Kraft cardstock and some distress ink from Ranger and made it also for some more web challenges.


Sugar Creek Hollow- stamping and vintage
Card crafter's circle- Die cuts
Totally papercrafts- Use kraft
Forever friends- use die cuts
Papercraft journey- monochromatic
A little bit crafty- Anything goes
Artistic stampers- Texture
Cards gallore- Vintage
Cards by Lady Ann- Anything goes
Flat friends- Faux stitching
Mema's craft-Anything goes
SWAT- No current products (the paper is like 1.5 years old, stamps are like 7-8 month old and fabric is relaly old)
Red carpet- Vintage

Sunday 14 April 2013

Easy Holiday gifts: Boys place cards

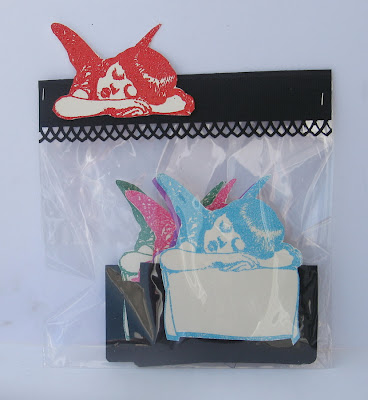
I love to  make small handmade gift that go great with a bigger , real present. So I decided to make a bag with this Large  Hand  holding black card  100 Proof Press stamps as an add- on to a real gift and I love the result.
I stamped the Hand stamp over the Kraft cardstock , heat embossed it with a few different blue embossing powders and then hand cut the hands and glued them to a different blue cardstocks for an interest. Then I made the topper for the clear bag and added one single hand over it. Easy and lovely gift and all you need is one gorgeous 100 Proof Press stamp.
And here are some of the cards standing
Just add the name and use them!
And now for my previous place cards project. Remember my darling place cards made with Sleeping Fairy  Girl Label stamp?
I made a bag for them too to use as a small gift.

So as I said- buy a great stamp from  100 Proof Press and make your own place cards in just a very short time.

Friday 12 April 2013

Fun in the sun with my dear Omer and A2Z Scraplets

This A2Z Scraplets chipboard frame was just so perfect to scrap my dear grandson's summer water photos. I used 4 photos and added 4 stamped collaged pieces (The Rubber Cafe oldies from my DT past on this great team).
All stamped images were heat embossed with WOW! Embossing powders in black and then colored with Faber Castell Design Memory Craft  Water color Gelatos (what a fun and easy way to make your own so called " art pieces"!)
All frame was embossed again with a lot of powders and I added some journaling over the washi tape.

And my stamped pieces


Made for some challenges:
Susan W.- colors, sky
 Texture for Artistic stampers

Thursday 11 April 2013

My " in box" altered town

Hello, my dear crafty friends!
Irit is here again for our Town week and this time a have a story to tell.
We live in a big 7 bedrooms home for last 18 years. Great home to raise your 4 kids. But then kids are already grown- ups and on their own and there were just 2 of us and a fatty cat. So about a year and a half we decided to move to a flat. Apartment. 4 bed rooms (2 for my craft addiction). So we bought this apartment and we are still waiting as this a big pretty new house and it takes ages to finish the construction. Lately we sold our house (finally) and were told that our new place will be ready in 3-4 month. So this project is a small recycled gift to myself and my DH. I am going to put the new key inside and to give n it to him when time comes and as I do all interior design it's like my new baby I will present to him and to our cat... (lol)
So this is my totally altered candy box (the bottom is even not altered), I used the cardboard inside to make this small town with Tando chipboards. I used stencil to make the bricks, heat embossed the walls and the roofs, made a moon/sun from the inside part of Tando Flowers chippboard and heat embossed with yellow powder. The title was made from Tando letters and heat embossed with black powder. The mini key (so adorable) heat embossed with Copper and the background paper is MME.


The box was covered inside with washi tapes and sticky lace on outside. The same washi and lace were added over the acetate cover, with a piece of cut out paper and Let's celebrate today die cut. The paper was heat embossed with yellow powder and the die covered with glaze for the shiny look.


I think it's a lovely recycled project made with great products and I will keep it for a few month to add a real key inside.

Wednesday 10 April 2013

April Inspired by Stamping full stamps release

Hello, my dear crafty friends! 
 Today is the day and all 9 new April sets are in Inspired by Stamping store.
So here are the sets we used for our release days
Creative tags

Single   fancy frame


 Trendy Circle  Sentiments

Whimsical Banners

Words of Inspiration


Spring Blossoms


Washi tape

Big notes 3

Big wishes 2

And as you know today and today only it's a free shipping day and it's you chance to get a lot of new and gorgeous stamps with totally free shipping.

Popular Posts