Sunday 29 June 2014

Life of your dreams: altered canvas


This Mixed Media altered canvas was made for Tando Creative Transportation week. I didn't have any transportation chipboards, but then who cares? Some Indigo blue stamps, some gorgeous Tando chippies, a lot of Mixed Media mediums, mists (Lindy's Stamp Gang) and a nice  quote- and I have this lovely canvas.


T


And how about this fantastic quote? " The biggest adventure you can take is to live the life of your dreams"!
I think I do live this life (at least a bit).

Saturday 28 June 2014

Having fun with girly dies

Hello my dear crafty friends!
Irit is here with my two first  cards made with our Die-Versions most gorgeous Girly June release.
I must say  as beautiful as this release is, it's kind of a hard  one for my style. I am not so much girly in my designs and the dies I got were so much teen girl ( this forgotten age in Shalom family). But yet, I really love DV dies and with a little or a lot of " brain storming" I found those Couture papers from Graphic 45 that I have for ages and never used  for the same " hard to use" collection and  both dies and papers were a great fit for those girly girl cards I made for you to showcase a couple of dies from this release.
So here is a first one, made with Whispers Diva Purse and Whispers Dressing table.

 I also added some fantastic " old " dies to my card: Pretty frame and Border lace, that was cut 3 times.
I think that the overall theme of Girly girl is covered and I just added this Congratulations sticker and some pearls to my card.


 My second card for today was made with  the very same Dressing table die that was die cut twice for the shaded look and this new Wee petites Diva Accessories that were die cut  with black cardstock. Then I added some glitter glues, black enamel paint and red pearl paint to make those wee cuties more realistic. I also added this Binding edge die cut from one of the previous releases to frame my focal image.


 Hope you got some girly inspiration and see you again in a couple of days with another new release project.

Friday 27 June 2014

Book cover with Ann Butler's Faux Quilt stamps

Hello my dear crafty friends and welcome to my new monthly post made for Ann Butler's blog too.
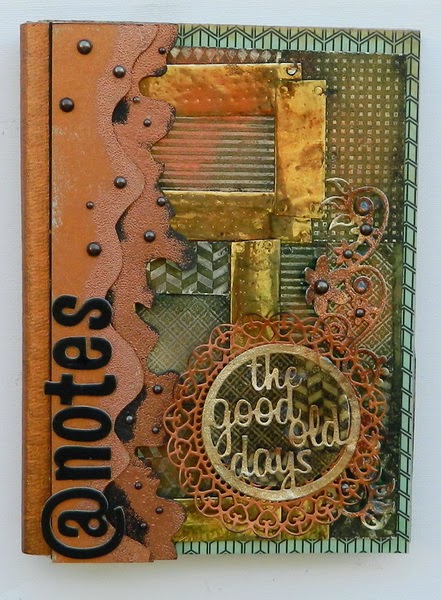
This time I am going to show you a bit of technique I used to make this altered book cover for my new art/memory journal. 
The chipboard parts are Tando Creative kit- easy to use and to made your own  altered book.
And this is a technique I used here: combo of stamping, heat embossing and painting , all in one.
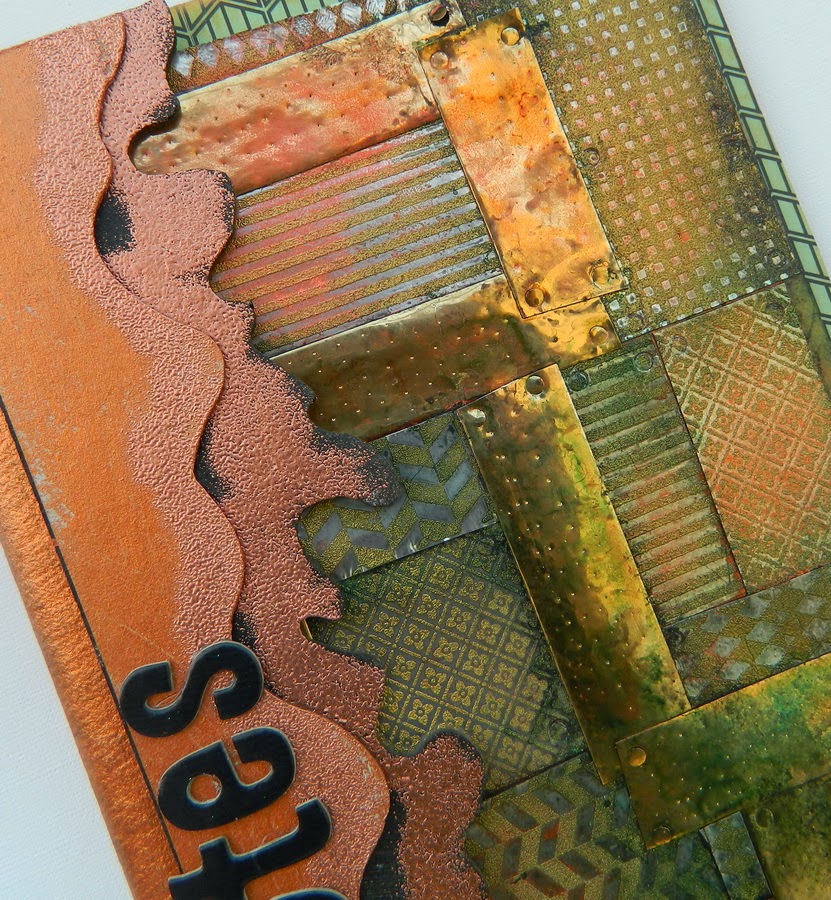
Step 1: Stamp a pattern (all patterns used here are from Ann Butler's Faux Quilting Unity sets and you can see the names and the store links later) over metallic  cardstock. (It works over real metal sheets too, but I was short of those).


Step 2: Heat emboss your stamped patterns with Clear embossing powder


Step 3: Paint the embossed cardstock with a mix of gold, copper and black acrylic paints. As you can see I use the cheap, craft store paints and not those fancy acid free paints for this cover. Wipe the paint until you have a thin layer  of it left over the stamped image and you like the color. If not- add more of the  paint you want to be seen .


Step 4 and the last: Those 4 squares here  were made just as a sample (will be used later for the cover corner embellishment cluster), so go on and make dozens of those squares with 2'' stamps and let them dry.
Cover the chipboard with a nice vintage looked paper; not much is seen after all.
Now cut those pieces to uneven rectangles and squares and made your cover  as shown here. Add gold foil tape in between the pieces and be sure to glue it to your cardstock pieces as this " self- adhesive" tapes are really " non- adhesive" ones. Paint the chipboard wavy pieces with copper paint, add a bit of copper embossing powder and a splash of black paint and embossing. Add the title. 


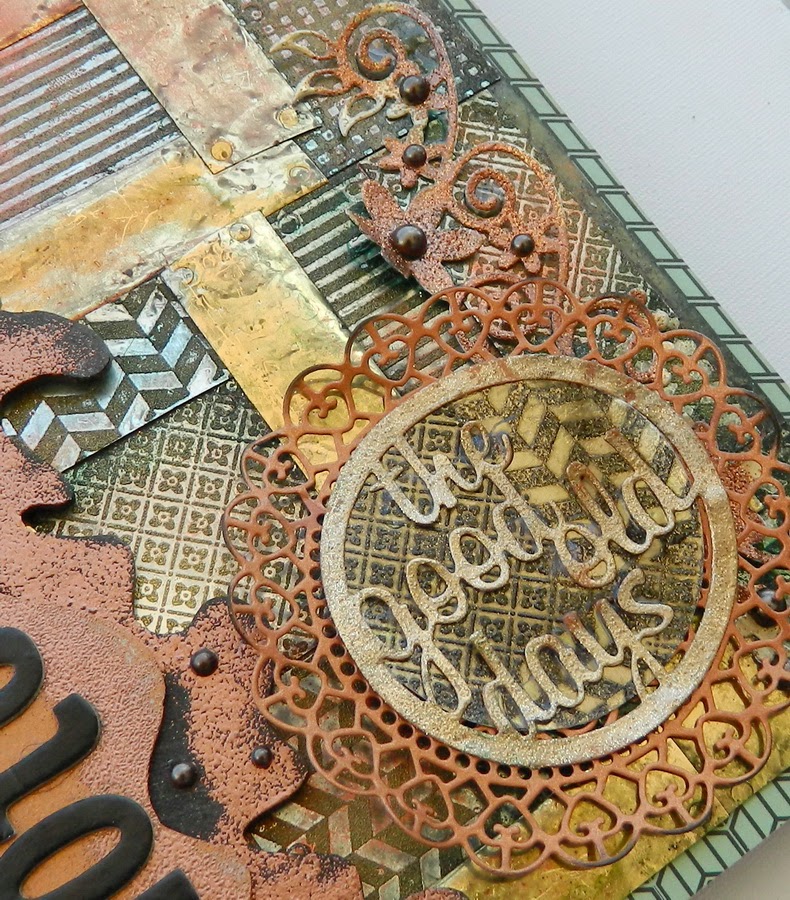
And now  I am going to show you my embellishment cluster. I made a punched circle form the 4 pieces square made as a tutorial as my subtitle base. Then I die cut the title with Die-Versions die form copper cardstock and heat embossed it with gold glitter embossing powder. I die cut the heart medallion from the same copper cardstock and inked it a bit with black ink around. All 3 circles were arranged to one central title piece and glued over the die cut flowers branch that was heat embossed with copper glitter embossing powder and copper pearls.


I hope you like my small tutorial and my finished project and would try to make something similar with those gorgeous Ann Butler's Faux Quilting stamps.

PRODUCT LIST:
Ann Butler's products:
Unity Faux Quilting stamps 2'' Leaves all over
2'' Doily Picnic

Other products:
Clearsnap black pigmented ink
WOW! Embossing Powders clear, copper, glitter gold, glitter copper powders
Tando Creative chipboard book kit
Die Versions dies
FWAB pearls
AC chipboard letters
Marion Smith paper
AC cardstock


Tuesday 24 June 2014

Just because you are special

Just because I like cards. Just because Inspired by Stamping stamps are gorgeous. Just because those colors make me happy. My new card made with tons of washi tapes, one die, a few pearls and two gorgeous Inspired by Stamping sentiments. Hope you like the final result!


Wednesday 18 June 2014

Pin cushions made easy with Faux quilting stamps by Ann Butler

Hello my dear crafty friends and welcome to my new post with something new for me too:
 pins cushions.
The base of this cute project were those Maya Road canvas die cuts and they come double sided and stitched from all sides.
 I got them in some grab box and for a few years never used any. And then I thought that if I cut the bottom and add some inside butting, it can be a very lovely and useful piece. 


So first I cut the bottom and  added a small package of SoftSoft HighLoft Thermally Bonded Polyester Batting from Warm Company  and glued it with  Beacon Fabri- Tac permanent adhesive. Then I  colored the whole canvas shape, both sides, with Ann Butler's Craft Inks from Clearsnap, using Aquamarine, Berry and Limelight inks.
Then I decided to add some embellishments and the only canvas shapes I had were those LYB canvas stickers that come bare.


So I stamped over them with Ann Butler's Unity  Faux quilting stamps, using 2'' Leaves all over

1'' Diamond and Plaids 

and 1'' Doily Picnic stamps with the same inks and with Sunshine ink over one shape.


That was all! Easy, cute, fast made pin cushions were made and I really love the result. Hope you like it too!

Products used:
Ann Butler's Unity stamps: 
Other products:
SoftSoft HighLoft Thermally Bonded Polyester Batting- Warm Company
Beacon Fabri- Tac permanent adhesive
Maya Road canvas die cuts
LYB canvas stickers


Tuesday 17 June 2014

Sweet Stamps Anything goes with new June release


This is my second post today! 
Please scroll down to see the first one! Thanks


Hello my dear crafty friends and welcome to our new weekly challenge here on Sweet Stamps blog.
This week we challenge you to make whatever you want as this is our Anything goes week.
Anyway, you can use whatever  products you want and even to win some gorgeous goodies; we, the design team, used some new June released stamps.
And here is my Art card (not so much artistic, just about the Art)
 I used 3  NEW RELEASED ATC backgrounds #3  with white embossing powder over vellum and made some  flags from the stamped pieces and then arranged it to this Art card. I also added Just for you sentiment and this card can be given to any artistic soul of any gender or age.


  And now it's your turn! Make anything (it can be not a card), link it to our weekly challenge and you can win BIG TIME!


Cornish Heritage Farms Make your stamped background challenge

Hello my dear crafty friends! Welcome to Cornish Heritage Farms new challenge and this time we challenge you to make your own stamped backgrounds with background stamps.
 Here is my almost clean and simple card and yet I used  one background  stamps and 4 stamps from another set.

First I made my stamped and white heat embossed background using 2 stamps from Beautiful set.
The whole piece was then inked around with red ink.
Then I made the front panel using masking technique  with Beautiful sentiment and a scroll stamp with red embossing powder heat embossing .The stamped image was covered with a mask and I stamped the whole background  Lined Paper backgrounder stamp over the sentiment. The panel was then cute to fit my  card layout and embellished with felt heart shaped buttons , some bling and twines.

 Now it's your turn to make your own stamped backgrounds and you can get a lot of inspiration from our design team.


Don't forget to stop by everyone's blog today for more inspiration.


Cornish Heritage Farms Blog - http://cornishheritagefarms.blogspot.com
Frances Byrne (Design Team Co-ordinator) - http://stampowl.blogspot.com
Kristine Reynolds - http://stampingandscrapingincalifornia.blogspot.com
Steph Ackerman - http://stephaniescraps.blogspot.com/  
Amber Hillman - http://ambersantics.blogspot.com
Ann Marie Saunders - http://cre8nart.blogspot.com
Irit Shalom - http://iritshalom.blogspot.co.il
Kelly Santi - http://sandcastlestamper.blogspot.com
Maureen Russell - http://maureensmagic.blogspot.com

Monday 16 June 2014

You are the best Dad: Sweet Stamps challenge #173

Hello my dear crafty friends! 
Irit is here with my FATHER'S DAY card made for our  weekly challenge here on Sweet Stamps blog.
You still can enter this challenge today and maybe it will be your lucky day!

As always, making masculine projects are hard and I just found that I don't have any male stamp in my huge stamps box, but one single sentiment. So what! We can always be creative and to use masculine colors, some general background stamps and to make a card that is good for any masculine  event.
So I used kraft base , some light patterned paper and stamped 9 squares with 2 stamps only over this kraft cardstock.

Some washi tapes and black pearls were added to make it more interesting and I think my mission to make a masculine card was a success.
 Here are the products I used for this project. You can get them in our Sweet Stamps shop and to make some similar projects too.


Dream Big in colors

 A very colorful card made with a lot of washi tapes, some die cuts, one embossing folder and one lovely Inspired by Stamping sentiment.
I really love the  multi- color result of this card. It even makes me happier!


Sunday 15 June 2014

Sweet Stamps monthly challenge: Painters tapes

Hello my dear crafty friends and welcome to our new monthly Sweet Stamps challenge.
 This month we challenge you to  use painters tapes over your crafts. Any  tape, any technique- just be creative and you can win some gorgeous SS goodies!
And here is my card. I used tapes as masks and left the white space for some sentiment stamping. A lot of sentiment stamping. First adhere the tapes over your card; then mist or watercolor the background and then peel your tapes and stamp the sentiment over the white spaces left.
  

I also stamped some Queen Ann's Wildflowers with black ink over the colored surface.


And now it's your turn: play with us and WIN!

Popular Posts