Some stamped and die cut 2*2'' pieces I made awhile ago and were already in print.
Made with Unity stamps (Ann Butler) and different dies with heat embossed black pigmented ink and gold pigmented ink.
So easy and so fancy! Don't you think?
Showing posts with label Ann Buttler. Show all posts
Tuesday, 11 April 2017
Hello life twinchies set
Labels:
AC,
Ann Buttler,
cherry lynn,
Clearsnap,
die cut,
die versions,
sequins,
sizzix,
stamping,
UNITY,
WOW
Sunday, 18 September 2016
Spring canvas tutorial
This time I made it with a lot of Iridescent Ann Butler's paint and other ESF mediums, chipboards, stamping over chipboards and a lot more techniques. It has a very rich textured background and I hope that you like this project.
Step by step instructions:
1.Cover the canvas with ESF Gesso and add some Tando chipboards over. Cover the chipboards with gesso too. Let it dry.
2.Paint the canvas with a mix of ESF Chalk It Up Avocado Pie and Key Lime paints.
3.Paint the canvas with a mix of ESF Ann Butler's Iridescents paints: Lilac, Lagoon and Ocean Surf. Make the thick layer of those paints and stap over the wet paint with a small jar lid to make those stamped circles all over the wet canvas.
4.Heat the whole surface with a heat gun to get those " bubbles and dots" over the wet paint.
6. Stamp over 5 chipboard butterflies with Ann Butler's Unity Faux Quilting stamps (I used just two of them) using clear embossing ink and white embossing powder. This step is not shown on the photos. Paint the corner chipboard and all stamped butterflies with more ESF Iridescents paints and wipe the paint over heat embossed areas. Arrange the corner and the butterflies as shown.
7. Outline the chipboards with black pen. Glue the Tim Holtz sticker on the bottom of your canvas.
Labels:
ALTERED,
Ann Buttler,
canvas,
earth safe finish,
gesso,
paint,
Tando
Friday, 1 July 2016
Jazz it up Mixed Media tag
Hello my dear crafty friends! Today I want to share a Mixed Media tag made with Visible image main stamp and Ann Butler's art screen, inks and background stamp.
As you can see I used Ann Butler's Stars art screen on the top with texture paste and then painted the background with Ann Butler's Clearsnap Crafters inks in Ocean Breeze and Blueberry. The main image was also stamped with Blueberry ink and heat embossed with clear embossing powder.
The plaid background is one of Ann Butler's Faux Quilting stamps by Unity.
And I enter this tag to some web challenges too:
Anything masculine for Southern Ridge Trading Com
Happy Little stamper Mixed Media challenge- Texture
As you can see I used Ann Butler's Stars art screen on the top with texture paste and then painted the background with Ann Butler's Clearsnap Crafters inks in Ocean Breeze and Blueberry. The main image was also stamped with Blueberry ink and heat embossed with clear embossing powder.
The plaid background is one of Ann Butler's Faux Quilting stamps by Unity.
And I enter this tag to some web challenges too:
Anything masculine for Southern Ridge Trading Com
Happy Little stamper Mixed Media challenge- Texture
Labels:
ALTERED,
Ann Buttler,
Clearsnap,
mist,
ribbons,
stamping,
stencil,
TAG,
tattered angels,
Visible Image
Saturday, 18 June 2016
Amazed by you: gift card envelope tutorial
Hello my dear crafty friends!
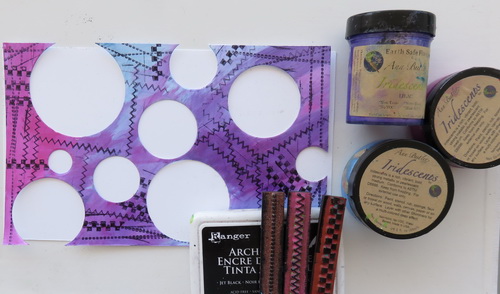
Irit is here and this is my new small gift card envelope tutorial made for Ann Butler's blog using Ann Butler's amazing Faux Quilting Stamps (by Unity), her Iridescents paints (ESF) and her Stitches stamps (by Clearsnap).
So here is my tutorial:
1. Arrange a few Stitched Nesting circles dies (Die Versions) over thick white cardstock and die cut them.
Irit is here and this is my new small gift card envelope tutorial made for Ann Butler's blog using Ann Butler's amazing Faux Quilting Stamps (by Unity), her Iridescents paints (ESF) and her Stitches stamps (by Clearsnap).
So here is my tutorial:
1. Arrange a few Stitched Nesting circles dies (Die Versions) over thick white cardstock and die cut them.
2.This is how the negative looks after the die cutting and later I am going to cut it to fit the envelope size.
3. Paint the negative with Ann Butler's Iridescents paints in Lilac, Lip gloss and Ocean Surf. Stamp over the dry painted cardstock using Ann Butler's Stitches Background Basics Clearsnap stamp and Ranger permanent black ink.
4. Take the die cut circles and stamp over them with Ann Butler's Faux Quilting stamps by Unity, using VersaMark watermark ink, Clearsnap Balck pigmented ink and heat emboss with black embossing powder. I used 2'' stamps from different sets and you can see the patterns here.
5. And now without any more step by step photos- my final project.
The stamped and heat embossed circles were painted with the same Iridescents colors with the add of yellow Sunshine paint. Arrange those painted circles inside the painted negative. Cut it to the Kraft envelope size to cover the front. Cut another piece for the sentiment made with stickers.
Add the Makin's Clay fairy that was made with the mold (some Russian company mold , sorry, I can't even spell the brand name) using Makin's Clay white air dry polymer clay. The fairy was painted with a mix of the same Ann Butler's paints and glued over envelope front.
Cut another piece from the painted cardstock and add as the closure on the envelope back. Add a piece of Velcro to close the envelope.
This technique is great for card making, ATC making and a lot more of easy to make craft projects and I hope you will use it some day.
I enter this piece to some web challenges too:
WOW! Embossing Powders as I used their powders- Anything goes
More Mixed Media- Anything goes with purple
Thursday, 5 May 2016
Family lo
Hello my dear crafty friends and welcome to my new lo post. This is a layout made with Ann Butler's delicious ColorBox Background BASIC Stitches stamp set and all her Clearsnap inks.
The stitches were just perfect for those patterned papers and I added then all over this layout- some stamped with clear heat embossing and some just with Ann Butler's inks without the heat embossing.
The title chipboards were also inked with Ann's Canyon Crafter's ink.
I also added a stamped circle and used Ann Butler's Faux Quilting Unity 2'' Stripes. Dots. Hearts stamp and Tangerine Crafter's Clearsnap ink, again with clear heat embossing.
Labels:
Ann Buttler,
chipboards,
Clearsnap,
lo,
paper house productions,
stamping
Monday, 2 May 2016
Making cards with inchies and twinchies: Ann Butler
Hello my dear crafty friends and welcome to my small tutorial made for Ann Butler's blog.
Ann Butler Faux Quilting Unity stamps are just perfect for this technique as they are 2'' and 1'' size.
So when we stamp one Twinchie (2'' square) and one Inchie (1'' square) and layer the small one over the large one we get an instant embellishment nthat can be a foacl point of pretty clean and simple, but yet fancy card.
So this is the technique taht you can do with Ann's stamps and as you see I made not one card, but whole 4 for this post.
I don't have a lot of steps for this tutorial, but just a few.
1. Stamp one 2'' stamp over copper cardstock with black pigmented ink (Crafter's Clearsnap) and heat emboss it with Clearsnap Clear embossing powder. Stamp 1'' Ann's stamp over the same cardstock with Gold pigmented ink (Clearsnap) and heat emboss it with the same clear powder.
2. Cut both stamped squares and layer the small over the large in every possible way. As you see from my finished cards I layered in the middle, on corners and even diagonally.
3. Die cut small sentiment that fits 2'' square or use stickers. I hade 4 nice sentiments from three different die cut companies and used them all (Sizzix, Cherry Lynn and Die Versions. Add some sequins over the squares.
4. Make 4 cards using DCWV Copper stack and glue the stamped piece over the card.
5. Stamp the sentiments or use the cardstock one (as I did with I love you card).
And here are my cards:
Card #1
Card #2
Card #3
Card #4
Labels:
Ann Buttler,
card,
cherry lynn,
DCWV,
die cut,
die versions,
heat embossing,
sequins,
sizzix,
UNITY,
WOW
Friday, 22 April 2016
StencilGirl/Earth Safe Finishes BLOG HOP
Hello my dear crafty friends and welcome to
StencilGirl/Eart Safe Finishes Earth Day blog hop!
First something you should know about my post.
I made this post before I had a full designers line up as I am actually out of the country right now and pretty much out of the web. So I can't link you to the person that is before and after me in this line up.
I can't even tell you what are the prizes for this hop.
So read my post, comment here and then just go to the main blog and check who is the next person in this hop and continue from there.
Here is a link for the main blog post in StencilGirl blog:
http://www.stencilgirltalk.com/
And this is a link to Earth Safe Finish main blog:
http://www.earthsafefinishes.com/
And now for my project:
I made an art journal page with StencilGirl 5 stencils, all possible ESF products and just a couple of stamps from Visible Image.
There are no " add- ons" on this page: no chipboards, embellishments or anything that is not paint or medium, so this page is totally flat and ready to go to my art journal.
Those are the stencils I used here:
Pretty as a peacock, Urban insiders circle, Doodle it layered circles and squares,Inside Out and Past Present Future.
Products used from ESF:Gesso, Gel Medium, Texture paste, Chalk It Up Whipped cream, Chalk It Up Licorice, Ann Butlers Iriscedents pains- Lilac, Lagoon, Limelight, Ocean Surf and maybe drops of more colors of Iridescents.
The sentiment is stamped over tissue paper (due the texture I couldn't stamp directly over the page) and glued with Gel Medium.
I hope that you like my art piece and please go to the next stop from one of the main blogs.
So Go and wake up and BE awesome!
I enter this piece to Anything but a card challenge for Sweet Stamps
StencilGirl/Eart Safe Finishes Earth Day blog hop!
First something you should know about my post.
I made this post before I had a full designers line up as I am actually out of the country right now and pretty much out of the web. So I can't link you to the person that is before and after me in this line up.
I can't even tell you what are the prizes for this hop.
So read my post, comment here and then just go to the main blog and check who is the next person in this hop and continue from there.
Here is a link for the main blog post in StencilGirl blog:
http://www.stencilgirltalk.com/
And this is a link to Earth Safe Finish main blog:
http://www.earthsafefinishes.com/
And now for my project:
I made an art journal page with StencilGirl 5 stencils, all possible ESF products and just a couple of stamps from Visible Image.
There are no " add- ons" on this page: no chipboards, embellishments or anything that is not paint or medium, so this page is totally flat and ready to go to my art journal.
Those are the stencils I used here:
Pretty as a peacock, Urban insiders circle, Doodle it layered circles and squares,Inside Out and Past Present Future.
Products used from ESF:Gesso, Gel Medium, Texture paste, Chalk It Up Whipped cream, Chalk It Up Licorice, Ann Butlers Iriscedents pains- Lilac, Lagoon, Limelight, Ocean Surf and maybe drops of more colors of Iridescents.
The sentiment is stamped over tissue paper (due the texture I couldn't stamp directly over the page) and glued with Gel Medium.
I hope that you like my art piece and please go to the next stop from one of the main blogs.
So Go and wake up and BE awesome!
I enter this piece to Anything but a card challenge for Sweet Stamps
Wednesday, 6 April 2016
Have an Eggs- cellent day with TPD
Hello my dear crafty friends and welcome to my first April post made for Two Paper Divas.
Easter is over , but this new stamp It's all about the egg set is just fantastic to make my own sentiment.
So I used the eggs from the set and made this " It's your eggs- cellent day" using It's your day TPD stamp and I just used a partial stamping with TPD stamp and added the stickers sentiment.
All eggs were stamped over white cardstock using Ann Butler's Clearsnap Crafter's inks in 6 colors: Sunshine, Aquamarine, Tangelo, Berry, Lilac and Limelight.
The background is dry embossed and I added a few drops from Ann Butler's reinkers over the front panel.
Dare2B ArtZy- polka dots
Labels:
Ann Buttler,
card,
Clearsnap,
dry embossing,
glaze,
heat embossing,
inks,
stamping,
stickers,
two paper divas,
WOW
Tuesday, 5 April 2016
Be you-nique art page with Ann Butler- tutorial
Hello my dear crafty friends and welcome to my new art page tutorial made for Ann Butler's blog.
I used Ann Butler's Iridescents paints from Earth Safe Finishes in different colors to make this modern, almost geometric art page and it was easy and fun and you can make one in no time using Ann's lovely products.
Step by step tutorial:
1. Paint rectangles and squares using 4 different color of Iridescents paint. I used Lilac, Orchid, Lipstick and Ocean surf mixed with a bit of Sunshine yellow.Add some strokes of yellow paint over the page as shown.
2. Make stencils with rectangles and one big circle using dies or punches and use those stencils to paint with white paint over the colored page as shown.
I used Ann Butler's Iridescents paints from Earth Safe Finishes in different colors to make this modern, almost geometric art page and it was easy and fun and you can make one in no time using Ann's lovely products.
Step by step tutorial:
1. Paint rectangles and squares using 4 different color of Iridescents paint. I used Lilac, Orchid, Lipstick and Ocean surf mixed with a bit of Sunshine yellow.Add some strokes of yellow paint over the page as shown.
2. Make stencils with rectangles and one big circle using dies or punches and use those stencils to paint with white paint over the colored page as shown.
3. Grab a bunch of Ann Butler's Unity Faux Quilting stamps and stamp inside the white rectangles with a mix of those stamps using black permanent ink.
Add the title inside the circle using stickers.
Outline each rectangle and the main circle with black pen.
Add stamped stitches using Ann Butler's Clearsnap Basic backgrounds Stitches at random.
Add some splashes of white paint over the page.
Labels:
ALTERED,
Ann Buttler,
art journal,
Clearsnap,
earth safe finish,
paint,
stickers,
UNITY
Thursday, 31 March 2016
ETI /Ann Butler Designs blog hop
Hello my dear crafty friends and welcome to ETI/Ann Butler's designs mutual blog hop.
You most probably came from Einat's blog here, and if not- begin with Ann Butler's blog here.
For this hop the Ann Butler's team members were asked to make a project with both ETI and Ann's products and this is my share for the hop.
I made the double sided acrylic pendant using Ann Butler's Unity Faux Quilting stamp, Ann's Crafter's Canyon ink, Ann's Sunshine, Aquamarine and Lime Light Crafter's inks re- inkers and Ann's Earth Safe Finish Iridescents Lagoon and Orchid paints. From the ETI side I used Easy Mold Silicone Putty, Easy Cast Clear Casting Epoxy and Amber transparent resin dye.
So here is one side of my finished necklace:
The elephant was made using a mold I made with putty with metal piece I wanted to cast. When my mold was dry I mixed Easy Cast resin with copper micro beads and Amber DIE pigment and after 24 hours I got this beauty. I painted the elephant with Ann Butler's ESF Orhid paint and glued it over the stamped side with liquid resin.
And this is the back side ofr the same piece:
This side was covered with Ann Butler's Crafter's inks reinkers and then heat embossed with clear powder.
The face was molded and casted in the same way as the elephant. Then I painted it with Ann's ESF Lagoon paint and glued a bit out of the center.
I hope tha you like my project and now you can visit the next designer on the list: Larissa
Labels:
Ann Buttler,
Clearsnap,
ETI,
heat embossing,
inks,
jewelry,
paint,
TIM HOLTZ,
UNITY
Subscribe to:
Posts (Atom)
Popular Posts
-
I still have lot of stash I got as a Rak to do some Halloween web chalenges- and to keep the finished projects for my American niece . So...
-
Hello my dear crafty friends and welcome to Sin City Day of Dead Sugar Sculls blog hop! The premise of this blog hop is for you to...
-
Hello my dear crafty friends and welcome to Die Versions and OWH BLOG HOP! With this March new military release it was just natural t...
-
So for this hop I designed this Spring time lo using Israeli catalog that you can see here and also recycling some old vellum pages from an...
-
This card was one of the Pink elephant pink challenge winners- thanks!! OK- it's Valentine all over the web- I just don't have time ...
-
This card made TOP3 on One stitch in time lace- ribbon- bow challenge- thanks!! For my 2 nd week GDT for JULY on Corrosive challenge blog w...
-
This card was published in DEC 2010 SNR issue This boot won the monochromatoc challenge on Whimsical ink sorority challenge blog- tha...
-
This card was published in the very first March 2010 issue of a new e zine called In a scrap creations. This card was published in Cards blo...
-
This box was a winner on Get sketchy sketch challenge- thanks!! This box made Top 3 at Die cuts r us challenge- thanks!! This box made Top 3...