Friday 29 April 2016

Window into Spring art board with Tando


Hello my dear crafty friends and welcome to my Spring decorative art piece.
Today I made the whole Spring scene with Tando stencil as the sun rays on the background and Tando square frame from mini Printers tray set   as a window to that scene.
First I used Tando Bullseye  mask with DecoArt texture paste and painted it over to make the " sun" image.
The whole piece was painted with DecoArt paints and DecoArt crackle was used over the window frame.
I stamped with black  ink over the painted surface (Rubber Dance stamps used here) and added a misted colored flower to the window.
This is a very simple project, but the sticker saying says it all: There is a beauty in simplicity.


Tando products used:
Bullseye mask

Mask - Bullseye

Mini printer tray

Mini Printer Tray 103mm x 103mm with stand

 I enter this to Southern Ridge Com. Anything Spring challenge
 Dimension- for Mixed Media Monthly

Thursday 28 April 2016

Dream Mixed Media card with Scrapmatts

This is my card made for Scrapmatts for April post:
 bright to pastel colors and background layers made with DCWV cardstock and Sizzix dies (both matting and holes  in the yellow layer).
The Scrapmatts chipboard window was covered with DecoArt crackle paste that can be seen even over this so delicate chipboard piece.
The flowers were painted with gel acrylic paints and you just need one single layer for the full shiny paint coverage.
Both chipboard oval frames are from the same set. The pink one was heat embossed with pastel pink embossing powder. The inner frame and the title word were heat embossed with black embossing powder.


I also added a small topper piece from the same Ornate frames set on the bottom to add some interest (pink embossed as the big frame).


As you can see this card is pretty flat and can be mailed in the regular envelope and still it has lots of layers and texture.
Scrapmatts products used to make this card:

Windows 04 CB5120
Flowers 12 CB1234
Ornate frames 05 CB1220 
Assorted words 01 CB1134
 And I enter it to some web challenges too:
 Studio 75- Color inspiration
Simon Says- Anything goes
 Die cut divas - Something connected to April- Spring and flowers 
Southern Ridge Com.- Anything Springs challenge

Scrapmatts April inspiration

Hello my dear crafty friends and welcome to my Scrapmatts April inspirational post.
This time I made a layout and a card in a totally different styles just to show you how the similar Scrapmatts chipboards can be used on a vintage style layout and very modern and bright card.
So first  the layout.
I made the background with Stencil  Circles CT1001 and green embossing paste ( DCWV cardstocks and old Plaid paste that is still working as you can see).
The whole set of three String circles 04 CB5140 was added over the two photos painted with almost white acrylic paint (also the natural color was very similar after all). The third circle was added to keep four journalling words from Scrap words 25 CB1239 set.


The  title cluster was made over the film strip  chipboard (Film strips 05 CB1232). It was heat embossed with clear embossing ink and black embossing powder. Another piece of Scrap words (Scrap words 25 CB1239) was also added to this title cluster.
All String circles were connected with wire- as the connection for this pair on their wedding day and just to keep them in the right position . A bit of washi tape was added from both sides of those circles too- again, for the connection and  as it's pretty difficult to glue such a thin chipboard piece in a nice clean way.


Scrapmatts products used:
Film strips 05 CB1232
String circles 04 CB5140
Scrap words 25 CB1239
Stencil  Circles CT1001


Wednesday 27 April 2016

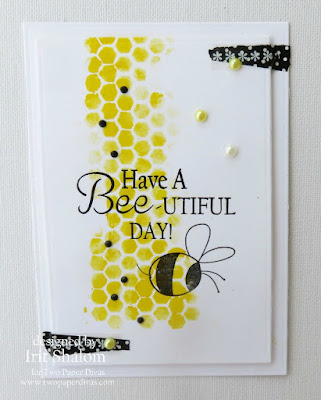
Have a Bee-utiful day with TPD

 This is my last card made this month for Two Paper Divas blog and this time another clean and simple kind of a card.
I made the background with stencil and acrylic paint and stamped the new TPD Big Buzz stamp over the stencilled area with black permanent ink. A few rhinestones and pearls were added as small embellishments and a couple of washi tape to connect the panel to the basic card.
And I enter this card to some web challenges too:
 Simon Says- Anything goes
 Addicted to stamps- Anything goes

Gift card holder tutorial


Hello my dear crafty friends and welcome to myGift card holder tutorial. This one was made as MOTHER'S DAY gift and can be given to all mothers around, mine too as it's not too young, not too bulky, not too complicated, but still very fancy from inside mostly.
As much as I was tempted to make an art journal page, I moved from my comfort zone and decided to make something useful. So say Hello to my Gift card holder made from  chipboard, cardstock, collage sheets and a lot of Mixed Media products.
Here how it looks when closed and I made it flat in purpose. You can add whatever flowers and extras on the cover if you wish, but I like it flat so it can be sent in an envelope.


Step by step instructions:
1. Cut white 12*12'' chipboard or thick cardstock into two even parts of 12*6''.
Score and fold the first one as shown on 3''-6''-3'' - this is the inner part of the holder.
Score and fold the second half to 2 1/2''- 1/2''- 4 1/2''- 1/2''- 4 1/2''.


2. Cut Kaisercraft patterned cardstock to fit  cover  in one piece and  cut other pieces to fit the " pages" with like 1/8'' less from each side.
3. Use Tim Holtz Gothic stencil and DecoArt Crackle paste  over the cover cardstock. Let it dry and be sure you see crackles before you continue with this piece.


 4.Make the " postcard" with Joggles Quirky Houses collage sheet. Cut  5 houses and arrange them over the patterned cardstock (light wood side). Glue them with Gel Medium and let it dry.

5. Color the Quirky houses with a mix of Ranger Distress markers. Cover  each colored house with Glossy Accents and let it dry. Do not cover the free spaces over the cardstock as we want them to absorb mists and paints later.


6. Use Travel stencil with DecoArt Modelling paste over three cardstock pieces that were cut for the horizontal inside pages. Let the paste dry.


7. Use a mix of distress Ranger inks (names in the supply list) to  color the stencilled cardstock pieces.


8.Cut three flower images from Joggles Basilius Besler Botanical plate collage sheet and glue them over the central piece as shown. Use Gel medium to glue the pieces as this is the best medium to keep everything on place forever.


9. From this step  I am going to show the finished  pieces without extra photos as this is just " add mediums/stickers" techniques.
This is a full opened project and I am going to begin with the upper piece.

And this is how it looks with closed " folds".


 The whole inside was inked with a mix of two distress inks : Wild Honey and Peacock Feathers.
 This upper  piece was covered with  dark " wood" cardstock. The pink bird from Watercolor  birds Joggles collage sheet was cut and glued over it. I covered it with a thin layer of Glossy Accents and added white pen line and dots around. The Tim Holtz stickers were added on the lower left part.

10. Add a bird from the same Watercolor birds collage sheet over the flowers, cover it with glaze and add white line and dots around as shown. Add pink  Glimmer mist ( Tattered Angels Wedding Pink) over the finished pages and let it dry.


11. Now for the closed folds- this is a place to add the real gift card inside the project.
Glue two patterned paper pieces and add 4 black  photo corners to keep the card inside.Ink cardstock edges with distress ink before you glue them.
Cut two feathers from Joggles Watercolor pink feathers collage sheet. First cover them with DecoArt Crackle glaze and let them dry.
Then add Gold fluid acrylic  to enter the crackles and glue them as shown. Outline the feathers with white pen and add  white dots.

12. The " postcard" lower piece was painted with Chalkboard paint; then the paint was wiped and just a bit of stain left over the  piece. Add Verdigris Tattered Angels mist over and wiped it from glazed houses.Add a sticker on the bottom as shown and make all outlines with white pen.


13. Use Gold fluid acrylic to cover the crackle paste crackles over the cover piece . Then add Verdigris mist and even a bit of pink mist and let the cover dry. Glue it over the basic chipboard. Add the metal trinket to make a closure.


I enter this piece to Creative Artiste Anything goes challenge- with chipboards, flowers and stencils.
 SSSS- Show us your metal
 Emerand Creek- Mother's day 

Monday 25 April 2016

Mixed Media cards with Rebecca Baer-April inspiration post


Hello my dear crafty friends and welcome to my inspirational post made for Rebecca Baer blog and using her gorgeous stencils.
 This post is all about cards.
Mixed media card are very trendy those days and with Rebecca's  stencil it's very easy to make a whole lot of cards for any occasion.
 My first card is very easy to make and all you need is one great RB stencil , one good big stamp sentiment and some shiny paint.

This first card was made with RB Jamboree medium stencil using gel medium as a medium under the stencil. First I stamped the sentiment with pigmented ink and heat embossed it with black embossing powder. I used My Favorite Things sentiment set as those sentiments are big and visible.Then I added the texture with stencil and gel medium and as this stencil has an oval gap in the middle , I just added medium around the gap and not inside it. I added mists from Tattered Angels (three colors, not more, unless you want to get a brown mess) and also dried each mist layer between the misting to avoid the mess. The stamped and stencilled panel was arranged over another layer and then arranged into Kraft base card. The natural twine was glued with the same gel medium to stay on its place as shown.


The second card is pretty much alike, but made with different mediums.I used  Harlequin Damask  stencil with texture paste and then painted it with Earth Safe Finishes Iridescent paint and wiped the paint from the stencilled parts to get this mute and light color over the paste.
Then I stamped another bold and big sentiment over the card with the same heat embossing and added a couple of heat embossed die cuts and more twine.


The last card is a bit different and made with more layers, but still with the stencil as a main part of it. The stencil used is Enchanted Vine one- small stencil that fits the small card panel  in the best possible way.
On this stencilled piece I used two colors mist and as you can see the  teal colored the pasted part of stencil and the copper stayed over the debossed part on the paper. The result is amazing!


Sunday 24 April 2016

Makin's Clay April post: Seeing all blue


Hello my dear crafty friends and welcome to my Makin's Clay first post for the new 2016 term.
I am very happy to stay on this gorgeous company team and to move to the next step from Makin's Professional certification I already got.
 But for this I need to develop my clay skills and this post is all about " do things without knowing the final result".
For this post we  were asked to mix Makin's Clay. Yes, to mix colors with Makin's  Clay Mixing Ruler and to make the project from the mixed colored clay.
So I mixed,and mixed and mixed and got like 10 shades of blue. (Not grey, just blues, like my mood lately). And then I made a lot of different things of all mixed clay and here is the way I worked this time.
But for today's post I am going to share just my kind of faux TURQUOISE color and made a really fancy necklace that maybe seams heavy, but as Makin's Clay is very light, it's just an illusion.
 Step by step tutorial:

1. Makin's Clay Mixing  Ruler  color chart has a lot of mixing possibilities; but unfortunately Turquoise  is not in the chart (and I didn't want to mess with mixing acrylic paint this time).
So I made my own mixing recipe and I checked and double checked it and IT WORKS!
Mix H part of Concord Blue  clay form Vineyard Tones set with G part of  white clay together with F part of Grape Leaf clay( Vineyard Tones colors) and E part of Green clay. This will give you the right  shade of turquoise, but if you want it lighter or darker- just add more white or use smaller  white portion. For my project I used much more then one portion (just mixed like 10 times more of each color to get colored clay for this project).


2.Make 2 large  round beads  and cover them with clear glitter. Make a few flat sided smaller beads using Makin's Clay Ultimate Clay  Extruder without any disc- the log that comes  out is just in a perfect size to make those beads in no time. Make a hole with the tool from Makin's Clay  Professional  Clay tools set pushing it from both sides of the flat beads. Cover flat beads with blue glitter. Now let the beads dry for 24 hours.


3. Use Makin's Clay roller and cut  a heart with a big heart cutter(just my old stash); I also added 4 small circles made with Makin's Clay small circle cutters. For the texture I rolled copper, light and dark blue micro beads over the wet heart shape. Just sprinkle the beads and roll over with Makin's Clay rolled tool. Then make holes and let the pieces dry overnight.


4. Arrange the necklace over the thin ball chain adding some copper beads.  Make elephant from black clay using a mold (this is my own home made mold). Paint the elephant with copper acrylic paint and a bit of turquoise acrylic hue and glue over the heart pendant. Cover all clay pieces with glaze and let it dry.
Enjoy you nice necklace !


And this is a finished necklace in all its glory!


Product list:

Makin's Clay products used:
White
Green
Concord blue
Grape leaf
 Black


Other products:
Heart cutter-my own kitchen
Copper acrylic paint- Plaid
Micro beads- Marth Stewart
Glaze- Sweet Stamps
Glitter
Elephant mold- hand made mold
Copper bead, ball chain


Friday 22 April 2016

StencilGirl/Earth Safe Finishes BLOG HOP

Hello my dear crafty friends and welcome to 
StencilGirl/Eart Safe Finishes Earth Day blog hop!
 First something you should know about my post.
 I made this post before I had a full designers line up as I am actually out of the country right now and pretty much out of the web. So I  can't link you to the person that is before and after me in this line up.
I can't even tell you what are the prizes for this hop.
So read my post, comment here and then just go to the main blog and check who is the next person in this hop  and continue from there.
Here is a link for the main blog post in StencilGirl blog:
http://www.stencilgirltalk.com/
And this is a link to Earth Safe Finish main blog:
http://www.earthsafefinishes.com/

And now for my project:


I made an art journal page with StencilGirl 5 stencils, all possible ESF products and just a couple of stamps from Visible Image.
 There are no " add- ons" on this page: no chipboards, embellishments or anything that is not paint or medium, so this page is totally flat and ready to go to my art journal.
Those are the stencils I used here:
Pretty as a peacock, Urban insiders circle, Doodle it layered circles and squares,Inside Out and Past Present Future.
Products used from ESF:Gesso, Gel Medium, Texture paste, Chalk It Up Whipped cream, Chalk It Up Licorice, Ann Butlers Iriscedents pains- Lilac, Lagoon, Limelight, Ocean Surf and maybe drops of more colors of Iridescents.
The sentiment is stamped over tissue paper  (due the texture I couldn't stamp directly over the page) and glued with Gel Medium.


I hope that you like my art piece and please go to the next stop from one of the main blogs.
 So Go and wake up and BE awesome!
 I enter this piece to Anything but a card challenge for Sweet Stamps


Thursday 21 April 2016

IBS April stamp release: Plumeria

Hello my dear crafty friends and welcome to Day 2 of Inspired by Stamping new April stamp release.
Today our designers will show you our work with Plumeria stamp set.
This is a gorgeous set with flowers and great sentiments that are good for Spring, Summer, Vacation and for whatever.
My card was made white cardstock with heat embossed stamped flowers. I painted them with gel acrylic paint and heat embossed over as this kind of paint need a very long drying time. Then I misted the whole card with a mix of three TA mists.
Now you are invited to see all other designers projects made with this same stamp set.


Wednesday 20 April 2016

IBS April stamp release- Flamingos

Hello my dear crafty friends and welcome to Day 3 of Inspired by Stamping new April stamp release.
Today our designers will show you our work with Flamingos stamp set.
This is a gorgeous set with lots of great sentiment that fit this flamingo image. I picked the most common  sentiment,  but made it in a kind of Mixed Media style.
The background cardstock is from DCWV  with a bit of SRM stickers to connect the paper pieces.
Stamped and heat embossed images and sentiment were misted with TA mists. I also added hand doodled faux stitching made with black pen.
Now you are invited to see all other designers projects made with this same stamp set.


Popular Posts