Wednesday, 22 June 2016

You are perfect card


Mixing the VLVS image stamp  with STAMPlorations sentiment and just to say that everyone is perfect in his own style.

And I enter this to some web challenges too:
Addicted to stamps- CAS
CAS mix up challenge- the matting are all die cuts

Dont' let life ruffle your feathers card

 Hello my dear crafty friends and welcome to my new Two Paper Divas post.
This new for me Feathers set was just perfect for my Mixed Media water colored new card.  As you can see the first layer is just stamped  with black ink and misted over. The outer feather is totally watercolored and added over the first layer. Isn't this sentiment just perfect? I think it is.


Sunday, 19 June 2016

Believe in yourself- Oriental style- with Rubber Dance

This  new in my blog art piece was made with Rubber Dance stamps and already print published in RSM print magazine. But was Blogoland it's a new piece, so I add it here in my  blog for all of those who doesn't buy any print magazine. As this piece was made for a print submission quite a while ago I still used the old Rubber Dance watermark here.  The stamps used are
Mesh- from Retro Beach set
Oriental lady from Woman Collage set
Flowers- from Bold and Beautiful set
Chinese

I also enter this piece wot some web challenges:
Anything goes with embossing powders- I used their powders- for WOW! Embossing Powders
 Happy Little stamper- Mixed Media challenge- Texture

Saturday, 18 June 2016

Amazed by you: gift card envelope tutorial


 Hello my dear crafty friends!
Irit is here and this is my new small gift card envelope tutorial made for Ann Butler's  blog using Ann Butler's amazing Faux Quilting Stamps (by Unity), her Iridescents paints (ESF) and her Stitches stamps (by Clearsnap).
So here is my tutorial:
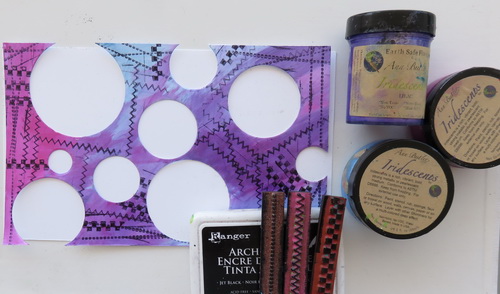
1. Arrange a few Stitched Nesting circles dies (Die Versions) over thick white cardstock and die cut them.


2.This is how the negative looks after the die cutting and later I am going to cut it to fit the envelope size.


3. Paint the negative with Ann Butler's Iridescents paints in Lilac, Lip gloss and Ocean Surf. Stamp over the dry painted cardstock  using Ann Butler's Stitches Background Basics Clearsnap stamp and Ranger permanent black ink.


4. Take the die cut circles and stamp over them with Ann Butler's Faux  Quilting stamps by Unity, using VersaMark watermark ink, Clearsnap Balck pigmented ink and heat emboss with black embossing powder. I used 2'' stamps from different sets and you can see the patterns here.


5. And now without any more step by step photos- my final project.
The stamped and heat embossed circles were painted with the same Iridescents colors with the add of yellow Sunshine  paint. Arrange those painted circles inside the painted negative. Cut it to the Kraft envelope size to cover the front. Cut another piece for the sentiment made with stickers.
Add the Makin's Clay fairy that was made with the mold (some Russian company mold , sorry, I can't even spell the  brand name) using Makin's Clay white air dry polymer clay. The fairy was painted with a mix of the same Ann Butler's paints and glued over envelope front.


Cut another piece from the painted cardstock and add as the closure on the envelope back. Add a piece of Velcro to close the envelope.


This technique is great for card making, ATC making and a lot more of easy to make craft projects and I hope you will use it some day.

I enter this piece to some web challenges too:
WOW! Embossing Powders as I used their powders- Anything goes
 More Mixed Media- Anything goes with purple

Friday, 17 June 2016

Bloom with grace card tutorial

Hello my dear crafty friends and welcome to my new technical card tutorial.
This time I decided to show you  my try of alcohol inks technique with  heat embossed over transparency stamping.
It's pretty easy to make and the result is looking really outstanding.
 So here we go!
Step by step tutorial:
1. Stamp Inspired by Stamping Magnolias  flowers  with clear embossing ink over thick embossable transparency. If you are not sure that your transparency can be heat embossed, just try over a small piece. Most of thick transparent materials can be heat embossed and the one I used is just from the general non branded kind.Now heat emboss your stamped image with black embossing powder.


2. Die cut or hand cut the piece that you want to use as your entire card background. I used a card sized die, but you can sure hand cut the same piece with your craft knife or trimmer.


3. Use three matching colors of alcohol inks and apply them to the back of your transparency. The heat embossed image is on the front of your die cut piece. Add a few drops of alcohol blending solution to get this splattered look of the inks and stop  when you are satisfied with the result.


4. Arrange your transparency over white cardstock that was cut to the same size. 
Make the basic card in the matching color and glue  both layers over the card base.
Stamp Inspired by Stamping sentiment from the same  Magnolias stamp set with black ink over white cardstock and arrange it over lilac matting (the same color as your basic card).
Try another color combos of alcohol inks with another IBS stamps. Each and every card will become a unique art piece.


Inspired by stamps set used:

Inspired-by-Stamping-Magnolias-Stamp-Set

I alos enter this card to some web challenges:
Anything goes with embossing powder- for WOW! Embossing Powders and I used their powder

Steampunk ATC with Tando


Hello my dear crafty friends!
Irit is here and this is my take for our usual Anything goes week with Tando.
This time I made a couple of Steampunk ATC CARDS and this was my very first time to use those best ever Tando Artist Trading Cards chipboard blanks.
As you can see both pieces are totally Tando, all  but Mediums that are DecoArt Mixed Media line.
The scull ATC was made with Tando Scullduggery  mask and Modeling paste and then, when dry, covered with layers of paints and glazes. On the top I added Cobweb mini mask in the same technique.
The blue paint splashes are made with Andy Skinner background stamp with acrylic paint from Stampendous Toxic stamp set. Then I added Tando screw pieces from the grab bag.
The right ATC piece was made with Cogs  mini mask in the same way as the first one. But this time I added 3 different chipboard pieces over this card.
The sentiments are from Tim Holtz and just fit the cards in this " out of the blue" way.
Tando products used:
ATC 
Artist Trading Cards

Grab bag of Screws
Grab Bag of Screws

Minis Mixed Halloween
Tando Mini's - Mixed Halloween

Sculldaggery  mask
A Skinner Stencil/Mask - Skullduggery

Mini mask Cogs
Mini Mask - Cogs

Mini mask Cobweb
Mini Mask - Cobweb

Toxic stamp set
TOXIC rubber stamp set

Decoart media line

Thursday, 16 June 2016

Strawberry fields forever: Makin's Clay tutorial


Hello my dear crafty friends and welcome to my new tutorial made for Makin's Clay blog.
As you maybe remember last month I decided to make a couple of flower tutorials  made with Makin's Clay and totally different techniques. This is my second tutorial and this time , as my tribute to Spring, I made this Strawberry blossoms with strawberries piece. Last month I explained the die cutting of dry Makin's Clay sheet technique.This time it's hand made, scissors cut flowers with a little help of other techniques that you will see in a second.
So lets make this beauty!
Step by step tutorial:
1. Roll a think sheet of Makin’s Clay® white clay using Makin's Clay  roller from the Makin’s Professional®Roller and Cutters set® set over Makin’s Professional® Cutting Mat.
Don't let it dry for now!


2.Use medium size circle cutter form 3 pc Makin's Clay 3 pc. Round Cutter set and make a few circles from your rolled white clay.


3.Now  lets see how to make  strawberry blossoms. First  I checked the number of petals and the general shape of those blossoms. We need 5 petals flowers and  they are round shaped ones.
So divide the cut circles to 5 as much as possible equal sectors using  Makin's Clay  tools and make the central notch. (See circle #1 from the left ).
Use your fine scissors and cut between the sectors as shown on flower #2 on this photo.
Now round the petals with scissors (#3 on this photo).
Flatten the hand cut flower a bit- not too much- with the roller (#4 on the photo).
Make veins with any tool you feel comfortable with and shape the flower (#5 on the photo).
Make as many flowers as your need. For this project I made just 5.


4.Make leaves with a die, but just as a shape maker.  I didn't die cut the leaves and used the die over the wet clay. Then hand cut the shape around the image as shown.Those leaves are pretty much general shaped ones; so you can also free  hand cut your own leaves without any die or template.


5.Make the back of the flowers using hand mixed Makin's Clays; I  used a mix of the same size Yellow and Olive green and just made an initial mix with marbled look. Then use Makin’s Clay® Cutters smallest Flower cutter and make 5 pieces from the mixed clay as the bottoms of your blossoms. 


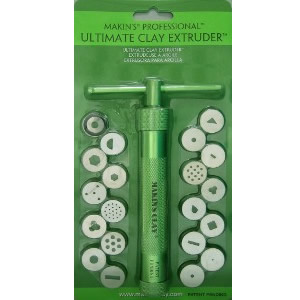
6.Make the blossom centre with Makin's® Ultimate Clay Extruder™  using the disc with the smallest possible round holes. Then arrange a few  round strips together to make your blossom's centres.


7.From this step and on there are no more detailed photos, but the general ones.
Use Colorarte Silk Acrylics (gel medium based) to paint the leaves and the finished blossoms with the centre on them. 
 Make three strawberries using a mold  with Makin's Clay  white clay and paint them as shown.


8. Make the arrangement base from Makin's Clay Brown clay and  medium  4 pc new Flower shaped cutter. This piece is not really seen, so you can use any other  natural color too.


9. Arrange your leaves, blossoms and  berries as shown.
Cover them with glaze and enjoy your Spring project!


Products used:
Makin’s Clay® white
Makin’s Clay® brown, olive, yellow
Makin’s Professional®Roller and Cutters set®
Makin’s Clay® Professional Clay Tools® 
Makin’s Professional® Cutting Mat
Makin’s Clay® Cutters-3 pc Round, 3 pc Flower

Popular Posts