Tuesday 31 March 2015

Moving in circles with RD


 Hello my dear crafty friends 1 Today I am going to share my new double art journal pages made with a new Rubber Dance gorgeous  Round in circles set of stamps.
When I first got those stamps I thought that I need to make an art page about something " going in circles" and this is how this page was born. So I made it with a lot of circles and titled it as " Walking in circles in my own neverland" (it means going nowhere doing nothing and just circling around myself as it happens a lot lately).
I picked this blue- red color scheme  and black stamping and used word stencils to make the writing (not easy task after all if you want it to be in circles).


Let's say it's not a last time I will use this stamp set. I already have a clue about the next " circled" project.


Monday 30 March 2015

3D Spring project for Inspired by Stamping


Hello my dear crafty friends!
This is my Spring 3d project made for Inspired by Stamping company  using this gorgeous new released Butterflies set.
I made this project from the " trash to treasure". The huge spool is made from two old CD-s and the toilet paper roll was added between two disks.
The " spool" was covered with PHP patterned paper and I stamped a lot of vellum butterflies with heat embossing and a lot of glitters.
I added the sentiment on the spool base and embellished with spring flowers, pearls and tulle.


Sunday 29 March 2015

Every love story card

My new card made with Inspired by Stamping new March release. I love this release a lot and it's so much me: Paris, couples, love, butterflies, bees, friends, flowers... Just one of the best  releases ever!
 So here is the very first smple  card I made for a couple that are getting married and I know that it should be very flat card as we add the gift check into the envelope here (no presents, just money gifts) and  it's impossible to fit the " fat" card to the safe opening.


Saturday 28 March 2015

Be Hoppy tag


 Another spring project with PHP gorgeous stickers and this time it's a tag!
So easy to make! So lovely! So happy and hoppy and springy!
This tag was published in Create magazine March issue.

Products used:
Paper: Paper House Productions- Hipster
Stickers: Be Hoppy 3d- Paper House Productions
Bling: Paper Studio
Ribbons: May Arts, other
Tag: Ranger
Ink: Clearsnap

How to make this project:
1. Ink the tag with pink ink around the edges. Cut 3 paper rectangles, distress them around and glue as shown.
2. Add stickers , the central centiment and bling strips as shown. Tie three ribbons over the tag

Friday 27 March 2015

Love lo- Tando stencils


 Hello my dear crafty friends and welcome to our Stencils week here in Tando blog.
Also I use Tando stencils almost in every single project, I decided to make a layout with some of those stencils as my background.
This page was done over Kraft cardstock with light cream texture paste and two masks:
Long Flourish  and Have you say masks.
I also added this heat embossed Love title to my Mixed Media simple page  as you can see.


Products used:
Cute/Love title
Word - CUTE LOVE

Long flourish mask

Mask - Long Flourish
 Have you say mask

 A Skinner Stencil/Mask - Have Your Say


Thursday 26 March 2015

Weddings cards with PHP

Two fast and fancy Wedding cards made with Die Versions  dies and Paper House Productions papers and 3d stickers. Very easy to make and very fancy look!


Wednesday 25 March 2015

Wedding celebration with Paper House Productions

Hello my dear crafty friends and welcome to our Paper House Productions Wedding celebration!
No, nobody is getting married right now. We just showcase you our Wedding projects and encourage you to use those most delicious PHP wedding themed products to make memories of your family weddings.
So here is the story of this layout.
Our family is pretty small and we don't celebrate too many weddings. The last one , of my oldest son, was about 6 years and two kids ago. Also one of my daughters is getting married in May this year, but till then the only wedding photo I can share are from this six years old wedding. Actually they have so many photos that I can scrap them forever. But with like 80 12*12'' layouts that I already made, the only thing I was thinking was to add as many photos as I can to each single page. So I made those photo collages  and as you can see I managed to scrap  a lot of photos with only  four 4*6'' photos and even those photos were a bit cropped after all.


Paper House Productions:
Patterned paper:
There is no really need to make the step by step tutorial for this easy to make page. So just a few tips and tricks I used to make this colorful wedding page.
1. Arrange all 4 photos diagonally over the pre-cut to 11*11'' patterned paper. Cut the photos to fit the edges and arrange the whole piece diagonally over the basic paper as shown.
2.Add all possible kind of stickers: 3d Wedding  and cardstock stickers as the upper title and as the lower journalling cluster. Add stickers over the photos and don't be afraid to cover some parts of your photos! You sure have more then you need with this collage system. Add some cork stickers around the photos and yes, they are seen. Make some white pen journalling if you like, but this is not obligatory after all as everyone can see that this is a wedding celebration. And last, but not least: glue some snapshot  stickers over the small photos as a part of your photo collage. Those stickers are so much unique and so much fit this kind of scrapping.


One thing on a top of another with TPD


Hello my dear crafty friends!
Today  I am going to share my last project for March made with Two Paper Divas gorgeous stamps and this time I used the whole Tea Cups set on this card.
I made 3 matings with Spellbinders dies and glitter cardstock and then stamped the cups and colored them with distress markers. The sentiment was stamped  on the bottom with black permanent ink.
Easy to make card and still very cute and lovely for any occasion.


Tuesday 24 March 2015

Bon Voyage door hanger


Product list:
Cardstock: 7 Gypsies
 Tag: 7 Gypsies
Stickers: Paper House Productions
Chipboard: Wycinanka
Bling: Paper Studio
Ink: Clearsnap, Ranger
 Paint: Plaid
Fabric: Canvas Corp
Embossing powder: WOW! Embossing powders
Other:Foam door hanger , metal charms, metal clips

How to make this project:
1. Paint the foam door hanger with  CC DIY  Ivory paint. My hanger was blue before and with this paint you don't need any sealer before the paint added.
2. Cut the cardstocks into  three rectangles and round the corners.
Ink the edges with chalk teal ink.Adhere the rectangles as shown.
3. Cover the chipboard with clear embossing ink and heat emboss with embossing glitter. Glue the tag over the hanger and glue the embossed frame over it.
4. Add two strips of gold pearls over the upper part of the hanger. Glue the camera sticker and the metal key near it. Add the sentiment sticker over the framed tag. Add the metal clips and tie a piece of canvas on the top of the hanger.


Sunday 22 March 2015

Just a note- with IBS


 This is my new card made with Inspired by Stamping new released  Tropical paradise stamp set and I made a small nature scene with a few of the stamps from this set. I used permanent inks, Gelatos over it to color the background and added a few strokes with distress markers. I die cut the scene with IBS Fancy labels 2 die and stamped a sentiment with Petite Banners set.


Saturday 21 March 2015

Saturday spotlight : Inspired by Stamping

Hello my dear crafty friends!
Today I am going to share one of my most favorite techniques and this is an easy one, that can be done by the new to stamping crafter.


It is a kind of a " White wash" combined with distress markers coloring technique and first we need to stamp the image with clear embossing ink and to heat emboss it with white embossing powder. I like to make it over Kraft cardstock as it gives us the good view of white splashes and white wash.
I used my favorite Inspired by Stamping  Flower of the month: Water Lily flower stamp and stamped it several times to make this frnt card panel.
Then I colored the flowers and the leaves with distress markers (I also added a bit of distress inks over the image as my markers were a bit dry). Then I added a " white wash" with pigmented white ink over the colored parts to give it this kind of white look.
The sentiment from last release Spring Bouquet  was stamped with the same distress ink and I also inked the edges with the very same inks.


This is a very easy coloring technique for those who are " coloring challenged" like me. LOL

Friday 20 March 2015

Fancy necklace with ETI products

Hello my dear crafty friends and welcome to my  new post.  All of those projects were made with ETI PRODUCTS and I added a few step by step photos for each one too.
So here we go!

 This time and a very first time for me I made a few jewelry pieces.
The first one was using lovely printed tissue paper, ETI SEALER and then ETI Jewelry Resin.
Here is an easy way to glue tissue into your metal shape.
Cover the inside of the shape with ultra seal.


 Press the tissue inside and let it dry.


Cut the tissue with your craft knife from inside. 


Add whatever  you like to the inner layer and cover with a mix of Jewelry Resin.
Add more embellishments over the partly hard resin and cover with a light layer over it.
Make the final  jewelry piece and wear it proudly.


Thursday 19 March 2015

Happiness with my grandkids and Meg's Garden

Hello my dear crafty friends!
This is Irit here and today I am going to share my March layout made with Meg's Garden new delicious Butterfly Garden collection and my dear grandchidren's studio photos.
This layout is a perfect example for baby scrapbooking with totally non baby products. All you need for this kind of scrapbooking are good photos with great backgrounds and outfits and lovely delicious vintage paper collection (such as this Meg's Garden one).


 The background paper was punched around with a mix of border punches and then I added stencil work with a couple of stencils and a light yellow painted texture paste. I also inked the edges with this teal ink and then adhered the stencilled paper over the basic one.
A few cut out paper were added on the back of the photo as my matting; each was in a different size and inked with a couple of inks around the edges.  I misted over the  page again and then glued my photo over the paper rectangles.
Meg's Garden paper doily was added on the back of this paper cluster for the interest. I made a flower cluster with Mag's flowers, ribbon, metal trinkets and paper lace piece on the lower photo corner and added a chipboard title that was lightly misted  too.


 A few paper cut butterflies were added randomly over the page.
The overall feeling of this page is light vintage Mixed Media and it fits my photo and my scrappy mood during the scrapping process.


Products used:
Meg's Garden:
Other products:
Chipboard title- Sweet Stamps
Stencils- Tando Creative
Inks: Ranger
 Punches: Martha Stewart, EK Success


Wednesday 18 March 2015

Life is wonderful art canvas


 Hello my dear crafty friends!
Today I am going to share my new Spring canvas and it's all about the life being wonderful.
I made it with a lot of Tando Creative stencils, texture paste, paints, mists, crackle  medium and a lot of work. But then, when you need a great sentiment for your art canvas, this fantastic Two Paper Divas Life's Little Sayings set is your best of the best choice. I stamped it over the tissue as my surface was very textured to stamp over it and glued it with Gel medium.


  Hope you like this little piece  of art!

Tuesday 17 March 2015

Creativity takes courage altered tray


Being a crafter means not just to make craft projects, but sometimes to make a definition about what crafting means to you. This altered tray was made as my own tribute to crafters and to myself and it's full of all creative encouragement quotes. Everything in this tray is connected to creativity and it's totally all about me art piece.

Supply list
Wooden tray- 7 Gypsies –Canvas corp
Patterned paper: Gypsy Moments collection- 7 Gypsies- Canvas Corp
Specialty paper: Corrugated brown- Canvas Cor
Stamps:  My Art, Frames- 7 Gypsies- Canvas Corp
Burlap: Canvas Corp
Tags: 7 Gypsies- Canvas Corp
Bottles Amber, Dome: 7 Gypsies Apothecary
Canvas Corp Jute rope light natural:
Chipboards: Creative Embellishments
Wooden ruler: Maya Road
Dies: Tim Holtz for Sizzix
Letters: American Crafts
Ink: VersaMark-Tsukineko
Word stickers: Advantus
Embossing powders: WOW! Embossing Powders
Other: pearls, key, charms, beads, cork

Step by step instructions:


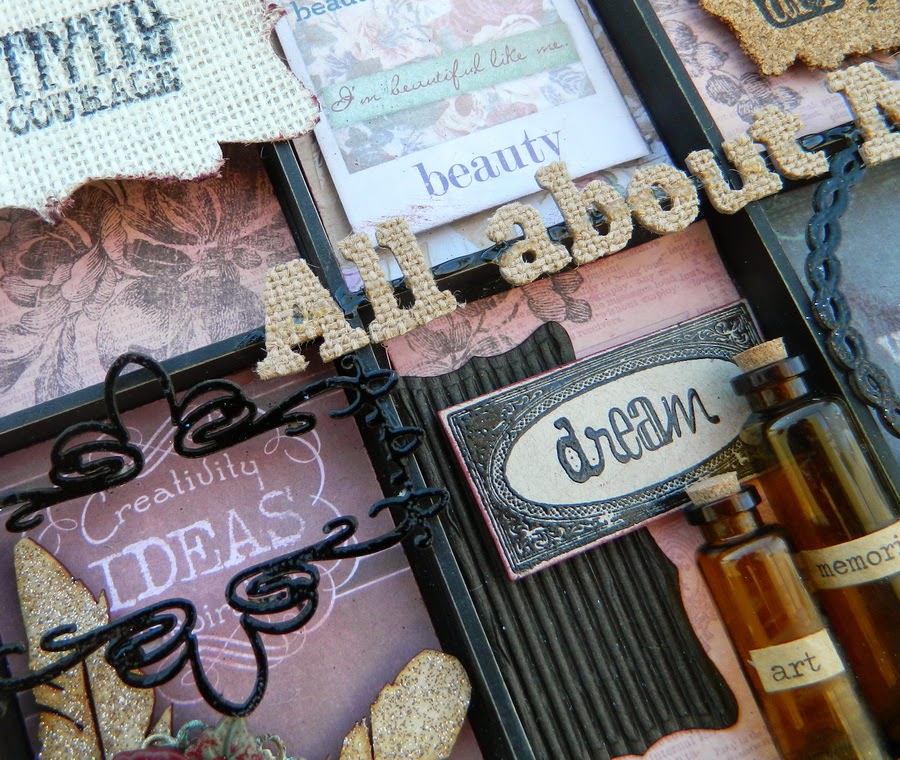
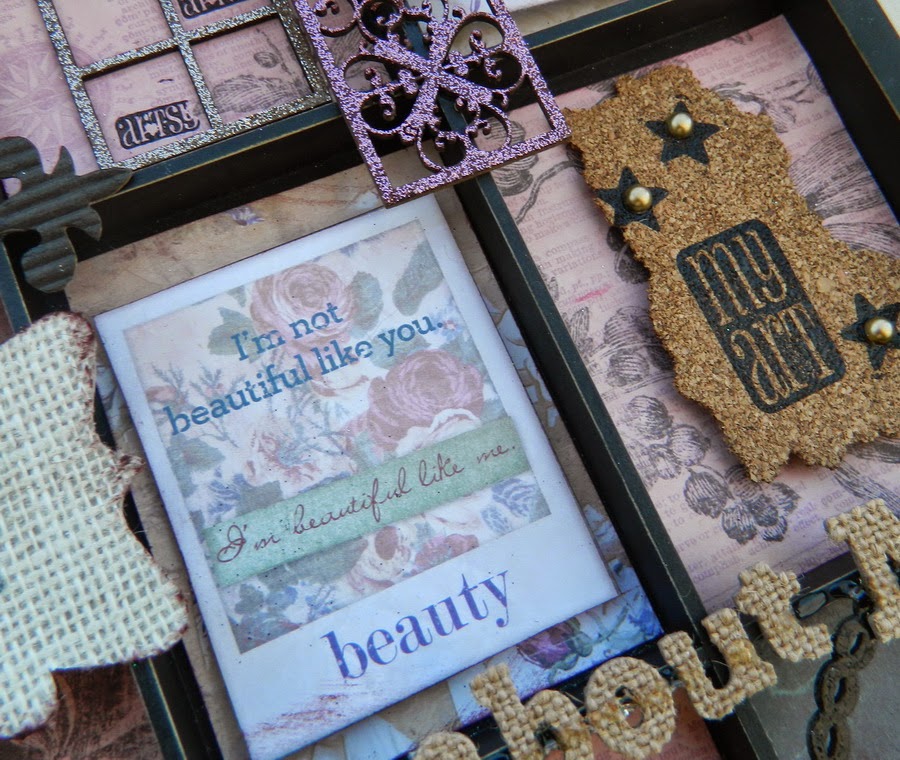
1. Cut patterned paper pieces to fit the ATC size tray windows. Cut smaller cards from the paper and glue those that will not be stamped over, such as Dream, Beauty, Be Yourself etc.
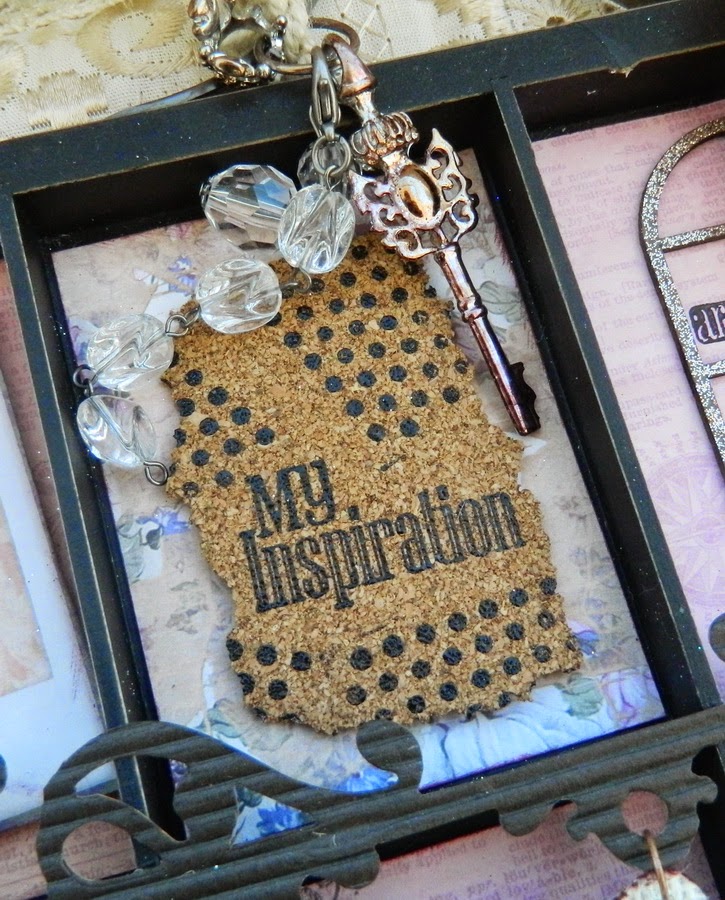
2. Stamp over other cards with VersaMark and heat emboss the stamped images. Stamp some words over cork and heat emboss the images. Glue all stamped paper pieces as shown and adhere cork stamped pieces with 3d foam glue as shown.
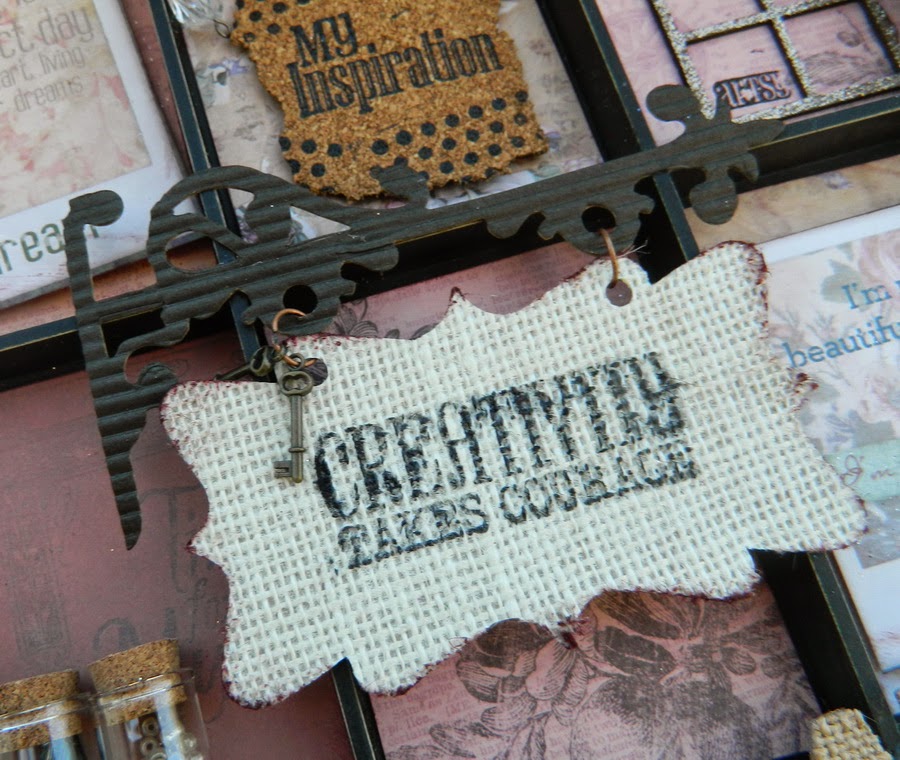
3. Die cut the central hanging sign from corrugated cardstock and a sign from natural burlap and stamps the saying over burlap as shown. Add small key and hang the sign. Glue "All about me" title in the middle of the tray.
4. Heat emboss the chipboard and wooden shapes with powders and glitters and glues them over the tray as shown. Die cut the burlap flower, mist it to a light pink and adhere on the top of the tray. Add the upper rope with an altered key, crown and beaded charms.
5. Add the burlap die cut flower, tag circle and the stamped: Created by me" circle on the right bottom of the tray. Add bottles with word stickers/beads inside as shown. Add resin flower over the feathers and some pearls over the cork stamped images.


I enter this to Think pink challenge for Frosted designs.


Popular Posts